This document provides comprehensive instructions for the DEWALT DWE7485 Table Saw, a professional power tool designed for ripping, cross-cutting, mitreing, and bevelling various materials such as wood, wood-analogous materials, and plastic. It emphasizes safety, proper assembly, operation, and maintenance to ensure efficient and safe use.
Function Description
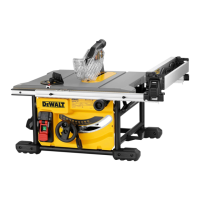
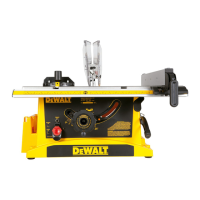
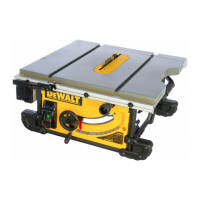
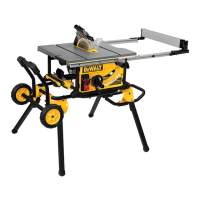
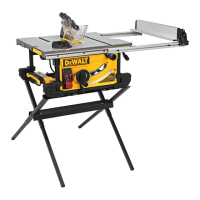
The DEWALT DWE7485 Table Saw is a versatile machine equipped with a powerful motor for cutting operations. Its primary function is to precisely cut workpieces to desired dimensions and angles. Key components include a saw blade (2), a rip fence (16) for guiding workpieces during ripping, and a mitre gauge (10) for accurate cross-cutting and mitre cuts. The saw features a blade guard assembly (11) and a riving knife (21) to enhance safety during through-cutting operations by reducing the risk of kickback and accidental contact with the blade. Dust collection ports (13, 14) are integrated to manage sawdust and maintain a clean work environment.
Usage Features
The DWE7485 Table Saw offers several features to facilitate precise and safe operation:
- Blade Height Adjustment: The blade height adjustment wheel (6) allows the user to raise and lower the saw blade, ensuring that the top three teeth just break through the upper surface of the workpiece for optimum performance.
- Bevel Angle Adjustment: The bevel lock lever (7) enables adjustment of the blade's bevel angle for angled cuts. The bevel stop screw (38) and pointer (39) assist in setting and verifying the desired angle, typically 0° and 45°.
- Rip Fence System: The rip fence (16) can be installed in two positions on the right side of the table (Position 1 for 0 mm to 510 mm ripping, and Position 2 for 100 mm to 610 mm ripping) and one position on the left. The rail lock lever (5) secures the fence in place during cutting, preventing movement. A fine adjust knob (4) allows for smaller, more precise adjustments of the fence position. The rip scale indicator (3) helps in setting the fence accurately, with separate scales for different fence positions.
- Narrow Ripping Fence/Work Support Extension: The saw includes a work support extension that can be rotated and slid into different slot sets (42, 43) to support long workpieces or to provide extra clearance for narrow ripping.
- Mitre Gauge: The mitre gauge (10) is used for guiding workpieces during cross-cutting and mitre cuts. It can be set to various angles and locked in place with a knob.
- Blade Guard Assembly and Riving Knife: The blade guard assembly (11) and riving knife (21) are crucial safety features for through-cutting. The riving knife helps prevent kickback by keeping the kerf open. Both components are designed for easy installation and removal, with a riving knife lock knob (29) for securing them.
- Throat Plate: The throat plate (15) covers the opening around the saw blade. It includes adjustment screws to ensure it is flush with the table surface. The locking screw (30) secures the throat plate in place.
- ON/OFF Assembly: The on/off assembly (8) features a green start button (40) and a red stop button (41), offering a no-volt release function for safety. A lock-off feature allows for a padlock to prevent unauthorized use.
- Dust Extraction: The saw is equipped with a dust collection port (13) at the rear and a guard dust collection port (14) on the blade guard assembly, compatible with dust extraction equipment. A reducer port is supplied for different nozzle diameters.
- Portability: Carry handles (12) are provided for transporting the machine. Mounting holes (9, 24) allow for fixing the saw to a workbench or DE7400 brackets.
Maintenance Features
Regular maintenance is essential for the longevity and safe operation of the DWE7485 Table Saw:
- Cleaning: The saw requires frequent cleaning to prevent dust accumulation. This includes blowing dirt and dust out of air vents with dry air, regularly cleaning the table top and ventilation slots, and cleaning the dust collection system. The dust access door (45) can be opened by loosening screws (46) to clean out excess dust.
- Lubrication: The motor and bearings do not require additional lubrication. However, if raising and lowering the blade becomes difficult, the height adjustment screw threads (44) should be cleaned and greased.
- Blade Maintenance: Saw blades should be kept clean, sharp, and with sufficient set. Worn or damaged blades must be replaced with appropriate ones as specified in the technical data.
- Guard and Riving Knife Inspection: Before each use, the upper and lower blade guards and the dust extraction tube should be inspected to ensure proper operation and alignment with the saw blade. Any jammed workpiece fragments between the blade and guards must be removed after disconnecting the power supply.
- Rail Lock Adjustment: The rail lock lever (5) tension can be re-adjusted by loosening the jam nut (36) and tightening the hex rod (37) on the underside of the saw.
- Blade Alignment: If the blade appears out of alignment with the mitre slot, it can be recalibrated by loosening rear pivot bracket fasteners (32) and adjusting the bracket.
- Rip Scale Pointer Adjustment: The rip scale pointer (35) may need adjustment if the user switches between thick and thin kerf blades.
- Storage: The push stick (20), blade guard assembly (11), blade wrenches (19), mitre gauge (10), and non-through sawing riving knife (21) have designated storage positions on the machine. The mains cable can be wound around the cable holder (23).