Do you have a question about the DeWalt DWE6401DS and is the answer not in the manual?
Read all safety warnings and instructions to reduce risk of injury, electric shock, fire, and serious injury.
Maintain a clean and well-lit work area to prevent accidents.
Avoid operating in explosive atmospheres due to spark ignition risk.
Ensure distractions are minimized by keeping children and bystanders away.
Ensure power tool plugs match outlets to reduce electric shock risk.
Prevent contact with grounded surfaces to reduce electric shock risk.
Keep tools dry to prevent increased risk of electric shock.
Avoid cord abuse, damage, or entanglement to prevent electric shock.
Use outdoor-rated extension cords to reduce outdoor electric shock risk.
Use GFCI protection in damp locations to reduce electric shock risk.
Maintain alertness and common sense when operating power tools.
Always wear appropriate personal protective equipment for safety.
Ensure switch is off before connecting power or picking up tool.
Remove tools before operation to prevent injury from rotating parts.
Maintain footing and balance for better control in unexpected situations.
Avoid loose clothing, jewelry, or long hair getting caught in moving parts.
Use dust extraction facilities properly to reduce dust-related hazards.
Use the correct tool for the job to ensure better and safer operation.
Repair tools with faulty switches as they are dangerous.
Disconnect power before making adjustments or changing accessories.
Keep tools away from untrained persons and children to prevent accidents.
Maintain tools properly; repair damaged tools before use to prevent accidents.
Maintain sharp cutting tools for better control and reduced binding.
Use tools and accessories as instructed, considering working conditions.
Ensure safety by having tools serviced by qualified personnel with identical parts.
Read all safety warnings, instructions, and specifications for safe operation.
This power tool is designed specifically for sanding operations.
Avoid operations not intended for the tool to prevent hazards.
Use only manufacturer-recommended accessories for safe operation.
Ensure accessory speed rating meets or exceeds the tool's maximum speed.
Use accessories with correct diameter and thickness that fit the tool's capacity.
Ensure accessory arbor size matches the tool's spindle for safe mounting.
Inspect accessories for damage before each use to prevent breakage.
Always wear appropriate PPE like face shields, goggles, and masks.
Maintain a safe distance for bystanders with appropriate PPE.
Grip tool by insulated surfaces to avoid shock from hidden wiring.
Keep the power cord away from the spinning accessory to prevent snagging.
Kickback is caused by snagging which stalls the accessory, forcing the tool.
Grip tool firmly and position body to resist kickback forces.
Keep hands away from the rotating accessory to prevent injury.
Avoid positioning body in the tool's potential kickback path.
Exercise care with corners and sharp edges to avoid snagging and kickback.
Avoid blades that cause frequent kickback and loss of control.
Use correctly sized sanding paper to avoid laceration or snagging hazards.
Do not use the tool for operations other than its intended sanding function.
Avoid covering air vents to prevent overheating and entanglement.
Use extension cords with adequate wire size to prevent voltage drop and overheating.
Always wear certified safety glasses for eye protection.
Use ANSI Z87.1 approved eye protection for safety.
Use ANSI S12.6 hearing protection for noise safety.
Use NIOSH/OSHA/MSHA approved respiratory protection for dust safety.
Be aware of chemical hazards in dust; use ventilation and approved masks.
Protect respiratory health by using approved respiratory protection for dust exposure.
Always wear certified hearing protection to prevent noise-induced hearing loss.
Minimize dust generation during paint removal for environmental safety.
Seal work areas with plastic sheeting to contain dust.
Prevent tracking paint dust outside the work area during sanding.
Vacuum and clean work area surfaces daily to remove dust.
Gather and properly dispose of plastic drop cloths and debris.
Wash children's items thoroughly after dust exposure.
Ensure power supply matches the tool's nameplate rating.
Always disconnect power before assembly, adjustments, or repairs to prevent injury.
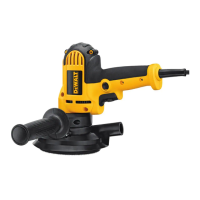
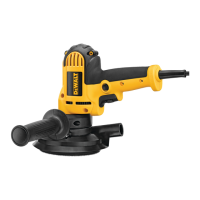
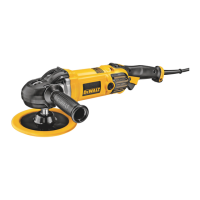
Fit and tighten the side handle securely for complete tool control.
Assemble the dust shroud by loosening screw, sliding, and securing it.
Do not modify the power tool or its parts to avoid damage or injury.
This sander is for professional sanding of solid surface materials like wood and metal.
Avoid using the tool in wet conditions or near flammable substances.
This is a heavy-duty, professional-grade power tool.
Keep children away from the tool; supervision is required for inexperienced operators.
Disconnect power before any accessory installation, adjustment, or repair.
The variable speed is controlled by a speed control dial and trigger switch.
Adjusts maximum speed from 0 to 3700 RPM via the control dial.
Increases speed as pressed; reduces speed as released.
Use 5" sanding discs with a 5-hole dust extraction pattern.
Do not use drywall sanding screens directly on the hook and loop pad.
Always use the correct hand position shown to prevent serious personal injury.
Hold the tool securely to anticipate and manage sudden reactions.
Proper grip involves one hand on the main handle, one on the side handle.
Disconnect power before any maintenance, installation, or repair.
Never use perforated paper without the dust collection system to prevent injury.
Empty dust collection frequently, especially with resin-coated surfaces, to prevent fire.
Connect the vacuum hose to the dust port for dust collection.
Operate by grasping firmly, turning on, and applying slight pressure.
Achieve best finish by starting with coarse grit and moving to finer grits.
Sandpaper may clog with paint when sanding painted surfaces.
Disconnect power before any maintenance, installation, or repair.
Clean air vents weekly with dry air; wear eye protection.
Use mild soap and water for cleaning; avoid harsh chemicals.
Use only DEWALT recommended accessories as others may be hazardous.
DEWALT recommended accessories are available from dealers or service centers.
Repairs must be done by DEWALT service centers using identical replacement parts.
Offers repair for faulty materials or workmanship for three years from purchase.
Provides free maintenance and part replacement for normal wear in the first year.
Offers a 90-day money-back guarantee with a receipt for full refund.
Provides free replacement for illegible or missing warning labels.
| Quantity per pack | 1 pc(s) |
|---|