ENGLISH
6
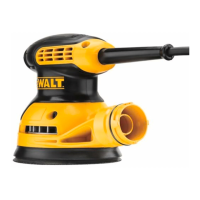
Motor
Be sure your power supply agrees with the nameplate
marking. Voltage decrease of more than 10% will cause loss
of power and overheating. These tools are factory tested; if
this tool does not operate, check powersupply.
Attaching an AirLock
™
Compatible Dust
Extractor (Fig. D)
Your drywall sander is compatible with the DeWALT
AirLock™ connection system. The AirLock™ allows for a fast,
secure connection between the AirLock™ connector
9
and
sander's dust extraction port
5
.
1. Ensure the collar on the AirLock™ connector is in the
unlock position. (Refer to FigureD.) Align notches
10
on collar and AirLock™ connector as shown for unlock
and lockpositions.
2. Push the AirLock™ connector onto the adapter
connectorpoint.
3. Rotate the collar to the lockedposition.
NOTE: The ball bearings inside collar lock into slot and
secure the connection.The power tool is now securely
connected to the dustextractor.
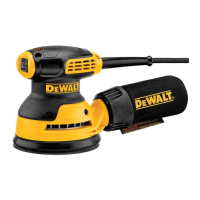
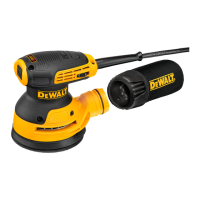
Brush‑Type Skirt (Fig. B)
A brush‑type skirt
8
surrounds the abrasive pad on the
DWE7800. This skirt serves two purposes:
• It extends below the surface of the abrasive pad to
prevent the abrasive from “gouging” thework.
• It helps contain the drywall dust until the vacuum
cleaner pulls itaway.
If the skirt is damaged or if it is worn excessively it should be
replaced by a DeWALT authorized servicecenter.
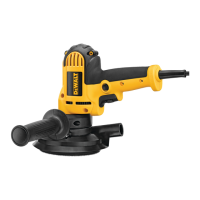
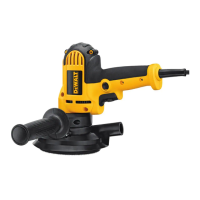
Speed Control Dial (Fig. A)
The DWE7800 Sander is equipped with variable speed
control. Adjust the speed by turning the speed control
dial
2
. The speed control dial is numbered “1” through “7”.
The setting “1” is the slowest speed (approximately 700
RPM) and “7” is the fastest speed (approximately 1200RPM).
Use the higher speed settings for fast stock removal. Use
the lower speed setting to reduce removal rate for more
precisecontrol.
To Attach Sanding Disc to the Sanding
Pad (Fig. B)
1. Turn the sander over so that the sanding pad
6
is
facingupward.
2. Clean the dust from the sanding padface.
3. Hold the pad with one hand to keep it fromrotating.
4. With the other hand, center and place the sanding
disc
7
directly on top of thepad.
The label on your tool may include the following symbols. The
symbols and their definitions are asfollows:
V ......................... volts
Hz .......................hertz
min ..................... minutes
or DC ......direct current
...................... Class I Construction
(grounded)
…/min ..............per minute
BPM .................... beats per minute
IPM ..................... impacts per minute
RPM .................... revolutions per
minute
sfpm ................... surface feet per
minute
SPM .................... strokes per minute
A ......................... amperes
W ........................watts
Wh ......................watt hours
Ah ....................... amp hours
or AC ...........alternating current
or AC/DC .... alternating or
direct current
...................... Class II
Construction
(double insulated)
n
o
.......................no load speed
n .........................rated speed
......................earthing terminal
.....................safety alert symbol
.....................visible radiation
..................... wear respiratory
protection
..................... wear eye
protection
..................... wear hearing
protection
..................... read all
documentation
Attaching Sanding Discs (Fig. B)
Your DWE7800 drywall sander is designed to use 9"
(230mm) sanding discs
7
. Sanding discs for the DWE7800
attach with hook andloop.
The recommended sanding discs are available at extra cost
from your local dealer or authorized DeWALT servicecenter.
ASSEMBLY AND ADJUSTMENTS
WARNING: To reduce the risk of serious personal
injury, turn unit off and disconnect it from
power source before making any adjustments or
removing/installing attachments or accessories.
An accidental start‑up can causeinjury.
• Air vents often cover moving parts and should be
avoided. Loose clothes, jewelry or long hair can be
caught in movingparts.
• An extension cord must have adequate wire size
(AWG or American Wire Gauge) for safety. The
smaller the gauge number of the wire, the greater the
capacity of the cable, that is, 16gauge has more capacity
than 18gauge. An undersized cord will cause a drop in
line voltage resulting in loss of power and overheating.
When using more than one extension to make up the
total length, be sure each individual extension contains at
least the minimum wire size. The following table shows
the correct size to use depending on cord length and
nameplate ampere rating. If in doubt, use the next heavier
gauge. The lower the gauge number, the heavier thecord.
Minimum Gauge for Cord Sets
Volts
Total Length of Cord in Feet
(meters)
120 V 25 (7.6) 50 (15.2) 100 (30.5) 150 (45.7)
240 V 50 (15.2) 100 (30.5) 200 (61.0) 300 (91.4)
Ampere Rating
American Wire Gauge
More
Than
Not
More
Than
0 6 18 16 16 14
6 10 18 16 14 12
10 12 16 16 14 12
12 16 14 12 Not Recommended

 Loading...