9
ENGLISH
b. Check to see if receptacle is connected to a light
switch which turns power off when you turn out
the lights;
c. If charging problems persist, take the tool, battery
pack and charger to your local servicecenter.
4. You may charge a partially used pack whenever you
desire with no adverse effect on the batterypack.
Charger Cleaning Instructions
WARNING:Shock hazard. Disconnectthe charger
from the AC outlet before cleaning. Dirt and grease
may be removed from the exterior of the charger using
a cloth or soft non‑metallic brush. Do not use water or
any cleaningsolutions.
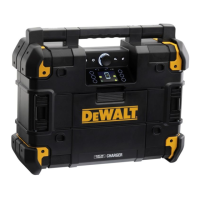
hasstarted.
NOTE: Charging can take place with the storage door
2
open or closed.
NOTE: To close the storage door
2
, use one hand to
support the storage door and use the other hand to lift up
and slide the door brace
16
towards the front of the box.
5. The Stage 1 charging blink indicator represents the charge
process that charges the majority of the battery's capacity.
6. The Stage2 charging blink indicator represents the
remainder, or top off charge process, for the battery to
reach fullcapacity.
7. The completion of charge for Stage 1 or Stage 2 will be
indicated by the stage's light remaining ON continuously.
8. The battery pack is fully charged when both Stage 1 and
Stage 2 charging lights remain ON continuously, and it may
be removed and used at this time or left in the charger.
NOTE: To remove the battery pack
20
, some chargers
require the battery pack release button
19
to bepressed.
Indicators
Stage 1 Charging
Stage 2 Charging
Fully Charged
Hot/Cold Pack Delay
A charger will not charge a faulty battery pack. The charger
refusing to light could indicate a problem with the charger or
a faulty battery pack.
NOTE: If the charger refuses to light, take the charger and
battery pack to be tested at an authorized servicecenter.
Leaving the Battery Pack In the Charger
The charger and battery pack can be left connected with the
charge indicators showing pack charged.
Important Charging Notes
1. Longest life and best performance can be obtained if
the battery pack is charged when the air temperature
is between 65°F – 75°F (18° C– 24°C). DO NOT charge
when the battery pack is below +40°F (+4.5°C), or
above +104°F (+40°C). This is important and will
prevent serious damage to the batterypack.
2. The charger and battery pack may become warm to the
touch while charging. This is a normal condition, and
does not indicate a problem. To facilitate the cooling of
the battery pack after use, avoid placing the charger or
battery pack in a warm environment such as in a metal
shed or an uninsulatedtrailer.
3. If the battery pack does not charge properly:
a. Check operation of receptacle by plugging in a lamp
or other appliance;
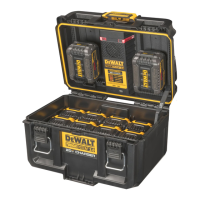
Carry Handle (Fig.A)
This DWST08050 has a built in carry handle
1
that allows
you to carry the DWST08050 when not attached to a
ToughSystem®storagebox.
OPERATION
WARNING: To reduce the risk of serious personal
injury, turn unit off and disconnect it from power
source and remove the battery pack before
making any adjustments or removing/installing
attachments or accessories. An accidental start‑up
can causeinjury.
Storage Compartment (Fig.F)
WARNING: Avoid overfilling the storage
compartment to prevent any interference with
the batteries being charged.
WARNING: Do not force close the storage door. If
the storage door will not fully close or the door latches
will not lock easily, ensure the storage compartment is
not overfilled. Remove a few items and try closing the
storage door and locking the latches again.
This DWST08050 has a built in storage compartment
12
to
carry your extrabatteries, cords or tools.
1. To unlock the storage door
2
, flip up the door latch
handles
3
and lift and remove the metal latches
4
from the latch pin slot
5
of the storage door.
2. To access the storagecompartment
12
, open
the storage door
2
until the door brace
16
locks
intoposition.
3. To close the storage door
2
, use one hand to support
the storage door
2
and use the other hand to lift up and
slide the door brace
16
towards the front of the box.
4. To lock the storage door
2
, lift and move the
metallatches
4
to the latch pin slot
5
of the
storagedoor. Press down and inward on the door latch
handles
3
until they make an audible click. Ensure the
door latch handles are securely held in place.