11
DANSK
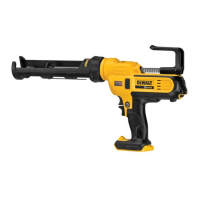
• DCE581 kan anvendes med 300-310 ml patroner, 400 ml
eller 600 mlposepakker.
Udskiftning af materialeholdere (Fig. C)
En ekstra materialeholder kan købes hos din lokale
forhandler eller hos et autoriseret servicecenter. Se
Tilbehørmhp.kontaktinformationer.
1. Skru skrue
17
ud med en skruetrækker og tag stemplet
7
af stempelstangen
5
.
2. Løsn materialeholderen fra holdemanchetten og fjern
materialeholderen.
3. Tryk på og hold stempelstangudløseren
6
inde, og træk
stempelstangen fuldkommen ud af enheden.
4. Hold stempelstangudløseren trykket ind og sæt en ny
stempelstang ind ienheden.
5. Skru den nye materialeholder ind imonteringsmanchetten.
6. Skru skruen gennem stemplet på enden atstempelstangen.
BETJENING
Brugsvejledning
ADVARSEL: Overhold altid sikkerhedsvejledningen og de
gældenderegler.
ADVARSEL: For at reducere risikoen for alvorlige
kvæstelser, anbring forlæns-/baglænsknappen
i startspærreposition eller slå værktøjet fra og
frakobel batteripakken, før der foretages nogen
justeringer, eller der af-/påmonteres tilbehør eller
ekstraudstyr. Utilsigtet start kan medførekvæstelser.
Korrekt håndposition (Fig. D)
ADVARSEL: For at reducere risikoen for personskade skal
du ALTID anvende den rette håndposition somvist.
ADVARSEL: For at reducere risikoen for alvorlig
personskade skal du ALTID holde godt fast i tilfælde af en
pludseligreaktion.
Værktøjet holdes korrekt ved at den ene hånd hviler mod
hovedhåndtaget, som vist på Fig. D.
Variabel hastighedsvælger (Fig.E)
Materialets flowhastighed kan reguleres med den
variable hastighedsvælger
3
for at tilpasse værktøjet til
forskelligeanvendelser.
• Vælg en hastighed ved at dreje vælgeren hen på den
ønskede indstilling.
BEMÆRK: ’1’ er den laveste (langsom) indstilling og ’6’ er
den højeste (hurtig)indstilling.
Udløserkontakt til variabel hastighed (Fig.E)
Materialets flowhastighed kan udover med hastighedsvælgeren
også reguleres med udløserkontakten til variabel hastighed.
1. Tryk på udløserkontaken
1
for at tænde forværktøjet.
BEMÆRK: Jo længere udløserkontakten trykkes ind, jo
hurtigere bliverflowhastigheden.
2. Slip udløserkontaken for at afbrydeværktøjet.
Udløserspærre (Fig.F)
Dit værktøj er udstyret med en udløserspærre
2
for at kunne
sikre det mod utilsigtet udslip afmateriale.
1. Skub udløserkontakten
2
opad for at låse
udløserkontakten. Værktøjet kan ikke startes med kontakten
ispærrepositionen.
2. Skub udløserspærren nedad for at oplåseudløserkontakten.
Drejelig patronholder (Fig.G)
Patronholderen
8
kan drejes 360˚ og materialet kan tilføjes ved
allevinkler.
Stempelstanggreb (Fig.A)
ADVARSEL: For at mindske risikoen for kvæstelerMÅ
STEMPELSTANGGREBET IKKE anvendes som krog til at
hænge objekter oppå.
Stempelstanggrebet
4
kan anvendes til at hænge værktøjet
op i på et stabilt sted, når det ikke anvendes eller skal deponeres.
Justering af stempelstang (Fig. A)
1. Tryk på og hold stempelstangudløseren
6
inde for at kunne
justere stempelstangen
5
manuelt.
2. Skub eller træk stempelstanggrebet
4
hen på den
ønskedeposition.
3. Slipstempelstangudløseren.
Isætning af materiale
Patronholder (Fig.A, I)
1. Kontrollér, om det anvendte stempel passer tilmaterialet.
BEMÆRK: Hvis der anvendes et forkert stempel, kan det
medføre at materialebeholderen eksploderer under brugen,
hvilket beskadiger patronholderen og/ellerfugepistolen.
2. Anvend udløserspærren (
2
) til at spærre
udløserkontakten
1
.
3. Skær dyseenden af fuge-/materialetuben (Fig.I). Små
åbninger kræver mere kraft til at skubbe materialet ud,
hvilket kan have indflydelse på batterietslevetid.
4. Bryd den indre forsegling på fuge- eller materialetuben med
hagen
9
, som findes på undersiden atpatronholderen.
BEMÆRK: Hvis den indvendige forsegling ikke brydes, kan
det forekomme, at materialet bliver presset ud gennem
bagenden på tuben og beskadigerværktøjet.
BEMÆRK: Sørg for at der ikke kommer materiale
på stempelstang, patronholder og patron. Hvis en
stempelstang skubbes ind med tørt materiale på, kan det
beskadige indvendige dele på værktøjet og forårsage at
tubenforskydes.
5. Hold godt fat i værktøjet, tryk på stempelstangudløseren
6
for at udkoble og frigøre stempelstangen
5
. Træk
stempelstangen tilbage med stempelstanggrebet
4
for
at gøre det muligt at placere fuge-/materialetuben inden
ipatronholderen.
6. Sæt fuge-/materialetubeni.
7. Tryk på og hold stempelstangudløseren
6
inde, mens
stempelstanggrebet
4
bliver skubbet fremad, indtil
stemplet
7
hviler modtuben.
 Loading...