Page 13;&(%$*4.8"4,7%<'*#$"&8#=%/7*,#*%4,77%>?@@@?@AA?BCDC1Item 57087
EF;6GHIJ6KFGLIMNFLMG6MFMO6 E6GPJ
N,`"83%,%N"$*(%O'$
M&$*- Miter cuts are used for cutting outside and inside
corners on material, decorative chair rail, and base
moulding with the workpiece at any angle to the Blade
other than 90°. Miter cuts tend to “creep” during cutting.
1. Install the Miter Gauge and adjust to
desired angle using Angle Scale. Secure
in place with Gauge Lock Knob.
2. Position Rip Fence at the desired distance
from the Blade and secure Locking Lever.
3. Place the workpiece on the Table
and firmly against the Fence.
4. Make sure the workpiece is clear of the
Blade and that the Switch is in the off-
position, then plug in the tool.
5. Insert the Safety Key and lift the Power
Switch up to the ON position.
6. Let the Blade build up to full speed and wait for the
Blade to get wet before feeding in the workpiece.
7. Use two hands and hold workpiece
securely against Table and Fence at all
times. Feed material into the Blade.
8. When the cut is made, turn the saw OFF.
Wait for the Blade to come to a complete stop
before removing any part of the workpiece.
9. To prevent accidents, turn off the tool,
remove the Safety Key, and unplug the tool
from its electrical outlet after use. Clean,
then store the tool indoors out of children’s
reach. Store the Safety Key separate from
the tool and out of children′s reach.
S7,9*
Q&(`/"*4*
T&4`"83%
T*W*(
K"/%;*84*
N"$*(%
R,'3*
N,`"83%,%S*W*7%O'$
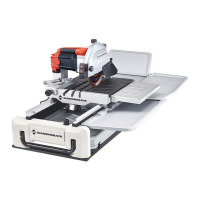
M&$*- Beveled 22.5° and 45° cuts can be
made using the legs of the Bevel Table.
1. Remove Rip Fence and lift Bevel Table.
2. Pull out Bevel Legs completely and let them
rest on the ledges at far end of Reservoir.
M&$*- The first set of notches will position the table at
a 22.5° angle, as indicated. The second set of notches
will position the table at a 45° angle, as indicated.
3. Make sure the workpiece is clear of the
Blade and that the Switch is in the off-
position, then plug in the tool.
4. Insert the Safety Key and lift the Power
Switch up to the ON position.
5. Let the Blade build up to full speed and wait for the
Blade to get wet before feeding in the workpiece.
6. Use two hands and hold workpiece
securely against Table and Fence at all
times. Feed material into the Blade.
7. When the cut is made, turn the saw OFF.
Wait for the Blade to come to a complete stop
before removing any part of the workpiece.
8. To prevent accidents, turn off the tool,
remove the Safety Key, and unplug the tool
from its electrical outlet after use. Clean,
then store the tool indoors out of children’s
reach. Store the Safety Key separate from
the tool and out of children′s reach.
S7,9*
Q&(`/"*4*
S*W*7%G,+7*
S*W*7%
T*3