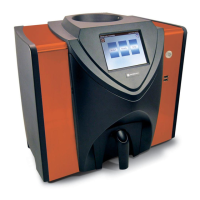
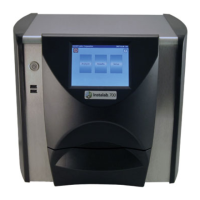
EasyManua.ls Logo

Dickey-John GAC 2500-AGRI - User Manual

Dickey-John GAC 2500-AGRI
87 pages
Print Icon
To Next Page IconTo Next Page
Loading...
OPERATOR’S MANUAL
GAC® 2500 AGRI
11001-1626B-201405
/
I
Safety Notices/Disclaimer .................................................................................. 1
Liability ..................................................................................................................2
Introduction ......................................................................................................... 3
Accessories ....................................................................................................................... 3
Unit Overview .................................................................................................................... 3
Features ............................................................................................................................ 4
Specifications .................................................................................................................... 4
Declaration of Conformity ................................................................................................. 4
External Communication Connections .............................................................................. 5
Printer ............................................................................................................................... 6
Unpacking the Instrument .................................................................................. 7
Unlock Shipping Brackets ................................................................................................. 7
Instrument Placement ..................................................................................................... 10
Leveling Instrument.......................................................................................................................... 10
Installation ......................................................................................................... 11
Connecting AC Power ..................................................................................................... 11
Grain Drawer ................................................................................................................... 12
Optional Bottomless Grain Drawer ................................................................................................. 12
Navigation .......................................................................................................... 13
Using External Devices ................................................................................................... 13
Touch Screen Button Functions ...................................................................................... 14
Home .............................................................................................................................................. 14
Power Off ....................................................................................................................................... 14
Initiate ............................................................................................................................................. 14
Print ................................................................................................................................................ 14
Back ............................................................................................................................................... 14
Abort ............................................................................................................................................... 14
Enter ............................................................................................................................................... 14
USB ................................................................................................................................................ 14
User ................................................................................................................................................ 14
Instrument Information ................................................................................................................... 15
LCD Display Touch Screen Calibration .......................................................................................... 15
Keypad ........................................................................................................................................... 15
Clean .............................................................................................................................................. 15
Password Restrictions ..................................................................................... 17
Setup .................................................................................................................. 19
Product ............................................................................................................................ 20
Create Product ............................................................................................................................... 21
Modify a Product’s Bias and Slope ................................................................................................ 21
Delete Product ............................................................................................................................... 23
Load New Product .......................................................................................................... 24
Administrative Settings ................................................................................................... 26
To Change a Known User Name/Password .................................................................................. 26

Table of Contents

Questions and Answers

  • H
    hwrightSep 23, 2025
    What to do if Dickey-John Measuring Instruments show cold sample moisture too high?
    • J
      Jennifer BakerSep 23, 2025
      If the Dickey-John Measuring Instruments display 'Cold Sample Moisture Too High' because the sample is too high in moisture to accurately read at its current temperature, warm the sample above the low temperature threshold specified in the product calibration file and rerun the measurement.
  • M
    Matthew WalkerAug 23, 2025
    What to do if Dickey-John Measuring Instruments show RF interference detected. Unable to compute moisture?
    • G
      gmorrisAug 25, 2025
      If the Dickey-John Measuring Instruments detect RF interference, remove the source of the outside radio interference. If the problem continues, contact DICKEY-john Technical Support at 1-800-637-3302.
  • J
    Joshua WilsonAug 25, 2025
    What to do if Dickey-John Measuring Instruments show unexpected application crash?
    • J
      Julie RodriguezAug 26, 2025
      If the Dickey-John Measuring Instruments application encounters an unexpected error, press the Initiate (green) button or cycle power to reboot the instrument. If the problem continues, contact Dickey-john Tech Support at 1-800-637-3302.
  • M
    Mark MyersAug 26, 2025
    How to fix incorrect date/time on Dickey-John Measuring Instruments?
    • S
      Samuel MartinezAug 27, 2025
      If the Dickey-John Measuring Instruments date/time is incorrect because the programmed machine date is less than expected, program the instrument date and time. If the problem continues, then the battery backup for the internal clock may need to be replaced. Contact DICKEY-john Technical Support at 1-800-637-3302 for service.
  • K
    Kristine ThomasAug 27, 2025
    What to do if Dickey-John Measuring Instruments show weight measurement device error?
    • E
      Erin BarnesAug 27, 2025
      If the Dickey-John Measuring Instruments detects a weight measurement device error, power the unit off and turn it back on to reset it. If the failure continues, service the unit.
  • H
    Heather TranSep 15, 2025
    What to do if Dickey-John Measuring Instruments show sample weight too high?
    • N
      Nicole SnowSep 15, 2025
      If the Dickey-John Measuring Instruments show ‘Sample Weight Too High’ because the test weight is greater than the range specified for the calibration selected, use a more representative sample and re-analyze the grain. Verify the correct grain calibration is selected.
  • L
    lisa70Sep 12, 2025
    What to do if Dickey-John Measuring Instruments show moisture too high?
    • C
      clineraymondSep 12, 2025
      If the Dickey-John Measuring Instruments shows ‘Moisture Too High’ because the measured product is above the moisture upper limit of the calibration, verify the sample filled the cell.
  • J
    Joshua HernandezSep 14, 2025
    What to do if Dickey-John Measuring Instruments show moisture too low?
    • N
      Norman GillSep 14, 2025
      If the Dickey-John Measuring Instruments shows ‘Moisture Too Low’ because the measured product is below the moisture lower limit of the calibration, verify the sample filled the cell.
  • M
    Mrs. Kimberly LawsonSep 5, 2025
    What to do if Dickey-John Measuring Instruments show empty cell measurement out of spec?
    • K
      Kimberly MoralesSep 5, 2025
      If the Dickey-John Measuring Instruments show ‘Empty Cell Measurement Out of Spec’ because of moisture or dirt buildup in the cell, dump the grain and verify the cell is clean and free of grain in and surrounding the cell.
  • E
    Eric GarciaSep 2, 2025
    How to fix invalid grain calibration file on Dickey-John Measuring Instruments?
    • D
      David MarshSep 3, 2025
      To resolve the 'Invalid Grain Calibration File' error on Dickey-John Measuring Instruments, re-install the selected calibration file because an invalid calibration file was selected.

Summary

Safety Notices and Disclaimers

Disclaimer

DICKEY-john reserves the right to make engineering refinements or procedural changes.

Liability

Introduction

Accessories

List of components included with the unit and available as replacement parts.

Unit Overview

Description of the physical components of the GAC® 2500-AGRI unit.

Features

Key features of the GAC® 2500-AGRI instrument.

Specifications

Technical specifications for the GAC® 2500-AGRI unit.

Declaration of Conformity

Statement of conformity with relevant directives and regulations.

External Communication Connections

Details on connecting external devices like USB, Ethernet, and RS232.

Unpacking the Instrument

Unlock Shipping Brackets

Procedure to unlock shipping brackets before setup and operation.

Instrument Placement

Guidelines for placing the instrument in a suitable environment.

Leveling Instrument

Instructions on how to level the instrument using the built-in bubble level.

Installation

Connecting AC Power

Steps to connect the unit to AC power.

Grain Drawer

Information about the standard and optional bottomless grain drawers.

Navigation

Using External Devices

How to use external devices like keyboards, mice, and barcode scanners.

Touch Screen Button Functions

Explanation of the various touch screen buttons and their functions.

Instrument Information

Accessing details about the unit's service date, serial number, and software version.

LCD Display Touch Screen Calibration

Procedure to re-calibrate the touch screen display for better responsiveness.

Keypad

Description of the virtual keyboard for text entry on the screen.

Clean

How to use the Clean button for automated cleaning of the cell and door.

Password Restrictions

Setup

Product

Allows editing, loading, and deleting product calibrations.

Create Product

Steps to create a new product by copying parameters from an existing one.

Modify a Products Bias and Slope

How to adjust moisture and test weight bias and slope for a product.

Delete Product

Procedure to remove a product and its calibrations from the unit.

Load New Product

Instructions for loading single or multiple product calibrations via USB.

Administrative Settings

Changing the admin username and password for system access.

System Setup

Printer Setup

Configuring printer connection, output format, and ticket details.

Language and Keyboard Settings

Setting the system language and choosing between QWERTY or Standard keyboard styles.

Locale Setting

Selecting a region or area for relevant calibrations.

Sample Setup

Enabling Sample ID, Customer ID, and User Login requirements.

Result Setup

Configuring automatic/manual return and display of test weight/temperature.

Export Data Format

Choosing the format (CSV or Excel) for saving data to a computer.

Time

Setting the system date and time.

Units

Selecting date format, temperature units, and measurement units.

Owner Data

Entering name, address, and phone number for print ticket header/footer.

Service Data

Fields for technicians to record service notes, dates, and reset counters.

LCD Display Touch Screen Calibration

Re-calibrating the touch screen to improve responsiveness.

Data Storage Capacity

Managing and deleting stored test results to free up memory.

Check Scale

Performing an instrument scale measurement for weight accuracy comparison.

Network Setup

Configuring Ethernet settings for the instrument.

Update Instrument

Updating the instrument's software via a USB memory device.

Startup

Power Down

Procedures for safely shutting down and powering off the instrument.

Analyzing Grain

User Login (Optional)

Optional feature requiring a user to log in before analyzing grain.

Selecting Product

How to choose the grain type for testing.

Performing a Grain Analysis

Steps involved in the grain analysis process and factors affecting the display.

Sample ID Screen

Entering sample and customer IDs before analysis.

Hopper Level Indicator

Visual indicators for hopper status during analysis.

Analysis Process

Details on the grain analysis process and status indicators.

Analysis Screen

Display of test results and options for further actions.

General Cleaning Tip

Recommendation for regular cleaning to maintain measurement accuracy.

Database Memory Messages

Warnings and procedures for managing full database memory.

Out of Memory

Handling situations where the results database is full.

Data Drive Memory Low

Warning about low memory on the data drive and clearing data.

Data Drive Out of Memory

Procedure when the data drive is completely out of space.

Results

To View Test Results

Accessing and viewing previously performed grain test results.

Refine Query Options

Filtering and customizing the display of test results.

All Products

Displaying all stored sample tests on the instrument.

Product Like

Searching for records based on product name criteria.

User Like

Searching for records based on user name criteria.

Sample ID Like

Searching for records based on sample ID criteria.

Unable to Show Query Results

Handling queries when memory capacity is near maximum.

View Products

Displaying an alphabetical list of active products and their Issue IDs.

Grain Calibrations

Diagnostics

Maintenance

External Cleaning

Instructions for cleaning the LCD display and exterior surfaces.

Internal Cleaning

Procedures for daily and extensive internal cleaning of the instrument.

Daily Clean Method

Steps for performing an automated daily cleaning of the cell and door.

Extensive Cleaning Method

Detailed steps for thorough internal cleaning, including the sensor probe.

Cleaning the Temperature Sensor Probe

Specific instructions for cleaning the IR temperature sensor.

Troubleshooting

Error Messages

Explains error messages and how to acknowledge or resolve them.

Dickey-John GAC 2500-AGRI Specifications

General IconGeneral
BrandDickey-John
ModelGAC 2500-AGRI
CategoryMeasuring Instruments
LanguageEnglish

Related product manuals