QUICK INSTALLATION GUIDE
DN-16081
for more product details, please go to
www.digitus.info
Package Contents Camera Overview
Before starting to set up your camera, please make
sure items below are in your box:
Standard package:
Camera Quick Guide
Optional accessories:
Screws &
Wall Plugs
Wrench
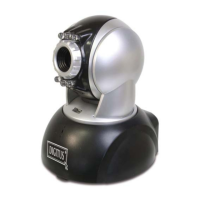
DN-16081
Side View
Installation
Step 1: Separate the dome cover from the camera.
Step 2: Make sure the screw holes on the plate are aligned with the holes on the camera base. If not, slightly loosen the two screws on the plate and rotate it.
Step 3: Mark the locations of the two screw holes on the ceiling or wall, and drill a hole for each on the ceiling or wall. The distance between your camera and the location you want to monitor should be 3 ~ 4
meters.
Step 4: Fix the camera to the ceiling or wall with the supplied screws.
Step 5: Connect your camera to power.
Step 6: Pan, tilt and rotate the lens itself to adjust the position and viewing angle of the camera, and fasten the two screws on the plate to fix.
Step 7: Replace the dome cover back to the camera.
Note: Please wipe the inner part of the dome cover against the lens for clear images.