Convection Heated Plate and Base Dispenser | 4
Operation
1. Plug the unit into the electrical outlet.
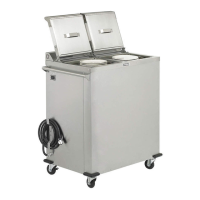
2. Lift open lid until it latches securely in safety latch (FIGURE
5). Place bases and plates into the self-leveling dispensers
as required, or until the dispensers are filled to the top.
Be sure to place each into the appropriate side, as marked
(Figure 4). Placing plates in the base side will overheat and
may damage plates. Bases will not heat up to proper
temperature if placed in the plate side. Always keep the
load leveled on the shelf or it could bind.
3. Close lids on the top of the unit by lifting up on the safety
latch (FIGURE 5).
4. Turn the power switch to the ON position. Green LED on
switch will illuminate.
5. Heat-up time period for bases and plates varies, depending on
number and style of each. Minimum heat-up time for a full unit
is one hour for lunch and dinner meals, and an hour and a half
for morning breakfast meal.
Dispensing
!
CAUTION: Operators should always wear gloves or use base/plate
lifters when dispensing.
After the unit is turned off, the bases/plates remaining inside
the unit will remain hot for some time.
Operating Thermostats & Hi-Limit Thermostats
All thermostats are accessible by removing the back louvered
panel. There are separate Hi-Limit thermostats for the Base &
Plate sides.
!
CAUTION: Turn unit OFF and unplug prior to the removal of the
back panel. Only qualied service personal should remove the back
panel and perform service work.
Both Hi-Limit thermostats are non-adjustable. However, they
can be reset by pushing the reset button located in the center
of the thermostat. Replace back panel and connect electrical
power to the dispenser.
!
CAUTION: Reset of the Hi-Limits & Adjustment of the Base & Plate
thermostats are not covered under warranty.
Operation: At power on the display will indicate “020” and the
program version for a few seconds. The control will then start
the Preheat timing cycle and start controlling the heaters to
the Preheat temperature setting. The display will alternate the
3 horizontal bars indicating Preheat delay. When the Preheat
cycle time expires the display will change and rotate a segment
counterclockwise around the perimeter of the display, this
indicates the Preheat cycle is ended and the control will start
the Ready cycle. The control will now maintain the heaters at
the preset Ready Temperature settings until power is removed
from the unit.
Cycle Time Adjustment: Whenever the unit is on you can
revise the Preheat time, Ready Delay time, Preheat heater
temperatures and Ready Delay heater temperatures. To set
the time settings press the Time button for approximately 5
seconds, the display will alternate “PrE”, “Ht” and the current
setting. The LEDs will be off. Press either the UP or DOWN
setting button to change the time. When done press the Time
button and the display will alternate “rdY”, “Ht” and the current
setting. When done press and hold the time button for 2
seconds the changes will be saved, or do not press any
button, after 5 seconds the unit will automatically exit and save
the changes. The control will use the new time setting when a
new timing cycle is initiated. A timing cycle in process will
continue unchanged.
Temperature Setting Adjustment: To set the individual Heater
setpoint temperatures press and hold the Temperature
button for approximately 5 seconds, the display will alternate the
Preheat settings, “PrE” “Ht” and the current setting for the lower
heater and the lower heater LED will be On. Press either the UP
or DOWN setting button to change the temperature. To select
the upper heater setting, press and release the Temperature
button, the display will now flash the upper heater setting and
the upper heater LED will be On. Again press either the UP or
DOWN setting button to change the temperature. When done
press the temperature button, the display will now alternate the
Ready settings, “rdY” “Ht” and the current setting for the lower
heater and the lower heater LED will be On. Press either the UP
or DOWN setting button to change the temperature. To select
the upper heater setting, press and release the Temperature
button, the display will now flash the upper heater setting and
the upper heater LED will be On. When done press and hold
the Temperature button for 2 seconds the changes will be
saved, or do not press any button, after 5 seconds the unit
will automatically exit and save the changes. The temperature
changes will take affect immediately
Changing Default Units of Measurement: To set the degree F
or C temperature display press and hold the Temperature but-
ton for approximately 2 seconds, the left display will flash the
current setting for the lower heater and the lower heater LED
will be On. Press both the UP and DOWN setting buttons
simultaneously for approximately 2 seconds, the display will
show the current F or C setting. Press either the UP or DOWN
setting button to change the F or C setting. When done press
and Hold the Temperature button for 2 seconds, the changes
will be saved, or do not press any button, after 5 seconds the
unit will automatically exit and save the changes.
Figure 4
Figure 5
PROGRAMMING
 Loading...