Do you have a question about the Diode Dynamics Demon Eyes and is the answer not in the manual?
Lists the necessary tools for installation, including pliers and a small Phillips screwdriver.
Details attaching the Demon Eye to the included bracket using locking screws and locknuts.
Explains mounting the Demon Eye board inside the projector housing shroud using mounting holes.
Guides connecting Demon Eye connectors to RGBW Drivers and bare wires to the RGBW Controller.
Crucial instruction to plug LEDs into the driver first, not directly into the controller.
Instructs connecting the remote control power to the Signal Wire and grounding the black wire.
Advises mounting drivers and controllers outside the headlight, away from excessive heat.
Final steps include thorough testing, resealing the headlight, and reinstalling onto the vehicle.
Provides resources for further assistance, including a QR code for installation videos.
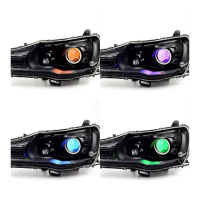
The Diode Dynamics RGBW™ Demon Eyes (Universal) are an innovative lighting product designed to add full multicolor functionality to your vehicle's projector housing. These modules allow for a highly customizable lighting experience, transforming the aesthetic of your headlights with a vibrant array of colors. The system is engineered for versatility, making it suitable for various projector types, though the installation guide specifically details the process for Mini H1 projector housings. For other projector sizes, the Demon Eyes can be custom mounted using adhesive, offering flexibility in application.
At its core, the Demon Eyes system comprises LED boards, RGBW drivers, and an RGBW controller. This architecture ensures precise control over the lighting output, allowing users to select and display a wide spectrum of colors. The LED boards are designed to be integrated directly into the projector housing, specifically within the shroud, to create a captivating "demon eye" effect. This effect enhances the vehicle's appearance, giving it a distinctive and aggressive look. The system is built with quality in mind, as indicated by its "Made in USA" origin and a 3-year warranty, reflecting confidence in its durability and performance.
Installation of the Demon Eyes involves several key steps, beginning with the physical mounting of the LED boards within the projector housing. Each Demon Eye module is attached to an included bracket using locking screws and locknuts. This secure mounting ensures that the LED board remains stable and properly positioned within the housing. The bracket itself can be mounted on either the front or back side of the projector housing, providing some flexibility depending on the specific projector design and desired aesthetic. The use of pliers and a small Phillips screwdriver is essential for tightening these components, ensuring a firm and reliable attachment. For custom installations on projectors other than Mini H1, adhesive can be used to secure the Demon Eyes, demonstrating the product's adaptability.
Once the physical mounting is complete, the electrical connections are crucial for the system's operation. Each Demon Eye connector must be linked to its respective RGBW driver. These drivers play a vital role in regulating the power supplied to the LEDs, preventing direct connection to the controller which could damage the LED panels. From the RGBW drivers, bare wires extend to the RGBW controller. It is imperative that these wires are inserted into the corresponding slots on the controller, with careful attention to matching colors (e.g., all white wires into the white slot). This meticulous wiring ensures that all boards function correctly and that the full range of multicolor options is available. A wiring method diagram is provided to guide users through this critical step, emphasizing the importance of correct connections for optimal performance.
Beyond the core lighting functionality, the Demon Eyes system incorporates features that enhance its usability and integration into a vehicle's electrical system. The remote control power needs to be connected to a signal wire, which then taps into any 12V power source. Additionally, a black wire must be grounded for the system to function properly. This standard electrical setup ensures compatibility with most vehicle electrical systems. After all connections are made, the RGBW drivers and controller need to be mounted. It is recommended to mount the drivers outside of the headlight assembly for serviceability and in a location away from the engine block to prevent excessive heat buildup. This consideration for heat management is important for the longevity and reliable operation of the electronic components.
Maintenance features, while not explicitly detailed as routine tasks, are implicitly supported by the design and recommendations. The suggestion to mount drivers outside the headlight for "serviceability" implies that these components might need access for troubleshooting or replacement, making their location critical for ease of maintenance. The robust construction and 3-year warranty also suggest a product designed for long-term reliability, minimizing the need for frequent maintenance. However, the initial installation process requires careful attention to detail, especially regarding wiring and heat management, which are crucial for preventing future issues.
The product also emphasizes user support and guidance. Diode Dynamics strongly recommends professional installation, especially since headlights must be opened to proceed with the installation. This highlights the complexity of the process and the potential risks involved if not handled correctly. For those who prefer a DIY approach or need additional assistance, Diode Dynamics offers a dedicated support line and email contact. Furthermore, a QR code is provided to link to an online installation video, offering a visual, step-by-step guide. This commitment to customer support and comprehensive resources aims to ensure a smooth installation experience and maximize user satisfaction. The "100% Satisfaction Guarantee" and "3 Year Warranty" further underscore the company's dedication to quality and customer confidence in their product.
In summary, the Diode Dynamics RGBW™ Demon Eyes (Universal) offer a sophisticated and customizable lighting upgrade for vehicle headlights. Its key features include multicolor functionality, flexible mounting options, precise electronic control, and robust construction. The installation process, while detailed, is supported by extensive guidance and customer service, ensuring that users can achieve a stunning and unique lighting effect for their vehicles. The product's design considerations for heat management and serviceability contribute to its overall reliability and user-friendliness, making it a compelling choice for automotive enthusiasts looking to personalize their vehicle's appearance.
| Category | Automobile Accessories |
|---|---|
| Operating Voltage | 12V DC |
| Lifespan | 50, 000 hours |
| Color Temperature | 6000K (White) |
| Housing Material | Aluminum |
| Waterproof Rating | IP67 |
| Color Options | Red, Blue |
| Compatibility | Universal (Vehicle-specific adapters may be required) |