SET UP- Ins talla tion ( MY D ISH )
01/ 01/07 0 0:03
Swi tch Type
DiSEqC 1.2/ USALS
Page
1/8
Mov e
Swi tch
Exi t
Set E ast Lim it
Set W est Lim i
NONE
NONE
NONE
NONE
Pos ition 01
Pos ition 02
Pos ition 03
Pos ition 04
Set Limi t
Disa ble Limit Clea r
Goto R ef. GoTo
Move Step Stop
Move Conti nue Stop
User Interface
1.1 Setting Language
User can select preferred language at Setup Installation General Setting page.
(1) Press <Menu> button to enter Main Menu.
(2) Press <Left/Right> button to select SETUP option.
(3) Press <Up/Down> button to select Installation option.
(4) Press <Up/Down> button to select General Setting option.
(5) Press <OK> button to enter General Setting page.
(6) Press <Up/Down> button to select the language option.
(7) Press <Left/Right> button to set a language.
1.2.2 Transponder configuration and scan
If there exist satellite in the database, then user can edit and scan transponder in the
menu Main Menu Setup Installation TP MANAGER, as Figure 6.
Press <Left/Right> button to select satellite;
Press <Up/Down> button to select transponder.
Press <OK/Up/Down/Left/Right/0~9>, user can edit Frequency, Symbol Rate or
Polarity of the transponder.
Press <BLUE> button to scan the focused transponder.
1.Quick Installation
3
Figure 6. Scan for Transponder Figure 7. General Setting
SET UP- Ins talla tion (Tr anspo nder Ma nager )
01/ 01/08 0 0:19
Mov e
Swi tch
Exi t
Sat ellit e Name EU TELSAT W 3A
No.
001
002
003
004
005
006
007
008
Fre quenc y
109 28
1134 5
1147 1
1151 3
1155 4
1159 5
1163 7
1167 9
Sym bol Rat e
300 00
275 00
300 00
275 00
275 00
300 00
300 00
300 00
Pol arity
H
H
H
H
H
H
H
H
OK
Edi t
Sca n Del ete AllDelAdd
00 00
S Q
01/ 01/08 0 0:19
Mov e
Swi tch
Exi t
SET UP- Ins talla tion (G enera l Setti ng)
OSD L angua ge
Aud io Lang uage
Sub title L angua ge
Aut o Time Zon e
Tim e Zon e
Eng lish
Eng lish
OFF
OFF
+ 08: 00
1.2 How to receive the programs?
Scan the satellites to receive the programs.
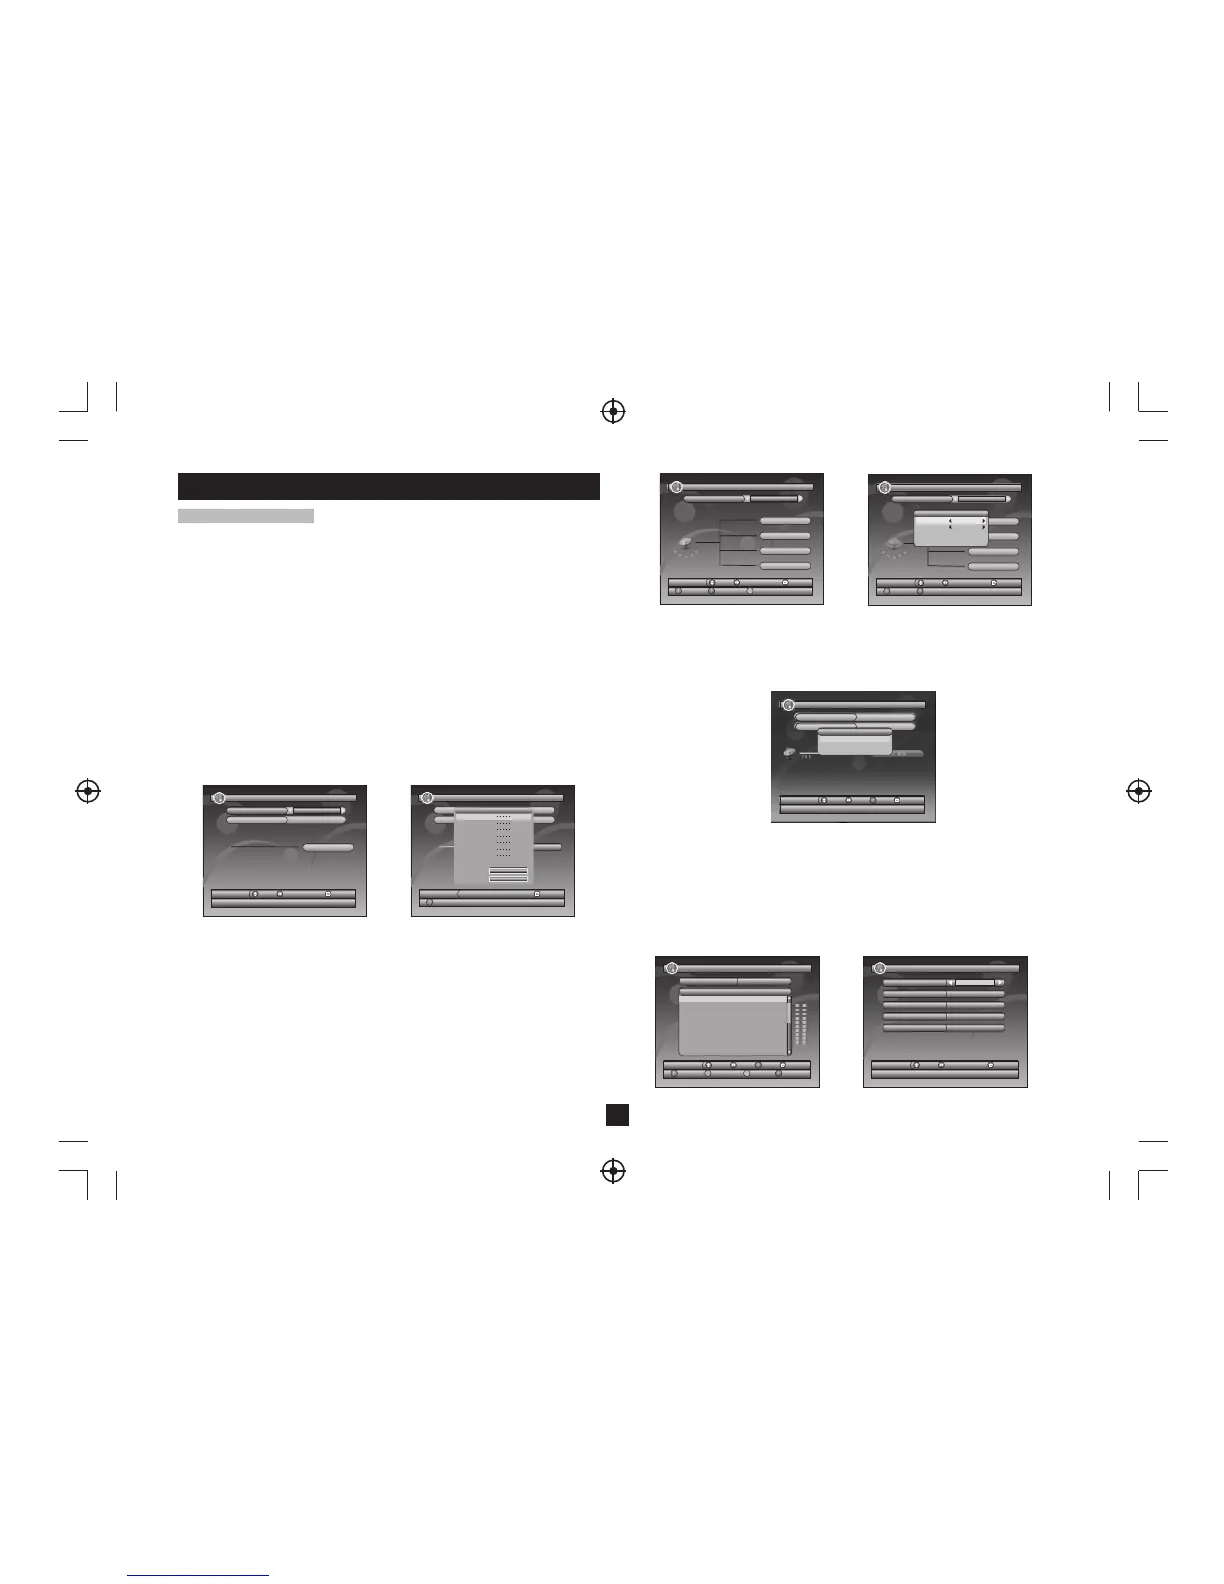
1.2.1 Satellite configuration
Satellite configuration and manager is in Main Menu->Setup->Installation->MY DISH
menu.
Firstly, select the proper switcher according to the switcher you have, as Figure 1.
For sample switcher, each branch is connected with a satellite, user can configuration it
as Figure 2.
Then user can press BLUE key to scan the focus satellite or RED key to scan multi-
satellites, as Figure 5.
Scan Mode: select Blind-Quick or Blind-Detail for blind scan, or Default to scan the
default transponder list.
Programme: select to receive all programs or only free programs.
For DiSEqC1.2 motor, user can set limit position, user location and LNB of it, as ,then
user can adjust and store max 32 position for different satellites, as Figure 3, Figure 4.
Switch Type: select DiSEqC1.0/1.2 switcher or DiSEqC1.2 motor, or select none if you
don't have any DiSEqC device.
Toneburst: enable or disable toneburst switcher.
move down to the satellite selection area, and press OK key to add the proper satellite,
as Figure 2.
LNB Type: select the LNB type according to your dish.
LNB Low Freq: set the low frequency of LNB.
LNB High Freq: set the high frequency of LNB if it is universal.
Figure 1.Satellite Installation Figure 2.Add Satellite
Figure 3. DiSEqC1.2 Setting Figure 4. DiSEqC1.2 Motor Limitation
Swi tch T
Toneb urs
Exi t
Add S AT
Edi t
SET UP- Ins talla tion ( MY D ISH )
01/ 01/07 0 0:02
Str ength 0 0%
Qua lity 00 %
Sat ellit e Name
LNB Ty pe
LNB L ow Freq
LNB H igh Fre q
22K Ton e
LNB P ower
Tran spond er
Figure 5. Scan Mode
SET UP- Ins talla tion ( MY D ISH )
01/ 01/07 0 0:03
Toneb urst
OFF
NONE
Swi tch Type
Prog ramme
All
Bli nd-Det ail
Scan Mo de
Sca n Mode
Mov e
Swi tch
Exi t
OK
Sca n
7.0 E
Move
Swit ch
Exit
SET UP- Ins talla tion ( MY D ISH )
01/ 01/07 0 0:02
Swi tch Type
Toneb urst
OFF
NONE
NONE
SET UP- Ins talla tion ( MY D ISH )
01/ 01/07 0 0:02
Swi tch Type
DiSEqC 1.2/ USALS
Page
1/8
NONE
NONE
NONE
NONE
Pos ition 01
Pos ition 02
Pos ition 03
Pos ition 04
Mov e
Swi tch
Exi t
Set L NBSet L ocati onSet L imit
 Loading...