Do you have a question about the Division 6 Dual Mini Sequencer and is the answer not in the manual?
Using CLK IN jacks for external clock signals and cascading sequencers.
Resets sequencer to step 1 and enters run mode when receiving a gate pulse.
Sends a gate pulse when sequence ends or hits a Loop step.
Provides an end-of-sequence gate signal for external modules or starting other sequencers.
Connect XP OUT to XP IN for longer sequences (e.g., 32-step).
How to select a sequence using the keyboard display and note keys.
How to select a song using the keyboard display and black keys.
Steps to program a sequence, including using PROG/RESET and STEP UP/DOWN buttons.
SLUR function holds CV out same as REST but doesn't fire the gate.
Details on selecting from 16 different gate timings for notes.
ACC output can be programmed per step with 3 modes: On, w/Drop, Gate Follow.
Steps to program songs by selecting sequences and advancing through song steps.
Method to copy existing songs or sequences to modify them or create new ones.
How to clear a sequence (lowest note) or song (sequence 1).
Details on the PROG/RESET button's multiple uses with other controls.
Automatically advances to the next step when programming notes, REST or LOOP.
Enables AUTO ADVANCE mode to stay on until manually turned off.
Temporarily transpose sequence up or down using note keys while running.
Allows programming sequence steps on the fly while the sequencer is running.
Sequencer sends pulse from XP OUT to XP IN when the end of a sequence is reached.
Sequencer starts when XP IN is high and resets when it is low.
Sets the sequencer to send its internal clock out via the ACC jack.
Switches to a new song or sequence on the next clock pulse.
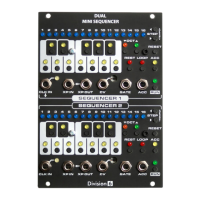
The Dual Mini Sequencer is a versatile musical instrument designed for creating and manipulating sequences of notes and control voltages. It features two independent sequencers, each capable of generating up to 16 steps, which can be linked together for longer sequences or operated independently. The device is equipped with a range of controls for programming, playing, and expanding its capabilities, making it suitable for both live performance and studio use.
The core function of the Dual Mini Sequencer is to generate a series of control voltages (CV) and gate signals in a programmed order. Each sequencer has 16 steps, represented by illuminated buttons that also serve as a miniature keyboard for note entry. The CV output can be set to cover 5 octaves, allowing for a wide range of melodic possibilities. Gate outputs trigger events in other modules, while an additional "ACC" (Accent) output provides an extra control signal that can be programmed per step.
The sequencer can operate using its internal clock or be synchronized with an external clock signal. The internal clock offers a variety of tempos, from slow to very fast, and can be adjusted on the fly. When an external clock is connected, the internal clock is automatically disabled, ensuring seamless integration with other modular systems.
Expansion capabilities are a key feature, allowing multiple sequencers to be daisy-chained for extended sequences. The "XP IN" and "XP OUT" jacks facilitate this, with "XP OUT" sending a gate pulse when a sequence ends, and "XP IN" resetting the sequencer to step 1. This normalled connection allows a single sequencer to loop automatically, or for complex multi-sequencer setups to be created. For example, two sequencers can be linked to form a 32-step sequence.
To start a sequence, the user presses the "RUN" button, which illuminates an LED to indicate active playback. Pressing "RUN" again pauses the sequence, allowing for on-the-fly programming. The "RESET" button stops the sequence, returns it to step 1, and puts the sequencer into "Ready" mode, indicated by a blinking "STEP" LED. In Ready mode, the sequencer will start from step 1 on the next clock pulse. Users can select a different starting step using the "STEP LEFT" and "STEP RIGHT" buttons. While in Ready mode, the note/keyboard buttons can be used to play tunes manually without altering the stored sequence.
Programming is performed when the "STEP" LED is steady (not Ready mode) and the sequencer is not running. This "Program" mode can be entered by pressing "RESET" a second time or by pausing a sequence with "RUN." Users select the desired step using "STEP LEFT" and "STEP RIGHT" and then press the note button they wish to program for that step. The new note is automatically saved to non-volatile memory.
The sequencer supports 5 octaves, and the "OCTAVE UP" and "OCTAVE DOWN" buttons allow for transposing the keyboard. LEDs indicate the current octave setting:
Beyond standard notes, steps can be programmed with "REST," "LOOP," or "ACC" functions:
Version 2 firmware introduces several advanced features, identifiable by a specific boot light show (step 2 LED then step 10 LED light up).
Pressing "OCTAVE UP" and "OCTAVE DOWN" simultaneously enters "SONG/SEQUENCE SELECT" mode, which changes the note key display. Pressing them again returns to normal note select mode.
In "SONG/SEQUENCE SELECT" mode, if all white keys are lit, the sequencer is in "SEQUENCE" mode. There are 7 sequence memories available. A steady LED indicates the currently selected sequence. To select a different sequence, the user presses the corresponding white note key. If the sequencer is running, the new sequence LED will flash until the current sequence finishes (or on the next clock, if "CHANGE ON CLOCK" mode is enabled), then it switches. Sequences can also be selected by holding "PROG/RESET" and pressing the desired sequence button.
If all black keys are lit in "SONG/SEQUENCE SELECT" mode, the sequencer is in "SONG" mode. There are 5 song memories, each capable of stringing together up to 16 sequences in any order. When a sequence in a song completes, the sequencer advances to the next song step. Songs are selected by pressing the corresponding black note key. Similar to sequences, a running sequencer will flash the new song LED until the current song completes (or on the next clock), then switch. Songs can also be selected by holding "PROG/RESET" and pressing the desired song button.
Each step in a song contains a sequence. To program sequences into song steps, the user enters "SONG/SEQUENCE SELECT" mode, selects a song, then enters "Program" mode. White keys are used to select the sequence for the current song step. "STEP UP/DOWN" buttons navigate through song steps. The "LOOP" button can be used to define the end of a song if fewer than 16 steps are desired.
Existing songs or sequences can be copied to new memory slots. In "SONG/SEQUENCE SELECT" mode, hold down the source song/sequence button, then hold down the destination song/sequence button for about 1 second. Note LEDs will flash to confirm the copy. Copies always go from the first button pressed to the second. Songs cannot be copied to sequences, nor sequences to songs.
To clear a memory, hold down the song/sequence button to be cleared, then hold down the "RESET" button for about 1 second. Note LEDs will flash. Clearing a sequence sets all steps to the lowest note; clearing a song sets all steps to sequence 1.
The internal clock in V2 offers more speed choices, concentrated in a "useful" range, with actual BPM values now known (e.g., 10 BPM to 8000 BPM).
The "RESET" button gains additional functions in V2, used in conjunction with other buttons to enable/disable various modes.
When enabled, programming a note, REST, or LOOP automatically advances the sequencer to the next step, simplifying initial sequence entry. Gate timing, SLURs, and ACC mode selection are not available in this mode. To enable/disable, hold "PROG/RESET" and tap "STEP DOWN/AUTO ADV." The "STEP 16" LED blinks twice for enabled, flickers dimly for disabled. This mode disables itself when the sequencer enters "RUN" mode, unless "PERSISTENT AUTO ADVANCE MODE" is enabled.
This mode keeps "AUTO ADVANCE" enabled even after pressing "RUN." To enable, hold "PROG/RESET," press "STEP DOWN/AUTO ADV," and hold both for 1 second. "STEP 16" LED blinks twice dimly for enabled, flickers once dimly for disabled.
When enabled and the sequencer is running (and not in "SONG/SEQUENCE SELECT" mode), note keys can temporarily transpose the entire sequence. To cycle through modes, hold "PROG/RESET" and tap "LOOP/LIVE XPOSE." Modes include "On" with root key at top, center, or bottom of the keyboard, and "Off." The "LOOP" LED flashes for "On" modes and flickers dimly for "Off." In this mode, the "NOTE" and "OCTAVE" LEDs display transposition status. Pressing the root key sets transposition to 0. Pressing keys above/below the root key transposes up/down, with LEDs indicating the amount. "OCTAVE UP/DOWN" buttons shift the keyboard octave for wider transposition.
With "LIVE EDIT" enabled, "NOTE" buttons can program the sequence on the fly while it's running. To enable/disable, hold "PROG/RESET" and tap "ACC." The "ACC" LED blinks twice for enabled, flickers dimly for disabled. Changes made in "LIVE EDIT" are saved to non-volatile memory only when the sequencer is paused or stopped.
Enabled by default, this mode causes the sequencer to send a pulse from "XP OUT" to "XP IN" (normalled) when a sequence ends, causing it to loop. Disabling 1X mode allows "XP IN" to be used as a reset input without an external gate mixer. To disable/enable, hold "PROG/RESET" and tap "RUN." The "RUN" LED flickers dimly for disabled, blinks twice for enabled.
This mode allows "XP IN" to start the sequencer when high and reset it when low. It can start the sequencer from any selected step. To toggle, hold "PROG/RESET" and "RUN" for about 1 second. The clock LED blinks twice for enabled, flickers dimly for disabled.
The internal clock can be sent out the "ACC" jack. To enable/disable, hold "PROG/RESET," then "ACC," then hold both for 1 second. The "ACC" LED blinks twice for enabled, flickers dimly for disabled. When enabled, "ACC" output will no longer send accent signals but will still operate normally with an external clock.
Normally, a new song or sequence selected while running waits for the current one to complete. "CHANGE ON CLOCK" mode switches to the new song/sequence on the next clock pulse. To enable/disable, hold "PROG/RESET," then "STEP UP," then hold both for 1 second. The "STEP 15" LED blinks twice for enabled, flickers dimly for disabled.
The sequencer can be calibrated to 1 volt per octave using a trim pot next to each "CV OUT" jack. The procedure involves connecting a voltmeter to the "CV OUT" jack, ensuring the sequencer is in Ready or Program mode, setting the keyboard to the highest octave (C4), pressing the "NOTE C" button, and adjusting the trim pot until the voltmeter reads 4.000V. The user then checks lower "C" notes (C3, C2, C1, C0) by pressing "OCTAVE DOWN" and "NOTE C" to ensure even voltage steps, adjusting the trim pot as needed. The outputs are buffered to maintain voltages, but the trim pot can be used to fine-tune calibration for compatibility with specific modules.
The internal clock uses the PIC microcontroller's built-in oscillator, which may not be super-accurate. For timing-critical applications, using an external clock is recommended.
| Manufacturer | Division 6 |
|---|---|
| Number of Sequencers | 2 |
| Step Count | 8 steps per sequencer |
| Voltage Control | Yes |
| CV Range | 0 to +5V |
| Gate Output | Yes |
| Clock Input | Yes |
| Reset Input | Yes |
| Direction Modes | Forward, Reverse, Pendulum, Random |
| Module Depth | 25mm |
| Power | +12V / -12V |