18
F
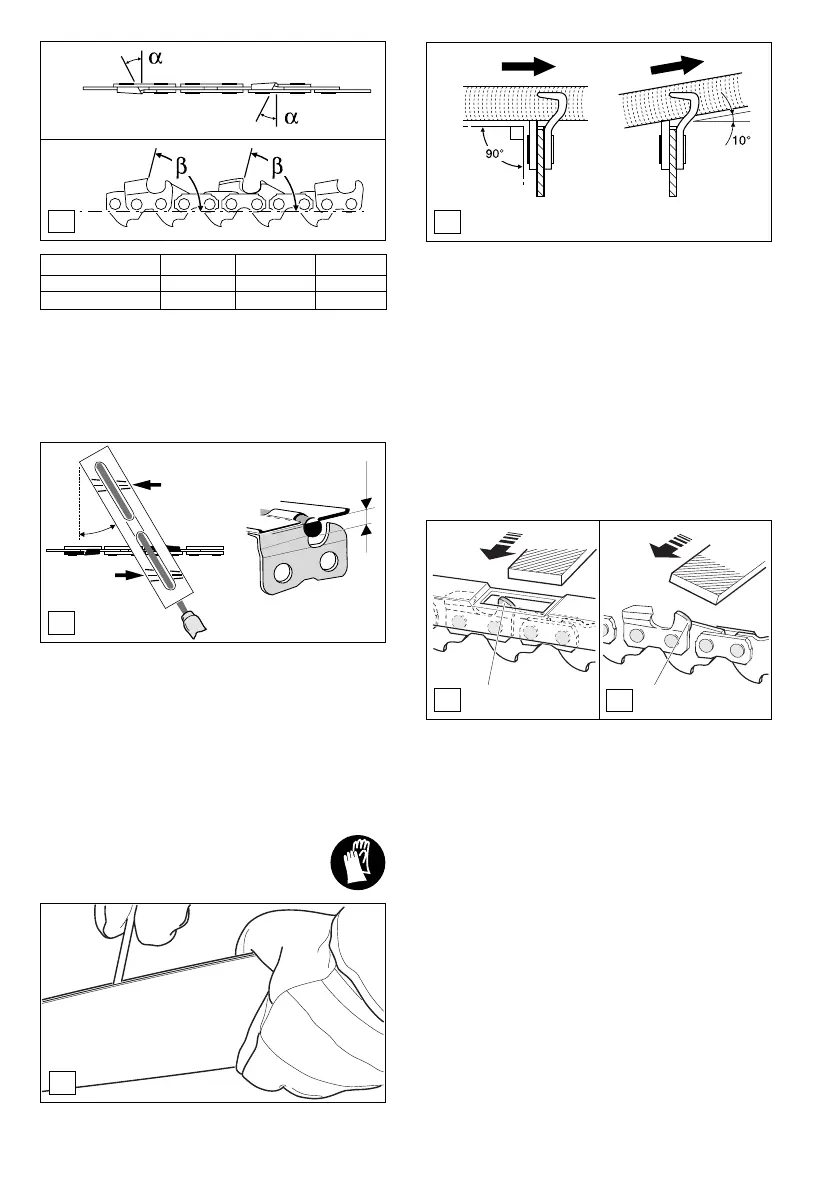
- The sharpening angle (α) must be identical for all cutters!
Different angles result in a roughly, irregularly running chain,
increase wear and tear and cause chain beakage.
- The front rake (β) of the cutter results from the cut depth of
the round Þ le. If the proper Þ le is used in the right manner,
the correct front rake will be obtained automatically.
Files and how to work with them
- Sharpen using a special Þ le holder with a saw chain round Þ le:
- 086 (.325") chain: File the Þ rst cutter half with a 4.8 mm dia.
round saw-chain Þ le, then switch to a 4.5 mm dia. Þ le.
- 093 (3/8") and 099 (3/8") chain: File the Þ rst cutter half
with a 5.5 mm dia. round saw-chain Þ le, then switch to a
4.8 mm dia. Þ le.
Normal round Þ les are not appropriate for this work. See
"Accessories" for the order number.
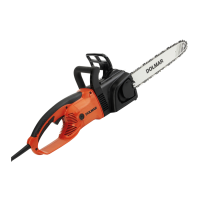
- The Þ le should cut only when pushed forwards (arrow). Lift
the Þ le when leading it backwards.
- First sharpen the shortest cutter. The length of this cutter is
then the standerd for all other cutters of the chain.
- Always guide the Þ le as in Fig. F shown (chain 086 (.325"),
099 (3/8") = 10° and 093 (3/8") = 90°).
E
Chain 086 (.325") 093 (3/8") 099 (3/8")
Sharpening angle α 30° 35° 25°
Front rake β 85° 85° 60°
Chain: 093 (3/8") 099 (3/8"), 086 (.325")
1 2
H
- After having sharpened the chain, the height of the depth
limiter must be checked by means of a chain gauge. See
"Accessories" for the order number.
- Correct even the smallest excess height with a special ß at
Þ le (1). See "Accessories" for the order number.
- Round off the front of the depth limiter (2).
I
G
- The Þ le holder makes Þ le guidance easier. It is marked for
the correct α sharpening angle (keep the marks parallel with
the chain when Þ ling, see illustration) and limits the cut depth
to the correct 4/5 of the Þ le diameter. See "Accessories" for
the order number.
4/5
α
Cleaning the guide bar
CAUTION:
Protective gloves must be worn!
Regularly inspect the bearing surfaces of the guide bar for
damage, and clean them with a suitable tool.
J