5
9.9.
9.9.
9.
Releasing Pre-Set TensionReleasing Pre-Set Tension
Releasing Pre-Set TensionReleasing Pre-Set Tension
Releasing Pre-Set Tension
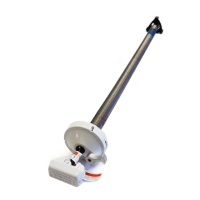
Remove cotter pin in the Safe-T-Lock™ end (right end) that
is holding factory pre-set torsion. The cotter pin is found in
the roller tube end cap
(FIG. 11)(FIG. 11)
(FIG. 11)(FIG. 11)
(FIG. 11). For easier removal, twist
the roller tube as if unrolling awning while pulling on cotter
pin.
When cotter pins are removed, springs are underWhen cotter pins are removed, springs are under
When cotter pins are removed, springs are underWhen cotter pins are removed, springs are under
When cotter pins are removed, springs are under
tension. The awning will attempt to close. Keeptension. The awning will attempt to close. Keep
tension. The awning will attempt to close. Keeptension. The awning will attempt to close. Keep
tension. The awning will attempt to close. Keep
hands clear of hardware and roller tube.hands clear of hardware and roller tube.
hands clear of hardware and roller tube.hands clear of hardware and roller tube.
hands clear of hardware and roller tube.
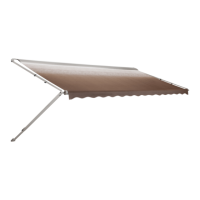
The awning should now roll up snugly against the
vehicle side. If no tension is felt, check to make sure the
Safe-T-Lock™ Lever is in the roll-up position.
10.10.
10.10.
10.
Securing Awning Securing Awning
Securing Awning Securing Awning
Securing Awning
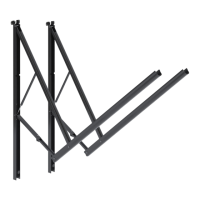
The awning must be secured from shifting within the
awning rail.
Open and close awning a few times to allow for natural
self adjustment of awning.
Measure in 2" from the edge of the awning and drill a
1/8" hole through the awning rail
(FIG. 12)(FIG. 12)
(FIG. 12)(FIG. 12)
(FIG. 12).
FIG. 11FIG. 11
FIG. 11FIG. 11
FIG. 11
FIG. 12FIG. 12
FIG. 12FIG. 12
FIG. 12
Secure by driving a #6 x 1/2" Tek screw through the rail
and into the hanger bead.
Repeat at other end.
11.11.
11.11.
11. Operate awning according to the Operating Instruc-
tions to check that all parts function properly.
12.12.
12.12.
12.
To Secure Awning for TravelTo Secure Awning for Travel
To Secure Awning for TravelTo Secure Awning for Travel
To Secure Awning for Travel
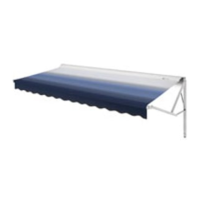
For added securing and rattle-free travel, tighten ad-
justment lock knob. Engage the travel latches, and
ensure the Safe-T-Lock™ is in the roll-up position.
(FIG. 13)(FIG. 13)
(FIG. 13)(FIG. 13)
(FIG. 13)
FIG. 13FIG. 13
FIG. 13FIG. 13
FIG. 13

 Loading...