15
DO937DV
www.domo-elektro.be
FR
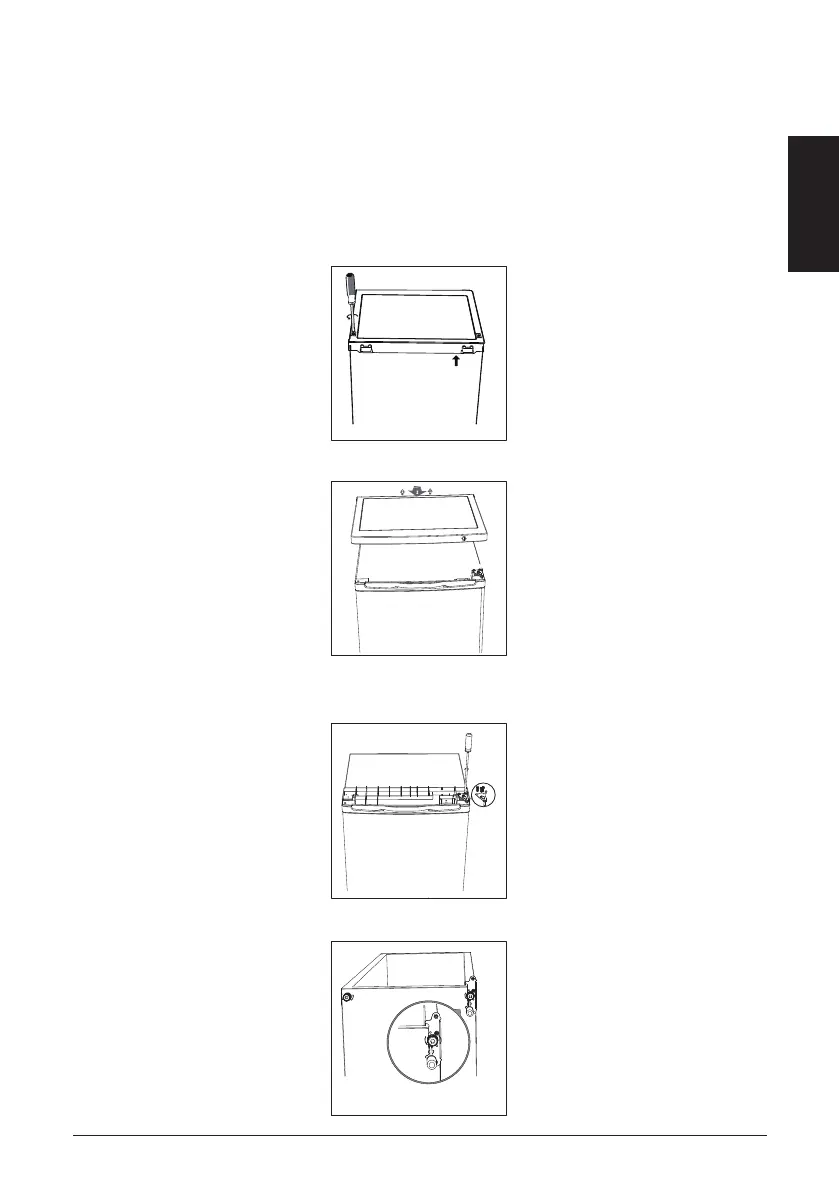
CHANGEMENT DU SENS D’OUVERTURE DE LA PORTE
La porte du congélateur est réversible. Si vous avez besoin de monter la porte du congélateur dans l’autre
sens, il est recommandé d’appeler votre agent d’entretien agréé pour eectuer cette inversion, ou de
demander à un technicien.
Avant d’inverser le sens d’ouverture de la porte, vous devez vous assurer que l’appareil est débranché et
vide.
1. Retirez les deux vis situées à l’arrière du couvercle supérieur.
Reverse Door
Tool required: Philips screwdriver, Flat bladed screwdriver, Hexagonal spanner.
Ensure the unit is unplugged and empty.
To take the door off, it is necessary to tilt the unit backwards. You should rest the unit on something solid
so that it will not slip during the door reversing process.
All parts removed must be saved to do the reinstallation of the door.
Do not lay the unit flat as this may damage the coolant system.
It' s better that 2 people handle the unit during assembly.
1. Remove two screws at rear side of top cover.
2. Remove top cover and thermostat knob, then place it aside.
3. Unscrew top hinge and then remove door and place it on a soft pad to
avoid scratch.
4. Unscrew bottom hinge. Then remove the adjustable feet from both
side.
7
unscrew
2. Retirez le couvercle supérieur du congélateur.
Reverse Door
Tool required: Philips screwdriver, Flat bladed screwdriver, Hexagonal spanner.
Ensure the unit is unplugged and empty.
To take the door off, it is necessary to tilt the unit backwards. You should rest the unit on something solid
so that it will not slip during the door reversing process.
All parts removed must be saved to do the reinstallation of the door.
Do not lay the unit flat as this may damage the coolant system.
It' s better that 2 people handle the unit during assembly.
1. Remove two screws at rear side of top cover.
2. Remove top cover and thermostat knob, then place it aside.
3. Unscrew top hinge and then remove door and place it on a soft pad to
avoid scratch.
4. Unscrew bottom hinge. Then remove the adjustable feet from both
side.
7
unscrew
3. Retirez les vis puis enlevez la charnière supérieure qui tient la porte en place. Enlevez la porte et
placez-la sur une surface rembourrée pour éviter qu’elle ne se raye.
Reverse Door
Tool required: Philips screwdriver, Flat bladed screwdriver, Hexagonal spanner.
Ensure the unit is unplugged and empty.
To take the door off, it is necessary to tilt the unit backwards. You should rest the unit on something solid
so that it will not slip during the door reversing process.
All parts removed must be saved to do the reinstallation of the door.
Do not lay the unit flat as this may damage the coolant system.
It' s better that 2 people handle the unit during assembly.
1. Remove two screws at rear side of top cover.
2. Remove top cover and thermostat knob, then place it aside.
3. Unscrew top hinge and then remove door and place it on a soft pad to
avoid scratch.
4. Unscrew bottom hinge. Then remove the adjustable feet from both
side.
7
unscrew
4. Retirez la vis du bas, le support de charnière et le pied réglable du bas de l’appareil.
Reverse Door
Tool required: Philips screwdriver, Flat bladed screwdriver, Hexagonal spanner.
Ensure the unit is unplugged and empty.
To take the door off, it is necessary to tilt the unit backwards. You should rest the unit on something solid
so that it will not slip during the door reversing process.
All parts removed must be saved to do the reinstallation of the door.
Do not lay the unit flat as this may damage the coolant system.
It' s better that 2 people handle the unit during assembly.
1. Remove two screws at rear side of top cover.
2. Remove top cover and thermostat knob, then place it aside.
3. Unscrew top hinge and then remove door and place it on a soft pad to
avoid scratch.
4. Unscrew bottom hinge. Then remove the adjustable feet from both
side.
7
unscrew