16
DO937DV
FR
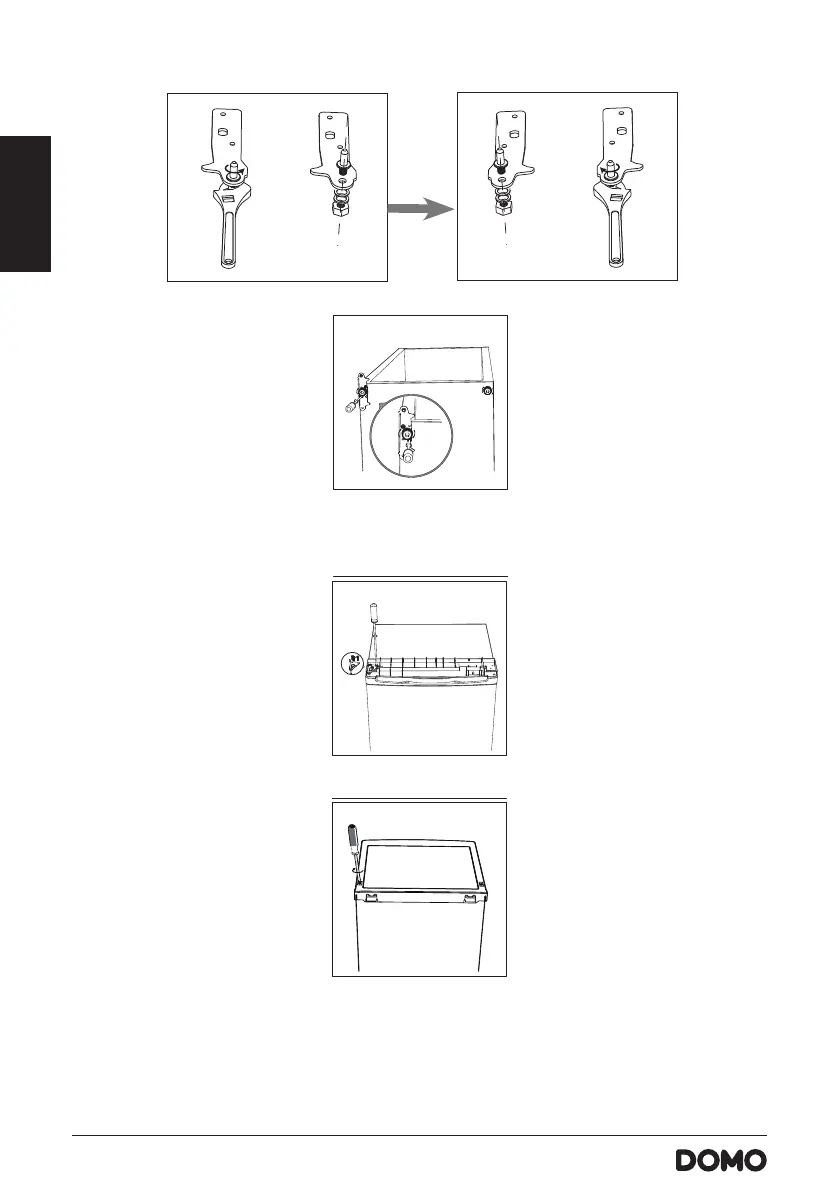
5. Détachez la goupille de la charnière-étrier. Retournez l’arceau, puis xez la goupille.
5. Unscrew and remove the bottom hinge pin, turn the bracket over and replace it.
6. Refit the bracket fitting the bottom hinge pin. Replace both adjustable
feet.
7. Place the door back on. Ensure the door is aligned horizontally and
vertically, so that the seals are closed on all sides before finally
tightening the top hinge.
8. Put the top cover and fix it with 2 screws on the back.
Unscrew
Screw
8
Reverse Door
9. Fix the thermostat knob.
screw
6. Fixez les vis, le support de charnière et le pied réglable sur le côté opposé. Sécurisez la xation sans
trop resserrer.
5. Unscrew and remove the bottom hinge pin, turn the bracket over and replace it.
6. Refit the bracket fitting the bottom hinge pin. Replace both adjustable
feet.
7. Place the door back on. Ensure the door is aligned horizontally and
vertically, so that the seals are closed on all sides before finally
tightening the top hinge.
8. Put the top cover and fix it with 2 screws on the back.
Unscrew
Screw
8
Reverse Door
9. Fix the thermostat knob.
screw
7. Remettez soigneusement la porte en place. Avant de resserrer la charnière upérieure, assurez-vous
que la porte est alignée horizontalement et verticalement de sorte que les joints soient scellés sur
tous les côtés. Insérez la charnière et vissez-la sur le haut.
5. Unscrew and remove the bottom hinge pin, turn the bracket over and replace it.
6. Refit the bracket fitting the bottom hinge pin. Replace both adjustable
feet.
7. Place the door back on. Ensure the door is aligned horizontally and
vertically, so that the seals are closed on all sides before finally
tightening the top hinge.
8. Put the top cover and fix it with 2 screws on the back.
Unscrew
Screw
8
Reverse Door
9. Fix the thermostat knob.
screw
8. Remettez le couvercle supérieur en place et xez-le de nouveau avec les vis.
5. Unscrew and remove the bottom hinge pin, turn the bracket over and replace it.
6. Refit the bracket fitting the bottom hinge pin. Replace both adjustable
feet.
7. Place the door back on. Ensure the door is aligned horizontally and
vertically, so that the seals are closed on all sides before finally
tightening the top hinge.
8. Put the top cover and fix it with 2 screws on the back.
Unscrew
Screw
8
Reverse Door
9. Fix the thermostat knob.
screw
DÉPLACEMENT DE VOTRE CONGÉLATEUR
· Si l’appareil est éteint pour une raison quelconque, attendez 10 minutes avant de le remettre en
marche. Cela permettra à la pression du système de réfrigération de s’égaliser.
· Éteignez l’appareil et débranchez le câble d’alimentation de la prise secteur Enlevez tous les aliments.
Enlevez également toutes les pièces mobiles (clayettes, accessoires, etc.) ou attachez-les dans le
réfrigérateur an d’éviter tout risque de choc.