5
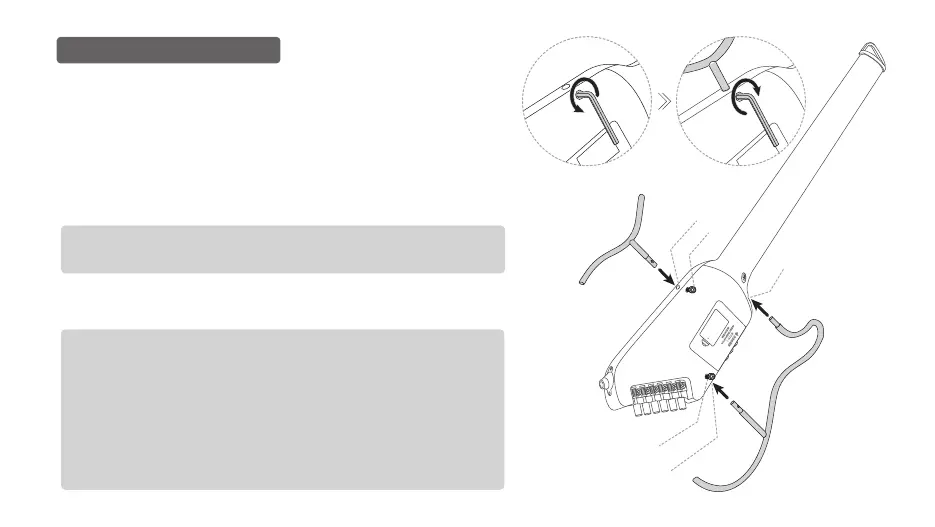
ASSEMBLE THE STAND
This stand is not assembled to the guitar body when shipping from the factory.
Step 1: Fully loosen [Stand attachment screw A] located in ① , and [Stand
attachment screw B] located in ③.
Step 2: At first, insert the lower rod of the left stand (the shorter one) fully into the
bracket hole ① on the Guitar’s main body. Next, insert the lower rod of the
right stand fully into the bracket hole ③ , and insert the upper rod fully into
the bracket hole ②.
Note:
● Make sure that upper and lower rods of the right stand are not reversed.
● Make sure do not press down the rod firmly or it may be damaged.
Step 3: After checking that both rods of the right and left stand are completely
installed, please turn the attachment screws clockwise and fix the both
stands to the Guitar’s main body.
Note:
● Please reverse the procedures of above steps if you need to disassemble
stands. Make sure disassemble upper rod firstly from guitar body and then
disassemble the lower rod.
● Make sure to check whether the screw A and B are tightened prior to use. The
instrument will sound noisy during the playing process when the screws are not
tightened completely.
● Please hold the guitar neck or guitar body when you carry the instrument. Hold
only the left stand or right stand to carry the instrument will result in the damage
of stands and fixed parts.
①
A
②
B