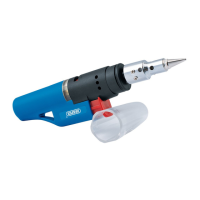
3. Refuelling
WARNING!Beforellingtheproduct,ALWAYS
ensurethatthecontrolleverisinitslowest
position.ONLYusebutanegastofueltheproduct.
Important: This product is not shipped with butane gas
and MUST be fuelled before use.
1 Fig.
(A)
1. Turn the soldering iron upside-down and push the
butane can nozzle rmly into the lling valve (A).
2. Filling begins automatically and takes only a few
seconds.
The fuel level can be viewed through the window (B)
beneath the control lever (C).
3. Allow a few minutes after lling for the gas in the
product to stabilise.
WARNING!Allowescapedgastodispersebefore
lighting the soldering iron. NEVER light the
product while a gas canister is inserted into the
llingvalve.
4. IgnitionandUse
WARNING! Keep your hands and face away from
thebarrelwhenignitingandoperatingthe
product.Gripthesolderingironbythehandleonly.
1. Fuel the product and allow the gas to settle.
2. Move the control lever (C) to the ON position to start
the fuel supply.
2 Fig.
(C)
(B)
3. Depress the ignition button (D) repeatedly until the
ame is lit.
3 Fig.
(D)
4. Adjust the size and temperature of the ame using
the control lever.
5. Allow approximately 30 seconds for the ame to
reach temperature, then direct the soldering tip
safely towards the workpiece.
6. Place the soldering tip against the appropriate area
of the workpiece and apply solder to the point of
contact as required.
Important: DO NOT apply excessive solder; use only
as much as is required for the connection.
7. To switch o the product, move the control lever
fully to the OFF position. Allow the soldering iron to
cool thoroughly.
– The clear lid (E) can be used as a stand while
cooling.
4 Fig.
(E)
Important: Avoid using the product in sideways or inverted
orientations as this may interrupt the ow of fuel to the
ame.
WARNING!ALWAYSensurethatthecontrollever
remainsintheopositionafteruse.Ifthefuel
supplyisre-engaged,residualheatcancause
reignitionwithoutoperatingtheignitionbutton.
Oncethetoolhascooled,followthenormal
ignition procedure to reignite.
 Loading...