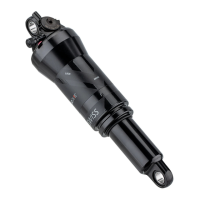
The DT Swiss R 232 ONE is a bicycle shock absorber, and this technical manual (V2021.10) provides comprehensive information for its maintenance and troubleshooting. It is designed for both experienced users performing minor service work and dealers.
Function Description:
The R 232 ONE is a rear shock absorber for bicycles, designed to provide damping and suspension. It features an air chamber for adjustable spring rate and a damping system to control rebound and lockout. The shock is available in both standard and trunnion mount configurations.
Important Technical Specifications:
The manual details the components of the air chamber seal kit, including:
- Support ring oil chamber tap: 33/39 x 1.4 mm
- Quadring oil chamber tab: 31.34 x 3.53 mm
- O-ring end cap / air chamber: 44.17 x 1.78 mm
- Quadring air chamber: 26.64 x 2.62 mm
- Guide band: 27.3/31.26 x 2.6 mm
- Wiper air chamber: 26.15/36.2 x 5 mm
The manual also lists specific tools and materials required for service, including:
- Service kit air chamber: CWKR232X30197S
- Grease: Buzzy's Slick Honey (4.7 dl: 40341000AD02000001 or 20 ml: TZXXXXXNSLICKS)
- Tool kit for dismounting DU pin: CWTXX10031935S
- Tool kit for dismounting DU bushing: CWTXX10031927S
- Tool kit for mounting DU bushing: CXTXX10031928S
- Thread locker: high-strength (for spherical bearings)
- Tool kit spherical bearings: CWTXX10028914S
Usage Features:
The shock is designed for use in bicycles, providing suspension and damping. Users can adjust the rebound and lockout settings. The manual emphasizes the importance of proper inflation and setup for optimal performance.
Maintenance Features:
The manual outlines detailed care and maintenance procedures, categorized into "Small Service" and "Full Service."
Care and Cleaning:
- Clean the shock with a damp cloth after each ride, removing dirt from the wiper seal area.
- Avoid aggressive cleaners, high-pressure cleaners, and greasing the wiper seal area.
- Lubricate the sliding surface of the remote lever on the handlebar after cleaning.
Service Intervals:
- Small Service:
- Intensive use: 40 operating hours
- Normal use: 100 operating hours
- Or as required (e.g., for leakage, unusual sounds, or other malfunctions)
- Full Service: Annually or after 200 operating hours
- Before and after each ride: Check for damage.
- Before each ride: Check fastening and functionality.
- After each ride: Clean with a soft sponge and suitable cleaning agent, especially around the wiper seal.
Small Service Procedures (detailed in the manual):
- Releasing the Air:
- Unscrew valve cap.
- Position shock with valve facing down, away from the body.
- Slowly press valve core or use a shock pump to reduce air pressure.
- If the shock fully compresses, reinflate and release air more slowly, or manually pull the shock apart to balance air chambers.
- Safety Note: Shock oil can be fatal if swallowed; always use a cloth and ensure the valve faces down. Risk of injury from pressurized components; ensure negative air chamber pressure is fully released before disassembly.
- Removing the Air Chamber:
- Remove the SAG O-ring.
- Clamp the shock vertically in a vice (using ground, aluminum, or plastic clamping jaws to prevent damage).
- Unscrew the air chamber by hand or with a strap wrench.
- Slide off the air chamber.
- Check for damping oil in the air chamber; if present, a full service is required.
- Remove the shock from the vice.
- Changing the Support Rings and Quadring:
- Remove both support rings and the quadring.
- Clean the oil chamber tap.
- Grease and fit the new quadring onto the oil chamber tap, ensuring it's not twisted or damaged.
- Fit two new support rings on both sides of the quadring.
- Checking the Air Chamber for Damages:
- Inspect the air chamber housing for scratches, wear, or cracks.
- Replace the housing if damaged.
- Replacing the Wiper Seal, Quadring, and Guide Band:
- Carefully remove the wiper seal using plastic forceps (do not reuse).
- Remove the guide band by hand (do not reuse).
- Clean the air chamber housing thoroughly.
- Slightly grease and install the new quad-ring into the inner groove, ensuring it's not twisted.
- Install a new guide band onto the web between the grooves.
- Slightly grease and install the new wiper seal into the outer groove, ensuring it lays evenly.
- Replacing the O-ring Between End Cap and Air Chamber:
- Standard Mount: Remove the O-ring from the end cap, then grease and install the new O-ring.
- Trunnion Mount: Remove the O-ring from the air chamber, then grease and install the new O-ring.
- Greasing the Inner Surface of the Air Chamber:
- Lightly grease the inside surface of the air chamber, the guide band, and the O-ring seat.
- Generously grease the wiper.
- Assembling the Air Chamber:
- Lightly grease the quadring, support rings, and oil chamber.
- Clamp the shock into the vice.
- Slide on the air chamber and tighten by hand, ensuring support rings are not twisted and the O-ring is not pinched. If hand tightening is difficult, mount the shock on the bike, compress it, and screw on the air chamber simultaneously.
- Remove the shock from the vice.
- Place the SAG O-ring onto the oil chamber.
Replacing DU Bushings (for shocks using DU bushings):
- Removing the Sleeves: Remove by hand.
- Testing the DU Bushings:
- Clamp the DU pin into a vice.
- Rotate the shock on the pin; if it rotates without resistance, replace DU bushings. If it rotates with resistance, the bushing is fine but should be checked again during the next small service.
- Mount sleeves again after testing.
- Removing the DU Pin:
- Slide the pusher into the DU pin.
- Align the receiver.
- Push out the DU pin using a press or bench vise.
- Removing the DU-Bushing:
- Slide the pusher into the DU bushing.
- Align the receiver.
- Push out the DU bushing using a press or bench vise.
- Mounting the DU Bushings:
- Slightly grease the inner surface of the shock eyelet and the outer surface of the bushing.
- Place the bushing onto the pusher.
- Position the bushing to the shock eyelet with the gap oriented 90° to the axis of movement.
- Align the receiver.
- Push in the bushing using a press or bench vise.
- Mounting the DU Pin:
- Slightly grease the inner surface of the DU bushing and the outer surface of the DU pin.
- Push in the DU pin by hand.
- Position the pin centrally by clamping it in the vice and turning the shock to push it to the center.
- Wait a few minutes and recheck the DU bushing; if it fails a second time, contact a DT Swiss service center.
- Mounting the Sleeves:
- Slightly grease the DU pin.
- Slide the sleeves onto the DU pin.
Replacing Spherical Bearings (for shocks using spherical bearings):
- Checking the Spherical Bearings:
- Check for play by hand; if it moves without resistance, replace it.
- Changing the Spherical Bearings:
- Insert the pin of the disassembly tool into one side of the spherical bearing.
- Push the counter sleeve onto the other side.
- Press out the spherical bearing using a press or vice.
- Clean the shock eyelet with degreaser and apply high-strength thread locker to the inner surface.
- Position the new spherical bearing in the shock eyelet so the plastic ring gap is offset by 90° to the axis of motion.
- Press in the new spherical bearing using the assembly tool.
- Remove excess threadlocker.
- Check if the spherical bearing is in the middle of the shock eyelet and recheck for play.
General Safety and Environmental Notes:
- All maintenance and assembly should be performed by a skilled professional.
- Only use original spare parts.
- Contact a DT Swiss Service Center if in doubt about your abilities or any issues.
- Warranty claims may be denied if work is not carried out properly.
- Dispose of all waste in an environmentally compatible manner.
- Only print the manual if electronic usage is not possible.
The manual provides clear illustrations for each step, ensuring users can follow the procedures accurately.