• 15 •
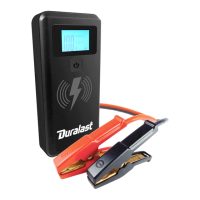
6. CARGAR EL ARRANCADOR
IMPORTANTE: CARGUE LA UNIDAD INMEDIATAMENTE DESPUES
DE COMPRARLA, DESPUES DE CADA USO Y CADA 30 DÍAS,
O CUANDO EL NIVEL DE CARGA CAE POR DEBAJO DEL 85%,
PARA MANTENER LA BATERÍA INTERNA COMPLETAMENTE
CARGADA Y PROLONGAR LA VIDA DE LA BATERÍA.
6.1 COMPROBACIÓN DEL NIVEL DE LA BATERÍA INTERNA
1. Presione el botón de pantalla. La pantalla LCD mostrará el porcentaje
de la carga de la batería. Una batería interna completamente cargada
leerá 100%. Cargue la batería interna si la pantalla muestra que está
bajo 85%.
2. 3DUDUHGXFLUHOULHVJRGHGHVFDUJDHOpFWULFDGHVFRQHFWHHOFDEOHGH
carga de la unidad desde un cargador USB o de pared antes de intentar
cualquier mantenimiento o limpieza. Simplemente apagar los controles
no reducirá este riesgo.
3. &XDQGRODFDUJDGHODEDWHUtDLQWHUQDWUDEDMDUHQXQiUHDELHQ
ventilada y no restringir la ventilación de ninguna manera.
6.2 CARGANDO LA BATERÍA INTERNA
NOTA: Utilice un cargador USB de 2A (no incluido) para recargar
rápidamente el arrancador.
1. Conecte el extremo
USB del cable de carga en el puerto de
HQWUDGD$FRQWLQXDFLyQFRQHFWHHOH[WUHPR86%GHOFDEOHGHFDUJDHQ
el puerto USB de un cargador.
2. Conectar el cargador a una toma de alimentación de CA o CC en vivo.
3. /DSDQWDOOD/&'VHLOXPLQDUiHOGtJLWRFRPHQ]DUiDSDUSDGHDU\
PRVWUDUi³,1´LQGLFDQGRTXHODFDUJDKDFRPHQ]DGR
4. El arrancador cargará completamente en 7-8 horas. Cuando la batería
LQWHUQDHVWiFRPSOHWDPHQWHFDUJDGDODSDQWDOODPRVWUDUi³´
5. &XDQGRODEDWHUtDHVWpFRPSOHWDPHQWHFDUJDGDGHVFRQHFWHHO
FDUJDGRUGHODWRPDGHFRUULHQWH\DFRQWLQXDFLyQUHWLUHHOFDEOHGH
carga del cargador y de la unidad.
6. &DUJXHODXQLGDGWDQSURQWRVHDSRVLEOHGHVSXpVGHXVDUVH
7. INSTRUCCIONES DE OPERACIÓN
7.1 ARRANCAR UN MOTOR DE VEHÍCULO
NOTA: Use el cable de arranque auxiliar modelo SA901.
IMPORTANTE: No utilice el arrancador mientras se carga su batería interna.
IMPORTANTE: Utilización de la función arranque del motor sin una batería
instalada en el vehículo dañará el sistema eléctrico del vehículo.
NOTA: La batería interna debe tener un cargo si al menos el 40%
para iniciar un vehículo.
1. Conecte el cable de las pinzas de la batería a la toma de salida del
arrancador.
2. 3RQJDORVFDEOHVGH&'OHMRVGHODVDVSDVGHOYHQWLODGRUEDQGDVSROHDV
u otras partes móviles. Asegúrese de que todos los aparatos eléctricos
del vehículo estén apagados.
NOTE: &ROGZHDWKHUPD\DIIHFWWKHSHUIRUPDQFHRIWKHMXPSVWDUWHU¶V
lithium battery. If you hear only a click and the engine does not turn
RYHUWU\WKHIROORZLQJ
With the jump starter connected to the car battery and the green LED
LOOXPLQDWHGRQWKHVPDUWFDEOHWXUQRQDOOOLJKWVDQGHOHFWULFDODFFHVVRULHVIRU
one minute. This draws current from the jump starter and warms the battery.
1RZWU\WRFUDQNWKHHQJLQH,ILWGRHVQRWWXUQRYHUUHSHDWWKHSURFHGXUH
Extremely cold weather may require two or three battery warmings before
the engine will start.
NOTE: ,IQRDFWLYLW\LVGHWHFWHGWKHVPDUWFDEOHZLOODXWRPDWLFDOO\VKXW
RIIDIWHUVHFRQGVDQGWKHUHGDQGJUHHQ/('VZLOOEHVROLG7RUHVHW
GLVFRQQHFWWKHFODPSVIURPWKHYHKLFOHEDWWHU\DQGWKHQUHFRQQHFW
IMPORTANT: DO NOT attempt to jump start your vehicle more
than three consecutive times. If the vehicle will not start after three
DWWHPSWVFRQVXOWDVHUYLFHWHFKQLFLDQ
7. $IWHUWKHHQJLQHVWDUWVXQSOXJWKHEDWWHU\FODPSVIURPWKHMXPS
starter socket and then disconnect the black clamp (-) and the red
FODPSLQWKDWRUGHU
8. Recharge the unit as soon as possible after each use.
7.2 CHARGING A MOBILE DEVICE, USING THE USB PORTS
The unit includes two USB output ports. The standard one provides
up to 2.4A at 5V DC.
7KHVHFRQGLVD86%)DVW&KDUJLQJSRUWZKLFK
SURYLGHVXSWR9DW$9DW$RU9DW$
1. Consult your mobile device manufacturer for proper charging power
VSHFL¿FDWLRQV&RQQHFWDPRELOHGHYLFHFDEOHWRWKHDSSURSULDWH86%SRUW
2. Charging should begin automatically. The display will show which port
is in use.
3. &KDUJLQJWLPHZLOOYDU\EDVHGRQWKHPRELOHGHYLFH¶VEDWWHU\VL]HDQG
the charging port used.
NOTE:
0RVWGHYLFHVZLOOFKDUJHZLWKDQ\RIWKH86%SRUWVEXWPD\
charge at a slower rate.
NOTE:
7KH86%)DVW&KDUJLQJSRUWUHTXLUHVDVSHFL¿FFKDUJLQJ
cable (not included).
4. :KHQ¿QLVKHGXVLQJWKH86%SRUWGLVFRQQHFWWKHFKDUJLQJFDEOHIURP
your mobile device and then disconnect the charging cable from the unit.
5. Recharge the unit as soon as possible after each use.
NOTE:
,IQR86%GHYLFHLVFRQQHFWHGSRZHUWRWKH86%SRUWVZLOO
automatically shut off after 30 seconds.
7.3 WIRELESS CHARGING (For Qi enabled devices)
The wireless charging pad provides 10W of power to quickly charge
your compatible mobile devices.
1. Consult your mobile device manufacturer to make sure your device
supports wireless charging. Place the compatible device face-up on top of
the charging pad.
2. Charging should begin automatically.
3. :KHQ¿QLVKHGFKDUJLQJUHPRYH\RXUPRELOHGHYLFH
4. Recharge the unit as soon as possible after each use.
 Loading...