Do you have a question about the Dyna-Glo DGA480SSP and is the answer not in the manual?
Critical safety warning regarding hazardous conditions and immediate actions to take.
Information about chemicals in the product known to cause cancer, birth defects, or reproductive harm in California.
Important precautions for safe operation, including use of fuel and lighting methods.
Warning about grill placement, clearance from combustible materials, and installation codes.
Precautions against storing flammables, using incompatible cylinders, moving hot grills, or altering the unit.
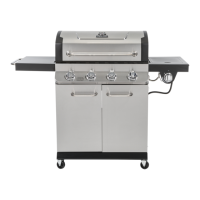
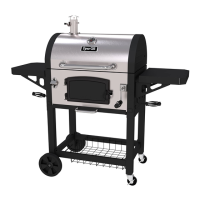
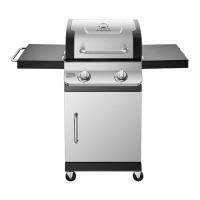
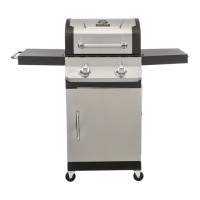
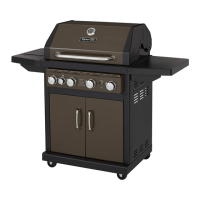
Lists all components included with the grill, along with their descriptions and quantities.
Details all screws, washers, and other small parts required for assembly, with quantities.
Secure the locking casters and standard casters to the bottom shelf using screws and washers.
Insert screws halfway into the bottom shelf, attach side panels via keyholes, and thread screws snug.
Slide rear panel over screws and secure to bottom shelf.
Attach upper door brace to side panels using screws.
Insert door handle sleeves into door assemblies, then attach handles using screws.
Align door assemblies with cart body hinge holes and secure with screws.
Slip control knobs onto valve stems; attach lid handle to lid using screws and bezels.
Lock casters, place grill body onto cart side panel tabs, align holes, and secure with screws.
Attach side burner assembly to grill body using screws, align tubing, and secure orifice.
Attach right shelf assembly to grill body using screws and tighten.
Place heat tents on brackets above burners; place cooking grates and warming rack.
Slide grease pan into grill body rails; slide grease cup onto grease pan rails.
Remove igniter cap, insert AA battery with positive end out, and replace cap.
Open cart doors, insert cylinder, align hand screw coupling, and tighten tank screw.
Use a soap and water solution to check all gas connections and fittings for leaks before lighting the grill.
Prepare leak test solution, ensure knobs are off, open tank valve, and spray solution on connections.
Ensure cylinder meets specifications and is equipped with an overfilling prevention device.
Close tank knob, ensure control knobs are off, remove cap, insert nipple, hand-tighten coupling nut.
Check knobs are off, open tank valve, open lid, push igniter and turn control knob to HIGH.
Use match holder, light match, insert through hole, press control knob to HIGH.
Turn control knobs to OFF, close tank valve, close lid, turn off LP supply at cylinder when not in use.
Burn-off grates after use, then clean with wire brush. Handle porcelain grates with care to avoid chipping.
Use mild dish soap, warm water, nylon pad, wire brush. Do not use acid, mineral spirits, or abrasive cleaners.
Clean outside surfaces, inside bottom pan, heat tents, and grease cup regularly with mild soap and water.
Flame should be blue-yellow, 1-2 inches high. View through match lighting hole.
Ensure gas is off, disconnect tank, remove racks/tents, remove cotter pins, slide burners out, detach ignition wire.
Turn gas off, disconnect cylinder, remove parts, detach burner, clean ports, check for damage and debris.
Ensure orifices are positioned correctly in burner inlet (venturi). Use flashlight to check position.
Annual service by qualified person, check area for combustibles, ventilation, cylinder enclosure, and clean tubes for insects.
Diagnose and fix issues with the igniter: check electrode, wires, battery, or replace faulty parts.
Resolve low heat issues by checking cylinder valve, burner valves, and proper LP gas flow sequence.
Troubleshoot match lighting failures: ensure match reaches burners, check tank, coupling, and burner inlet.
Address no gas flow problems: verify tank valve, fuel level, regulator coupling, and clean burner inlet.
Reduce excessive flare-ups by cleaning components, trimming fat, using appropriate marinades, and adjusting temperature.
Warrants against broken/damaged parts for 1 year. Excludes neglect, abuse, modifications. No labor coverage.
Visual representation of all grill components with corresponding part numbers for reference.
Detailed list of all parts, their descriptions, and corresponding part numbers for ordering replacements.
Continues the detailed list of grill components, descriptions, and part numbers.