- 4 -
©2018 ECHO Incorporated. All Rights Reserved
X7672053800
3. Insert locking tool, allen wrench, or screwdriver,
(E), into gear case. Turn head counterclockwise
to tighten. Remove locking tool, allen wrench, or
screwdriver.
E
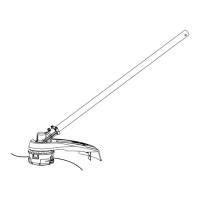
Procedure – Ryobi Straight Shaft Trimmers
1. Identify the correct trimmer in the Application Fit-
up Chart, see pages 5-6. Locate and record the
RL REF#.
2. Remove the existing trimmer head. Do not
remove the upper xing plate from the gear case.
3. Ryobi models with a at xing plate (main image)
will use an adapter (D), models with step down
(Image –1a) will use washer (C) and no adapter.
Install as shown:
A - Gear case
B - Rapid-Loader Trimmer Head
C - RL42 – 3/8 x 1 3/8”. silver fender washer
D - 8mm triangle adapter
E - RL70 – M8 x 1.25 blue left-hand nut
C
A
D
E
or
4. Insert locking tool, allen wrench, or screwdriver,
(F), into gear case. Turn head counterclockwise
to tighten. Remove locking tool, allen wrench, or
screwdriver.
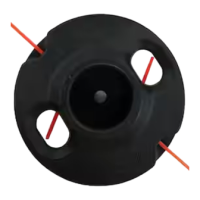
Inserting Trimmer Line
Insert one piece of trimmer line through eyelet on
each side of head. Route line as shown.
Accepts line diameter 0.080 - 0.130 in.
Removing Trimmer Line
Pull line out of head in direction shown:
For Additional Fit-Up Information
Please visit the Product Support section at
www.echo-usa.com.
Step down
 Loading...