EasyManua.ls Logo

Eclipse POWERSHADE MH005 - User Manual

Eclipse POWERSHADE MH005
2 pages
Print Icon
To Next Page IconTo Next Page
Loading...
SINGLE
CHANNEL
REMOTE
PROGRAMMING INSTRUCTIONS
FOR MH005
MULTI
CHANNEL
REMOTE
FRONT
INITIAL SET UP
LINK REMOTE TO MOTOR
1. To start you will need an installed motorised
blind, remote control and push pin/paper clip/
pen. For installation, please follow Powershade
Assembly Instructions.
2. Makesurewhenttingtheblindintothe
brackets that the motor with SET button
&chargeportarefacingdownwards(towardsyou).
3. Resetthemotorbypressingandholdingthe
SET button on the motor for approx
8 SECONDS until the motor BEEPS (SLOW & FAST).
4. Ifusingamulti-channelremotecontrol,selectthedesiredchannel.Usethebuttons
toselectchannel.Ifnotusingmulti-channelremote,continuetostep6.
5. Tolinktheremotecontroltothemotor,rstpressandholdtheSET button on the motor until
the motor BEEPS (SLOWLY).
6. Press “C” on the back of remote control while the motor IS BEEPING. The motor will beep fast
to indicate the remote control is linked to the motor.
BACK
UP DOWN LEFT RIGHTSTOP
C
L
7. Checkwhetherthemotoristurninginthecorrectdirection.Todothis,pressthebutton
on the remote control. If the blind moves down, the motor direction does not need to be
adjusted.Ifpressingthebuttonraisestheblind,youneedtoadjustthemotordirection.
8. Tochangethemotordirection:pressandholdboth“L” and button (TIP: Press “L” button
onthebackoftheremoterst). The motor will BEEPS FASTtoconrmchange.Check
theblindisnowmovinginthecorrectdirectionforthearrows.Ifnot,pleaserepeatstep8.
CHANGING MOTOR DIRECTION
SET BLIND LOWER LEVEL
9. Press and hold “L” on the back of the remote control until the motor BEEPS FAST.
The motor is now in LEVEL SETTING MODE.
10. Pressthebuttonontheremotecontrol.Theblindwillbegintolower.
11.Whentheblindisnearingthepreferredlowerlevel,pressthebuttonontheremotecontrol.
12. Press buttons to accurately position the lower level.
13. When the blind has reached the correct position, press “C” on the back of remote control.
14. The motor will BEEP FASTtoconrmlevelpositionisset.Thisconcludesthelowerlevel
settingbutthemotorisstillinLEVEL SETTING MODE.
SET
Question and Answer IconNeed help?

Do you have a question about the Eclipse POWERSHADE MH005 and is the answer not in the manual?

Summary

Initial Setup and Motor Reset

Blind Bracket and Motor Orientation

Ensure motor with SET button and charge port face downwards during bracket fitting.

Motor Reset Procedure

Hold the SET button on the motor for approximately 8 seconds until it beeps.

Linking Remote Control to Motor

Channel Selection (Multi-channel Remote)

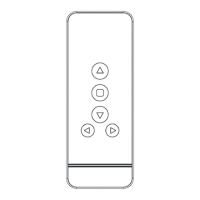
Select the desired channel using directional buttons if using a multi-channel remote.

Remote Pairing Procedure

Hold SET on motor until it beeps slowly, then press 'C' on remote; motor beeps fast.

Motor Direction Adjustment

Verify Motor Direction

Press a remote button to check if the blind moves in the correct direction.

Reverse Motor Rotation

Hold 'L' and a directional button on the remote to reverse the motor's turning direction.

Setting Blind Limit Positions

Enter Lower Level Setting Mode

Press and hold 'L' on the remote until the motor beeps fast to enter level setting mode.

Set Lower Limit Position

Lower blind, stop, fine-tune, and press 'C' on remote to save the lower level.

Set Upper Limit Position

Raise blind, stop, fine-tune, and press 'C' on remote to save the upper level.

Set Mid Level Position

Move blind to desired position, hold 'L' and directional button to save mid level.

Grouping Blinds

Prepare Blinds for Grouping

Program each blind individually (steps 1-22) before grouping.

Link Grouped Blinds to Remote

Hold SET on motor to break links, then re-link to desired remote channel.

Operate Grouped Blinds

Use directional buttons on the remote to operate all grouped blinds simultaneously.

Overview

This document outlines the programming instructions for the Powershade motorised blind, model MH005. It covers initial setup, linking the remote control to the motor, adjusting motor direction, setting lower, upper, and mid-level positions, and grouping multiple blinds.

Function Description:

The Powershade MH005 is a motorised blind system designed for automated window covering. It operates with a remote control, allowing users to raise, lower, and stop the blind at desired positions. The system supports both single and multi-channel remote controls, enabling individual or group control of multiple blinds. The motor features a "SET" button for programming and a charge port for power. The programming process involves a series of button presses on both the motor and the remote control, often accompanied by audible beeps from the motor to confirm actions.

Important Technical Specifications (Inferred):

  • Model: MH005
  • Control Type: Remote control (single or multi-channel)
  • Motor Features: Integrated "SET" button, charge port
  • Feedback Mechanism: Audible beeps (slow, fast) from the motor to indicate programming status and confirmation.
  • Grouping Capability: Supports grouping of multiple blinds (recommended maximum of 5 blinds per channel).
  • Power Source: Motorised, likely battery-operated given the charge port, though specific voltage/battery type is not detailed.

Usage Features:

Initial Setup:

  1. Required Tools: Installed motorised blind, remote control, and a small pointed object (push pin/paper clip/pen) for pressing the SET button.
  2. Motor Orientation: Ensure the motor's SET button and charge port face downwards (towards the user) when installed in the brackets.
  3. Motor Reset: Press and hold the SET button on the motor for approximately 8 seconds until the motor beeps (slow and fast).

Linking Remote to Motor:

  1. Channel Selection (Multi-channel remote only): Use the left/right arrow buttons on the multi-channel remote to select the desired channel.
  2. Initiate Linking: Press and hold the SET button on the motor until it beeps slowly.
  3. Confirm Link: While the motor is beeping, press the "C" button on the back of the remote control. The motor will beep fast to confirm the link.

Changing Motor Direction:

  1. Direction Check: Press the down arrow button on the remote. If the blind moves down, the direction is correct. If it raises the blind, the direction needs adjustment.
  2. Reverse Direction: Press and hold both the "L" button (on the back of the remote) and the down arrow button simultaneously. (Tip: Press "L" first). The motor will beep fast to confirm the change. Re-check the direction.

Setting Blind Lower Level:

  1. Enter Level Setting Mode: Press and hold the "L" button on the back of the remote until the motor beeps fast. The motor is now in LEVEL SETTING MODE.
  2. Initiate Lowering: Press the down arrow button on the remote. The blind will begin to lower.
  3. Stop at Desired Level: When the blind nears the preferred lower level, press the stop button on the remote.
  4. Fine-tune Position: Use the up/down arrow buttons to accurately position the blind.
  5. Confirm Lower Level: Once the blind is in the correct position, press the "C" button on the back of the remote. The motor will beep fast to confirm the lower level is set. The motor remains in LEVEL SETTING MODE.

Setting Blind Upper Level:

  1. Initiate Raising: Press the up arrow button on the remote. The blind will begin to rise.
  2. Stop at Desired Level: When the blind nears the preferred upper level, press the stop button on the remote.
  3. Fine-tune Position: Use the up/down arrow buttons to accurately position the blind.
  4. Confirm Upper Level: Once the blind is in the correct position, press the "C" button on the back of the remote. The motor will beep fast to confirm the upper level is set. The motor will now exit LEVEL SETTING MODE.

Setting Mid Level:

  1. Position Blind: Run the blind to the desired mid-level position using the up/down/stop buttons on the remote.
  2. Set Mid Level: Press and hold both the "L" button (on the back of the remote) and the up arrow button simultaneously until the motor beeps fast. (Tip: Press "L" first). The mid-level position is now set.
  3. Cycle to Mid Level: When the blind is at either the upper or lower level positions, pressing the stop button will cycle it to the mid-level position.

Grouping Multiple Blinds:

  1. Individual Programming: Each blind intended for grouping must first be programmed individually (steps 1-22), including setting its limits.
  2. Break Existing Link (for each blind to be grouped): Press and hold the SET button on the motor until it beeps (slow and fast). This breaks any existing remote link but retains programmed limits.
  3. Select Channel (Multi-channel remote only): Choose the desired channel on the multi-channel remote. (Skip for single-channel remotes).
  4. Initiate Linking (for each blind): Press and hold the SET button on the motor until it beeps slowly.
  5. Confirm Link (for each blind): Press the "C" button on the back of the remote to link it to the motor.
  6. Repeat: Repeat steps 24-27 for all remaining blinds to be grouped.
  7. Group Operation: Once grouped, using the up/down/stop buttons on the remote will operate all selected blinds simultaneously, while retaining their individual limit presets.

Maintenance Features (Inferred):

  • Charge Port: The presence of a charge port indicates the motor is rechargeable, implying a need for periodic charging. Specific charging instructions or battery life are not detailed in this document.
  • Reset Functionality: The motor reset feature (holding SET button for 8 seconds) can be used to clear programming, which might be useful for troubleshooting or re-programming.
  • Retained Limits: When breaking a remote link for grouping, the programmed upper and lower limits are retained, simplifying the grouping process as limits do not need to be re-set.

Eclipse POWERSHADE MH005 Specifications

General IconGeneral
BrandEclipse
ModelPOWERSHADE MH005
CategoryWindow Blinds
LanguageEnglish

Related product manuals