Printed in USA
© 2001
Page 5
E-SS20/16A-I-0801
100 Thomas Johnson Drive, Frederick, MD 21702-4600 USA
Phone (301) 663-1600 • 1-800-638-3326
Fax (301) 663-1607 • 1-800-447-3326
Website: www.edcoinc.com • Email: sales@edcoinc.com
Operating Instructions
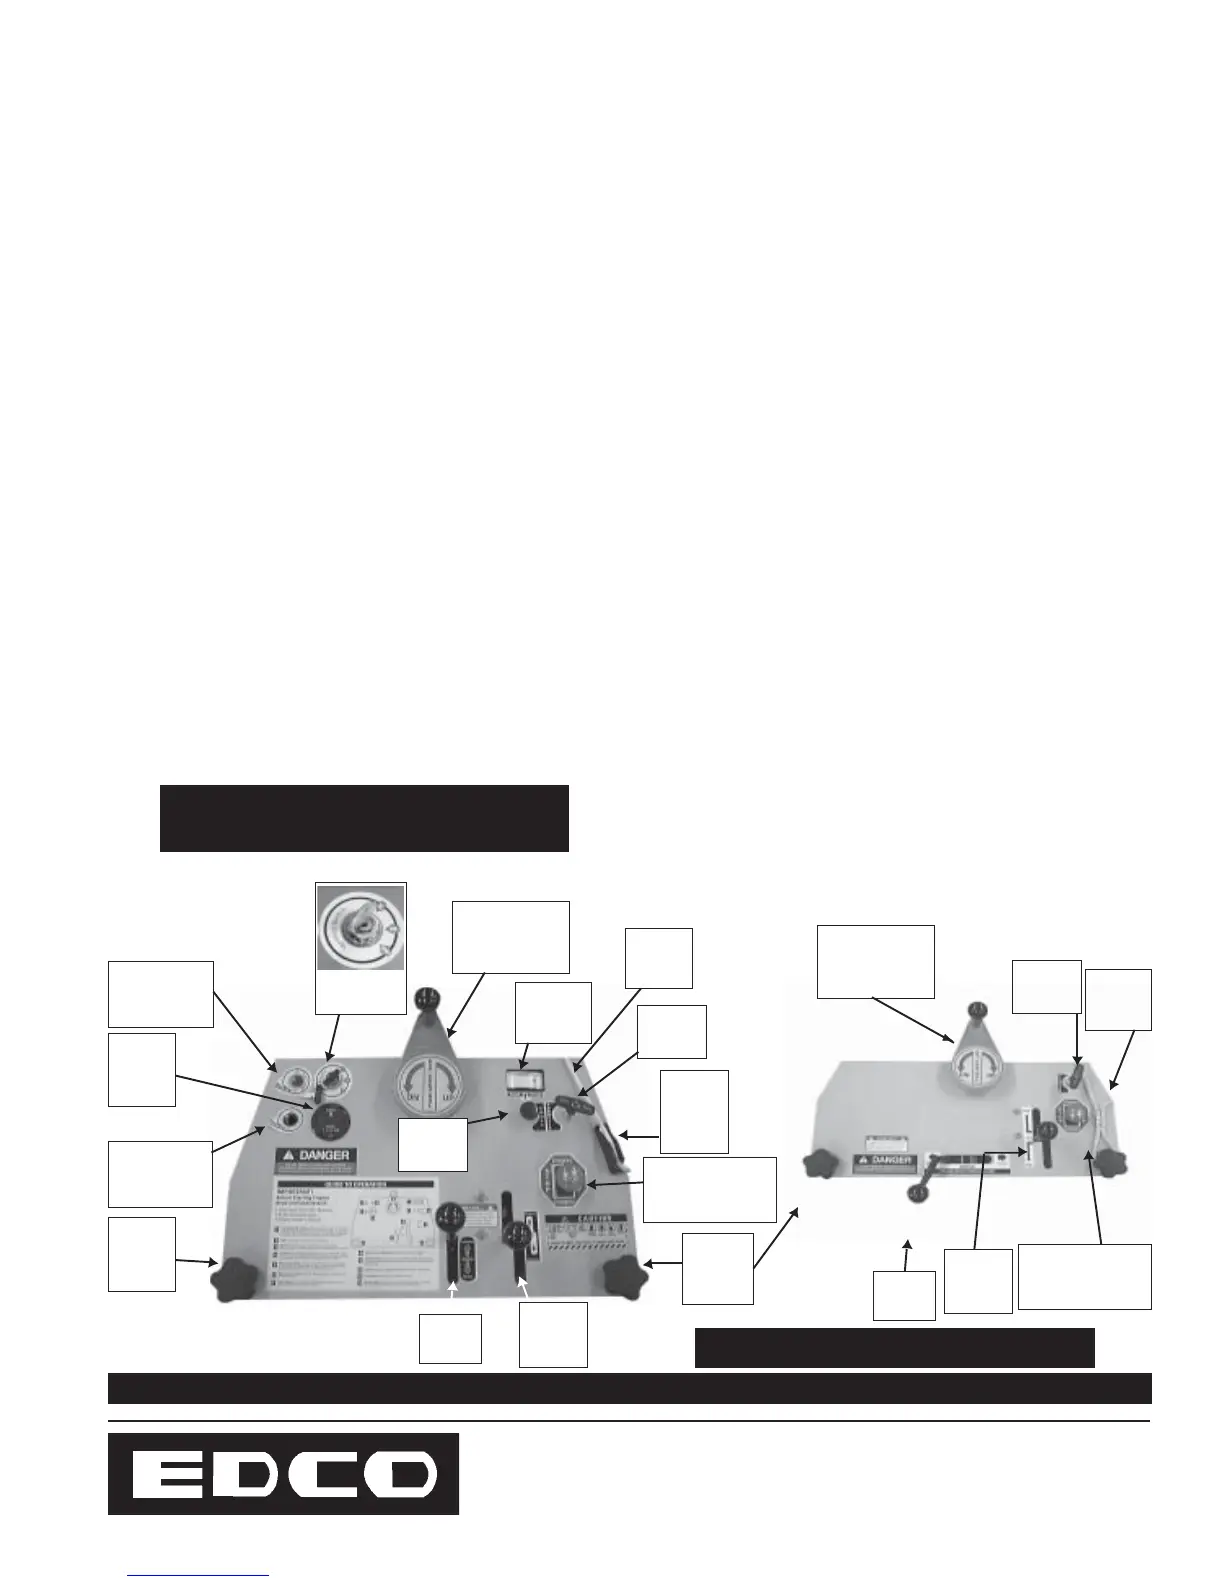
6 - Water Pump Switch: (Optional) Activates pump to pull
water from an external tank when city water source is not
convenient or available. *
7 - Depth Gauge: Provides readout of blade depth. *
8 - Depth Control Handwheel: Raises and lowers the blade.
9 - Speed Control: Controls saw speed in FWD and REV. This
EDCO saw is equipped with a Hydrostatic Transmission,
which permits infinite speed control. (Actual cutting speed is
limited by the saw blade and cutting conditions).
10 - Clutch: Pull back to engage DRIVE. Push forward to
release drive wheels (Freewheel) SS-20. Push right to engage
DRIVE. Push to left to release drive wheels, SS-16A only.
11 - Hour Meter: Gives readout of engine run-time. One
suggested use for this meter is to keep track of scheduled
maintenance. (See page 11)
12 - Handle Locks: Loosen knobs to adjust handle position.
Be sure to securely retighten the knobs once handles are
positioned. Adjust before starting saw for operator comfort and
safe operation.
13 - Guide Rope: Provides raising and lowering of cutting
guide.
14 - Guide Rope Cleat: Locks Guide Rope during transit or
storage. *
1 - Emergency Stop (E-Stop): PUSH to shut off the engine in
an emergency. Before operation, be sure the E-Stop is reset by
lifting the knob. CAUTION: Do not use the E-Stop as an ON/
OFF switch in place of the ignition. If the ignition is left on, it will
drain the battery.
2 - Choke: Use to aid cold weather engine starting. Follow the
instructions in the Engine Owner’s Manual. *
3 - Ignition Switch: Turn key to START position. Once engine
starts, leave in RUN position. Shut off Ignition Switch between
uses. As a safety precaution, remove key when not in use. *
4 - Throttle: Turn COUNTER CLOCKWISE to unlock. PULL
UP to increase engine RPM, PUSH DOWN to decrease. Turn
CLOCKWISE to lock cable in position once desired engine
speed is reached.
5 - Blade Saver Switch: Must be in the DRY position or
engine will not start. The purpose of the Blade Saver is to stop
the engine if water pressure drops. If using a WET CUT
Blade, open the water valve and select the WET position
after
starting the engine and before starting to cut. *
Figure 2
6
Water Pump
Switch
12
Handle
Locks
3
Ignition
5
Blade Saver
Switch
1
Emergency Stop
(E-Stop)
10
Clutch
9
Speed
Control
1
Emergency Stop
(E-Stop)
10
Clutch
7
Depth
Gauge
12
Handle
Locks
4
Throttle
8
Depth Control
Handwheel
11
Hour
Meter
2
Choke
9
Speed
Control
13
Guide
Rope
8
Depth Control
Handwheel
13
Guide
Rope
4
Throttle
14
Guide
Rope
Cleat
Note: Numbers coincide with the Guide To
Operation label on the SS-20 machine only.
Note: * Not available on SS-16A console.
 Loading...