A705-40-880 Issue B
Page 44 © Edwards Limited 2011. All rights reserved.
Edwards and the Edwards logo are trademarks of Edwards Limited.
Maintenance
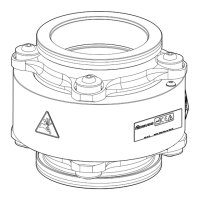
Figure 8 - Exploded view of an oil-level sight-glass
5.9.4 Refit the bearing caps and bearing cover
1. Refer to Figure 9. Refit the bearing cap (7) with a new bearing cap O-ring (8) on the drive rotor shaft. Apply a
suitable thread sealant (for example, Loctite Screwlok 242 or equivalent) to each of the three bearing cap
retaining bolts (6) and refit the bolts to secure the bearing cap.
2. Repeat Step 1 to refit the bearing cap (12) on the driven rotor shaft.
3. Apply a light wipe of vacuum grease to the new bearing cover O-ring (14) and the water jacket O-ring (11), then
place them in position on the high-vacuum head-plate.
4. Refit the bearing cover (5) to the high vacuum head-plate and secure with the ten bolts and spring washers (15).
5. Secure the snap-switch to the support bracket with the two M6 screws (4) and nuts (1).
6. Refer to Figure 3. Turn the coolant filler cap (1) clockwise to tighten it.
7. Dispose of the old grease safely: refer to Section 6.2.
5.9.5 Leak test the pump
If your pump is part of an ATEX system, you must leak test the pump after re-fitting the valve to the pump. If you
fail to do so, the ATEX certification of your system will be invalid.
1. Gearbox
2. Compression ring
3. O-ring
4. Sight-glass
5. O-ring
6. Bezel
7. Screw (4 off)

 Loading...
