DESCRIPTION
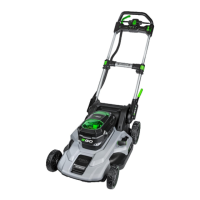
KNOW YOUR MOWER (Fig. A & B & C & D)
1. Handle
2. Safety Key Slot
3. Bail Switch (Switch Lever)
4. Handle Locking Clamp
5. Rear Discharge Door
6. Rear Storage Handle
7. Battery Pack Cover
8. LED Work Lights
9. Front Storage Handle
10. Front Wheel
11. Mower Deck
12. Rear Wheel
13. Cutting Height Adjustment Lever
14. Grass Bag
15. Quick Adjust Lever
16. Side Rail
17. Support for Stand-up Storage
18. Trailing Shield
19. Battery-release Button
20. Power Indicator on the Mower
21. Switch Button for LED Work Lights
22. Side Discharge Chute
23. Mulching Insert
OPERATION
WARNING: To prevent accidental starting that could
cause serious personal injury, always remove the safety key
and the battery pack from the tool when assembling parts.
ASSEMBLING THE GRASS BAG
1) Slide the grass bag onto the frame (Fig. E).
2) Assemble the top clips to the frame (Fig. F), then
assemble the two side clips. Assemble the bottom
clip last.
3) The completely assembled grass bag is shown in Fig. G.
NOTICE: Under normal usage, bag material is subject to
wear. To reduce the risk of injury, frequently inspect the
bag assembly and replace if there are any signs of wear
or deterioration. Use only grass bags manufactured for
this mower.
ADJUSTING THE FOLDABLE HANDLE
WARNING: Do not attempt to start the mower until
the handle has been locked at one of the two preset
operating positions (UPPER OPERATING POSITION or
LOWER OPERATION POSITION).
Your mower is shipped with the handle in the compact,
LOCKED STORAGE POSITION (Fig. H).
1) Press and hold the quick-adjust lever to release the
handle from the LOCKED STORAGE POSITION
(Fig. I-1).
2) Lift the handle from its folded position, then release
the lever.Gently pivot the handle upward until you hear
and feel the lock pin engage in one of the the different
positions as shown in the Fig. I.
◾ GRASS BAG ATTACHMENT/REMOVAL POSITION (Fig. I-2).
◾ UPPER OPERATING POSITION (Fig. I-3).
◾ LOWER OPERATING POSITION (Fig. I-4).
ATTACHING/REMOVING THE GRASS BAG/
MULCHING INSERT/ SIDE DISCHARGE CHUTE
WARNING: Do not at any time make any adjustment
to the lawn mower without rst stopping the motor and
removing the safety key.
NOTICE: Attach any of the attachments to the lawn
mower before mowing.
◾ To Attach/Remove the Grass Bag (Fig. J)
NOTICE: Remove the pre-installed mulching insert in
the mower before attaching the grass bag to the mower.
◾ To Attach/Remove the Mulching Insert (Fig. K)
◾ To Attach/Remove the Side Discharge Chute (Fig. L)
ADJUSTING THE CUTTING HEIGHT (Fig. M)
WARNING: Keep your feet away from the deck when
adjusting its height. The mower can be set to 5 cutting
heights between 25mm and 80mm. Choose the proper
cutting height according to the types and conditions of
the grass.
NOTICE: When moving the tool, make sure the cutting
height is adjusted at the position of 3 or higher. Failure to
do so, could result in the damage of the blade.