GB
- 16 -
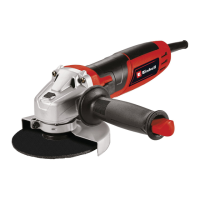
5.1 Fitting the additional handle (Fig. 2)
•
The angle grinder must not be used without
the additional handle (3).
•
The additional handle can be secured in any
of 2 positions (A, B).
Tool side Suitable for
Left (position A / as
shown)
Right-handed users
Right (position B) Left-handed users
5.2 Setting the guard (Fig. 3)
Warning!
•
Switch off the tool. Pull the power plug.
•
Adjust the guard (4) to protect your hands
so that the material being ground is directed
away from your body.
•
The position of the guard (4) can be adjusted
to any specific working conditions. Undo the
screw (a) and turn the cover (4) into the requi-
red position.
•
Ensure that the guard (4) correctly covers the
gear wheel casing.
•
Retighten the screw (a).
•
Ensure that the guard (4) is secure.
Take care that the safety device is secure.
Never use the angle grinder without the
guard.
5.3 Fitting/removing the cutting wheel guard
(Fig. 4-6 / Item 6)
•
The angle grinder is equipped with a remo-
vable cutting wheel guard (6).
•
The guard (4) does not need to be replaced
in order for you to fit the cutting wheel guard.
•
Beginning from the end with the lug (Fig. 4/
Item f), push the removable cutting wheel gu-
ard (6) onto the guard.
•
Make sure when doing so that the guard (4)
lies between the guide ribs (g) of the remo-
vable cutting wheel guard (Fig. 4).
•
Then push the removable cutting wheel guard
counter-clockwise onto the guard until you
hear this guard latch in place (Fig. 5a-5c).
•
To take off the removable cutting wheel guard
(6) again, press the lug (f) slightly away from
the guard (4) as shown in Fig. 6 until you can
rotate the removable cutting wheel guard (6).
Now turn the cutting wheel guard clockwise
and off the guard (4).
5.4 Test run for new grinding Wheels
Allow the right-angle grinder to run in idle for at
least 1 minute with the grinding or cutting wheel
fi tted in place. Vibrating wheels are to be replaced
immediately.
6. Operation
6.1 Switch (Fig. 7)
The angle grinder comes with a safety switch
which is designed to prevent accidents. To switch
on, press down the On/Off switch (2) at the back,
push it forwards and then press it down at the
front. To switch off the angle grinder, depress the
On/Off switch (2) at the back. The On/Off switch
(2) will jump back into its starting position.
Restart safeguard
If the mains power supply is interrupted when the
switch is locked in the On position, the electric
tool will not run after the power supply is restored.
For the equipment to run, the switch must be tur-
ned off and then on again.
Wait until the machine has reached its top
speed. You can then position the angle grin-
der on the workpiece and machine it.
6.2 Changing the grinding wheels (Fig. 8)
Use the face spanner (5) supplied to change the
grinding wheels. The face spanner (5) is stored in
the additional handle (3). Pull the face spanner (5)
out of the additional handle (3) when you need it.
Important! For safety reasons, the angle grinder
must not be operated with the face spanner (5)
inserted in it.
Warning!
Pull out the power plug.
•
Simple wheel change by spindle lock:
•
Press the spindle lock and allow the grinding
wheel to latch in place.
•
Open the flange nut with the face spanner.
•
(Fig. 8)
•
Change the grinding or cutting wheel and
tighten the flange nut with the face spanner.
Notice!
Only ever press the spindle lock when the
motor and grinding spindle are at a stand-
still! You must keep the spindle lock pressed
while you change the wheel!
Anl_TC_AG_125_850_Kit_SPK13.indb 16Anl_TC_AG_125_850_Kit_SPK13.indb 16 24.08.2023 09:41:3724.08.2023 09:41:37
 Loading...