GBGB
- 21 -
2. Layout and items supplied
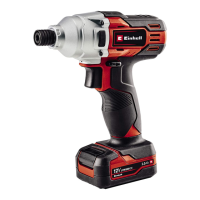
2.1 Layout (Fig. 1)
1. Torque selector
2. Changeover switch
3. ON/OFF switch
4. Battery pack
5. Pushlock button
6. Selector switch for 1st gear to 2nd gear
7. Quick-change drill chuck
8. Battery charger
9. LED light
2.2 Items supplied
Please check that the article is complete as spe-
cied in the scope of delivery. If parts are missing,
please contact our service center or the nearest
branch of the DIY store where you made your
purchase at the latest within 5 work days after
purchasing the article and upon presentation of
a valid bill of purchase. Also, refer to the warranty
table in the warranty provisions at the end of the
operating instructions.
•
Open the packaging and take out the equip-
ment with care.
•
Remove the packaging material and any
packaging and/or transportation braces (if
available).
•
Check to see if all items are supplied.
•
Inspect the equipment and accessories for
transport damage.
•
If possible, please keep the packaging until
the end of the guarantee period.
Important!
The equipment and packaging material are
not toys. Do not let children play with plastic
bags, foils or small parts. There is a danger of
swallowing or suocating!
•
Cordless drill/screwdrivers
•
Battery charger Bi-volt
•
Battery pack
•
Original operating instructions
3. Proper use
The cordless drill/screwdriver is designed for tigh-
tening and undoing screws, as well as for drilling
in wood, metal and plastic.
The equipment is to be used only for its pre-
scribed purpose. Any other use is deemed to be
a case of misuse. The user / operator and not the
manufacturer will be liable for any damage or inju-
ries of any kind caused as a result of this.
Please note that our equipment has not been de-
signed for use in commercial, trade or industrial
applications. Our warranty will be voided if the
machine is used in commercial, trade or industrial
businesses or for equivalent purposes.
4. Technical data
See waranty card of your country.
Sound and vibration
Sound and vibration values were measured in
accordance with EN 62841.
Wear ear-mus.
The impact of noise can cause damage to
hearing.
Total vibration values (vector sum of three direc-
tions) determined in accordance with EN 62841.
Warning!
The specied vibration value was established in
accordance with a standardized testing method. It
may change according to how the electric equip-
ment is used and may exceed the specied value
in exceptional circumstances.
The specied vibration value can be used to
compare the equipment with other electric power
tools.
The specied vibration value can be used for initi-
al assessment of a harmful eect.
Keep the noise emissions and vibrations to a
minimum.
•
Only use appliances which are in perfect
working order.
•
Service and clean the appliance regularly.
•
Adapt your working style to suit the appliance.
•
Do not overload the appliance.
•
Have the appliance serviced whenever ne-
cessary.
•
Switch the appliance off when it is not in use.
•
Wear protective gloves.
Residual risks
Even if you use this electric power tool in
accordance with instructions, certain resi-
dual risks cannot be rules out. The following
hazards may arise in connection with the
equipment’s construction and layout:
1. Lung damage if no suitable protective dust
mask is used.
2. Damage to hearing if no suitable ear protec-
tion is used.
3. Health damage caused by hand-arm vibra-
tions if the equipment is used over a pro-
longed period or is not properly guided and
maintained.
5. Before starting the equipment
Be sure to read the following information before
you use your cordless screwdriver for the rst
time:
1. Charge the battery pack with the charger
supplied. An empty battery pack requires a
charging period of approximately one hour.
2. Only ever use sharp drill bits and screwdriver
bits which are suitable for the purpose and in
faultless condition.
3. Always check for concealed electric cables
and gas and water pipes when drilling and
screwing in walls.
6. Operation
6.1 Charging the LI battery pack (Fig. 2-3)
The battery is protected from exhaustive dis-
charge. An integrated protective circuit automati-
cally switches o the equipment when the battery
is at. In this case the bit chuck will cease to turn.
Warning! Do not press the ON/OFF switch any
more if the protective circuit has actuated. This
may damage the battery.
1. Remove the battery pack (4) from the handle,
pressing the pushlock buttons (5) on the left
and right sides to do so.
2. Check that your mains voltage is the same as
that marked on the rating plate of the battery
charger. Insert the power plug of the charger
(8) into the mains socket outlet. The green
LED will then begin to ash.
3. Insert the battery pack (4) into the battery
charger (8).
4. In section 10 „Charger indicator“ you will nd
a table with an explanation of the LED indica-
Anl_TE_CD_12_Li_Ex.indb 21Anl_TE_CD_12_Li_Ex.indb 21 14.12.2020 08:15:3714.12.2020 08:15:37
 Loading...