Do you have a question about the EINHELL TE-CI 18/1 Li and is the answer not in the manual?
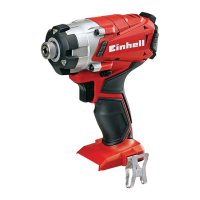
Overview of the cordless hammer screwdriver and its components.
List of all parts included in the product packaging.
Instructions for charging the lithium-ion battery pack using the supplied charger.
Using the switch to set rotation direction and lock the tool.
How to operate the variable speed trigger for power control.
Checking the remaining battery charge level via LED indicators.
Using the integrated LED light for workspace illumination.
Procedure for safely inserting and removing screwdriver bits.
Recommendations for selecting and using appropriate screwdriver bits.
Attaching and using the clip for hanging the tool.
Guidelines for cleaning the equipment to ensure proper function and longevity.
Information regarding internal maintenance requirements of the tool.
Data needed to correctly order spare parts for the machine.
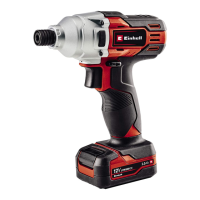
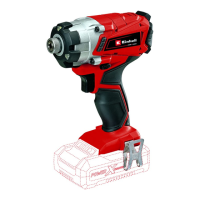
The Einhell TE-CI 18/1 Li is a cordless hammer screwdriver designed for tightening and undoing screws. This versatile tool is part of the Einhell Power X-Change family, allowing for interchangeable battery use across a range of Einhell cordless products.
The primary function of the TE-CI 18/1 Li is to provide powerful and efficient screw driving capabilities, enhanced by a hammer action for tougher applications. It operates on an 18V DC motor, providing ample power for various tasks. The device features a 1/4" (6.35 mm) bit mount, which is a standard size for many screwdriver bits, ensuring compatibility with a wide range of accessories.
A key feature is the changeover switch (3), which allows the user to select the direction of rotation (clockwise or counter-clockwise). This is crucial for both tightening and loosening screws. For safety and to prevent damage to the gearing, the direction of rotation should only be changed when the equipment is at a standstill. When the changeover switch is in the middle position, the On/Off switch (4) is blocked, preventing accidental activation.
The On/Off switch (4) itself offers infinitely variable speed control. The further the switch is pressed, the higher the speed of the cordless screwdriver, providing precise control over the driving process. This allows users to adapt the speed to the specific material and screw type, preventing overtightening or damage to delicate workpieces.
For enhanced visibility in poorly lit working conditions, the TE-CI 18/1 Li is equipped with an LED lamp (7). This light automatically illuminates when the On/Off switch (4) is pressed, ensuring that the work area is well-lit and improving accuracy and safety.
The device is powered by a Lithium-ion battery (5), which offers consistent power and a long lifespan. To keep track of the battery's charge status, a battery capacity indicator (2) is integrated into the tool. This indicator uses three LEDs to display the remaining charge: all three LEDs lit mean a full charge, two or one LED(s) lit indicate an adequate remaining charge, and a blinking LED signifies an empty battery that needs recharging. If all LEDs blink, it suggests the battery pack has undergone exhaustive discharge and is defective, in which case it should not be used or charged.
Before starting any work, it is essential to charge the battery pack using the supplied charging unit (6). The battery pack is removed from the handle by pressing the pushlock button (8) downwards. Once removed, it is placed onto the charging unit. The charger features an LED indicator that provides information on the charging status, such as "Ready for use," "Charging," "Battery charged," "Adapted charging," "Fault," or "Temperature fault." It is important to ensure the mains voltage matches the charger's rating plate and that there is good contact at the charging contacts.
When inserting a bit, the sleeve on the bit mount (1) must be pulled towards the bit while simultaneously inserting the bit into the mount until it stops. Releasing the sleeve secures the bit. To remove a bit, the sleeve is pulled towards the bit again, held tight, and the bit is removed. It is crucial to set the changeover switch (3) to its center position before changing bits or performing any maintenance work to prevent accidental activation.
For optimal and safe operation, it is advisable to use self-centering screws, such as Torx or cross-recessed head screws. Furthermore, users should always ensure that the screwdriver bit used is of the correct size and shape for the screw to prevent stripping or damage. Before screwing into walls or masonry, it is vital to check for concealed electric wiring, gas pipes, and water pipes to avoid serious accidents.
The removable holding clip (9) is a practical feature that allows the equipment to be hung on a belt, providing easy access during work. This clip can be screw-fitted to either the left or right-hand side of the equipment, depending on user preference, although its fitting is optional.
Regular cleaning and maintenance are crucial for ensuring the longevity and safe operation of the TE-CI 18/1 Li. Before performing any adjustments or maintenance, the battery pack must always be removed to prevent accidental startup.
All safety devices, air vents, and the motor housing should be kept free of dirt and dust. This can be achieved by wiping the equipment with a clean cloth or by blowing it with compressed air at low pressure. It is recommended to clean the device immediately after each use. For a more thorough cleaning, a moist cloth and some soft soap can be used. However, it is important to avoid using cleaning agents or solvents, as these can damage the plastic parts of the equipment. Care must also be taken to prevent water from seeping into the device, as water ingress into an electric tool increases the risk of electric shock.
The TE-CI 18/1 Li is designed with no internal parts requiring additional maintenance from the user. For any replacement parts, users should quote the machine type, article number, identification number, and the specific replacement part number. This information can be found in the service information section of the manual or on the product itself.
When storing the equipment, it should be kept in a dark and dry place, above freezing temperature, with an ideal storage temperature between 5 and 30 °C. The electric tool should be stored in its original packaging, and batteries should be charged to at least 40% before storage to maintain their health.
| Power source | Battery |
|---|---|
| Charging time | 0.6 h |
| Battery voltage | 18 V |
| Battery capacity | 2 Ah |
| Carrying case | Yes |
| Number of batteries included | 1 pc(s) |
| Chuck type | Keyless |
| Product color | Black, Grey, Red |
| Product design | Pistol grip drill |
| Idle speed (max) | 2300 RPM |
| Maximum torque (hard applications) | 140 N⋅m |
| Weight | 1550 g |
|---|---|
| Package weight | 3700 g |