GBGB
- 31 -
Danger!
The equipment and packaging material are
not toys. Do not let children play with plastic
bags, foils or small parts. There is a danger of
swallowing or suocating!
•
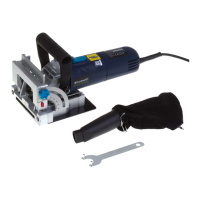
Hand-held electric plane
•
Parallel stop
•
Wrench
•
Step depth scale
•
Original operating instructions
3. Proper use
The hand-held electric plane is designed for pla-
ning, rabating and chamfering pieces of wood.
The equipment is to be used only for its prescri-
bed purpose. Any other use is deemed to be a
case of misuse. The user / operator and not the
manufacturer will be liable for any damage or inju-
ries of any kind caused as a result of this.
Please note that our equipment has not been de-
signed for use in commercial, trade or industrial
applications. Our warranty will be voided if the
machine is used in commercial, trade or industrial
businesses or for equivalent purposes.
4. Technical data
See warranty card of your country.
Sound and vibration
Sound and vibration values were measured in
accordance with EN 62841.
Wear ear-mus.
The impact of noise can cause damage to hea-
ring.
Total vibration values (vector sum of three direc-
tions) determined in accordance with EN 62841.
Warning!
The specied vibration value was established in
accordance with a standardized testing method. It
may change according to how the electric equip-
ment is used and may exceed the specied value
in exceptional circumstances.
The specied vibration value can be used to
compare the equipment with other electric power
tools.
The specied vibration value can be used for initi-
al assessment of a harmful eect.
Keep the noise emissions and vibrations to a
minimum.
•
Only use appliances which are in perfect con-
ditions.
•
Service and clean the appliance regularly.
•
Adapt your working style to suit the appliance.
•
Do not overload the appliance.
•
Have the appliance serviced whenever ne-
cessary.
•
Switch the appliance off when it is not in use.
•
Wear protective gloves.
Residual risks
Even if you use this electric power tool in
accordance with instructions, certain resi-
dual risks cannot be rules out. The following
hazards may arise in connection with the
equipment’s construction and layout:
1. Lung damage if no suitable protective dust
mask is used.
2. Damage to hearing if no suitable ear protec-
tion is used.
3. Health damage caused by hand-arm vib-
rations if the equipment is used over a pro-
longed period or is not properly guided and
maintained.
5. Before starting the equipment
Before you connect the equipment to the mains
supply make sure that the data on the rating plate
are identical to the mains data.
Warning!
Always pull the power plug before making
adjustments to the equipment.
5.1 Adjusting the chip depth (Fig. 4/Item 1)
You can adjust the chip depth in steps of 0.1 mm
from 0 to 3 mm by turning the setting knob for the
chip depth (1).
Turn the setting knob for the chip depth (1) in a
clockwise direction to set a greater chip depth.
Greater chip depth
Turn the setting knob for the chip depth (1) in a
counter-clockwise direction to set a lower chip
depth. Lower chip depth
After nishing work, set the chip depth so that the
knives are lowered and thus protected from da-
mage. Turn the setting knob for the chip depth to
position “0” for this purpose.
5.2 Chip extraction (Fig. 5-8)
For optimum dust extraction you can connect the
equipment to a vacuum cleaner (not supplied). To
do so, insert the vacuum cleaner tube (c) into the
chip ejector adapter (7). Check that all parts are
properly joined together. The vacuum cleaner
tube can be connected optionally on either the left
or right. This requires the chip ejector adapter (7)
to be Þ tted accordingly:
•
Press the lock button (a).
•
Pull the chip ejector adapter (7) out of the
mount (10).
•
Insert the adapter into the mount (10) on the
other side until the locking knob (a) engages
with an audible click.
•
While inserting, make sure that the guide (b)
of the adapter (7) coincides with the slot of
the mount (10).
Note!
The vacuum cleaner you use for the vacuum ext-
raction must be suitable for the material you are
cutting.
5.3 Parallel stop (Fig. 9)
Use the parallel stop (2) when you want to plane
parallel to the edge of the workpiece.
Fitting the parallel stop
•
Fasten the mount (d) of the parallel stop to
the left side of the tool using the supplied
thumb screw (a).
•
Now connect the mount (d) to the slide of the
parallel stop (2).
•
The guide rail must always be aligned in
downward direction.
•
Fix the distance required between the parallel
stop and the edge of the workpiece.
•
Fasten the parts with the carriage bolt (b) and
the wing nut (c).
6. Operation
6.1 ON/OFF switch (Fig. 10)
•
The hand-held electric plane comes with a
safety switch which is designed to prevent
accidents.
•
To switch on the tool, press the side safety
lock-off (3) and press the button switch(4).
•
Release the button switch (4) to switch off the
Anl_SA_TE_PL_900_SPK8.indb 31Anl_SA_TE_PL_900_SPK8.indb 31 12.10.2020 15:00:0712.10.2020 15:00:07