1. Put the test paper into the tap water for
about 1 sec. Do not put the test paper
under running water.
2. Shake the test paper to remove any
remaining water.
3. After 1 min, check water hardness with
the table below.
4. Set the water hardness level in the menu:
Basic settings.
The colours of the test paper continue to
change. Check the water hardness within 1
min after testing.
You can change the water hardness level in
the menu: Basic settings / Water hardness.
The table shows water hardness range (dH)
with the corresponding level of Calcium
deposit and the water classification. Adjust
the water hardness level according to the
table.
When the tap water hardness level is 4 or
above, fill the water drawer with still bottled
water. Use bottled water with a maximum
calcium deposit Ca
2+
of 3.9 mmol/l or 151
mg/l (check bottle label). If you use the water
softening system make sure that the water
hardness level is between level 1 and 3,
otherwise use bottled water within this range.
For more information about your tap water
hardness (dH) contact your local water
supplier.
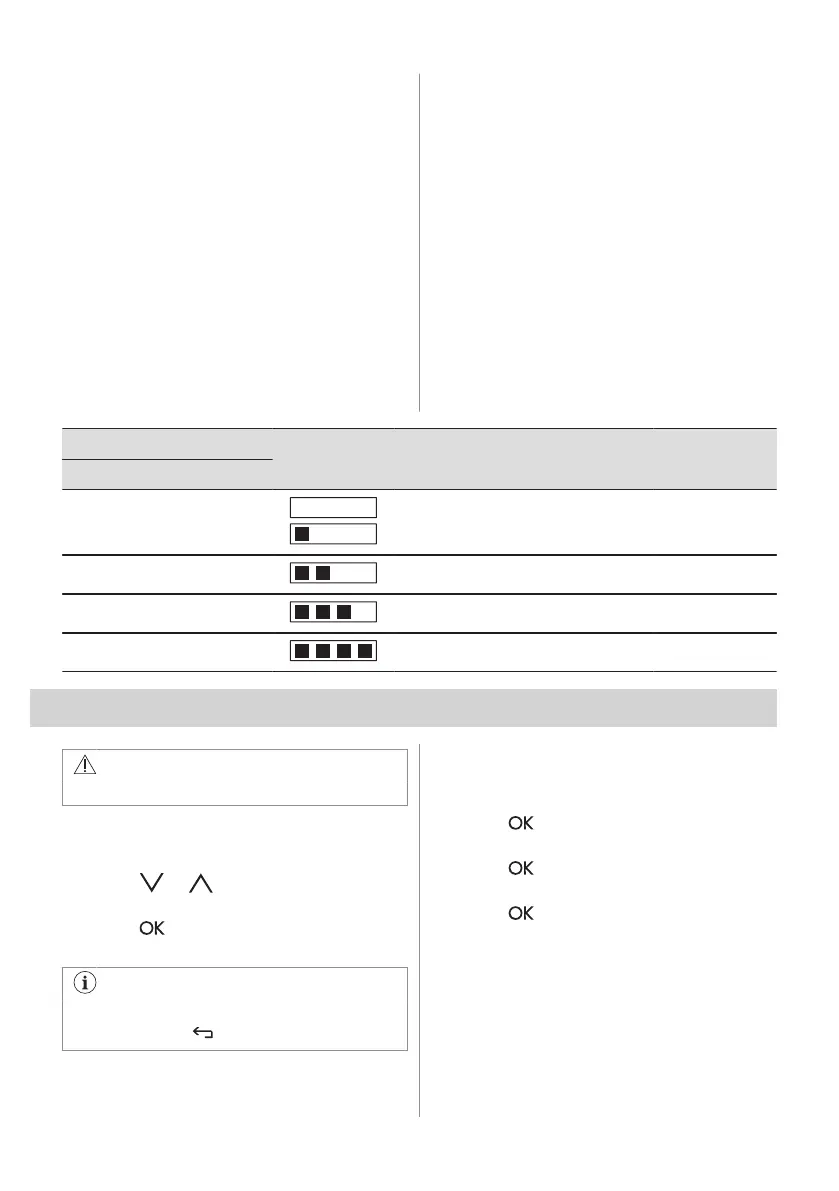
Water hardness Test paper Calcium depos‐
it (mmol/l)
Calcium de‐
posit (mg/l)
Water classifi‐
cation
Level (dH)
1 0 - 7 0 - 1.3 0 - 50 soft
2 8 - 14 1.4 - 2.5 51 - 100 moderately hard
3 15 - 21 2.6 - 3.8 101 - 150 hard
4 ≥ 22 ≥ 3.9 ≥ 151 very hard
6. DAILY USE
WARNING!
Refer to Safety chapters.
6.1 Navigating the menus
1. Turn on the oven.
2. Press or to select the menu
option.
3. Press to move to the submenu or
accept the setting.
At each point you can go back to the
main menu with .
6.2 Setting a heating function
1. Turn on the oven.
2. Select the menu: Heating Functions.
3. Press to confirm.
4. Select a heating function.
5. Press to confirm.
6. Set the temperature.
7. Press to confirm.
6.3 Cooking with steam heating
function
The water drawer cover is in the control
panel.
10 ENGLISH