15
Az ajtó átfordítása
Áramtalanítsa a készüléket mielŒtt bármiféle
mıveletbe kezdene.
Az ajtó átfordításához a következŒképpen járjon el:
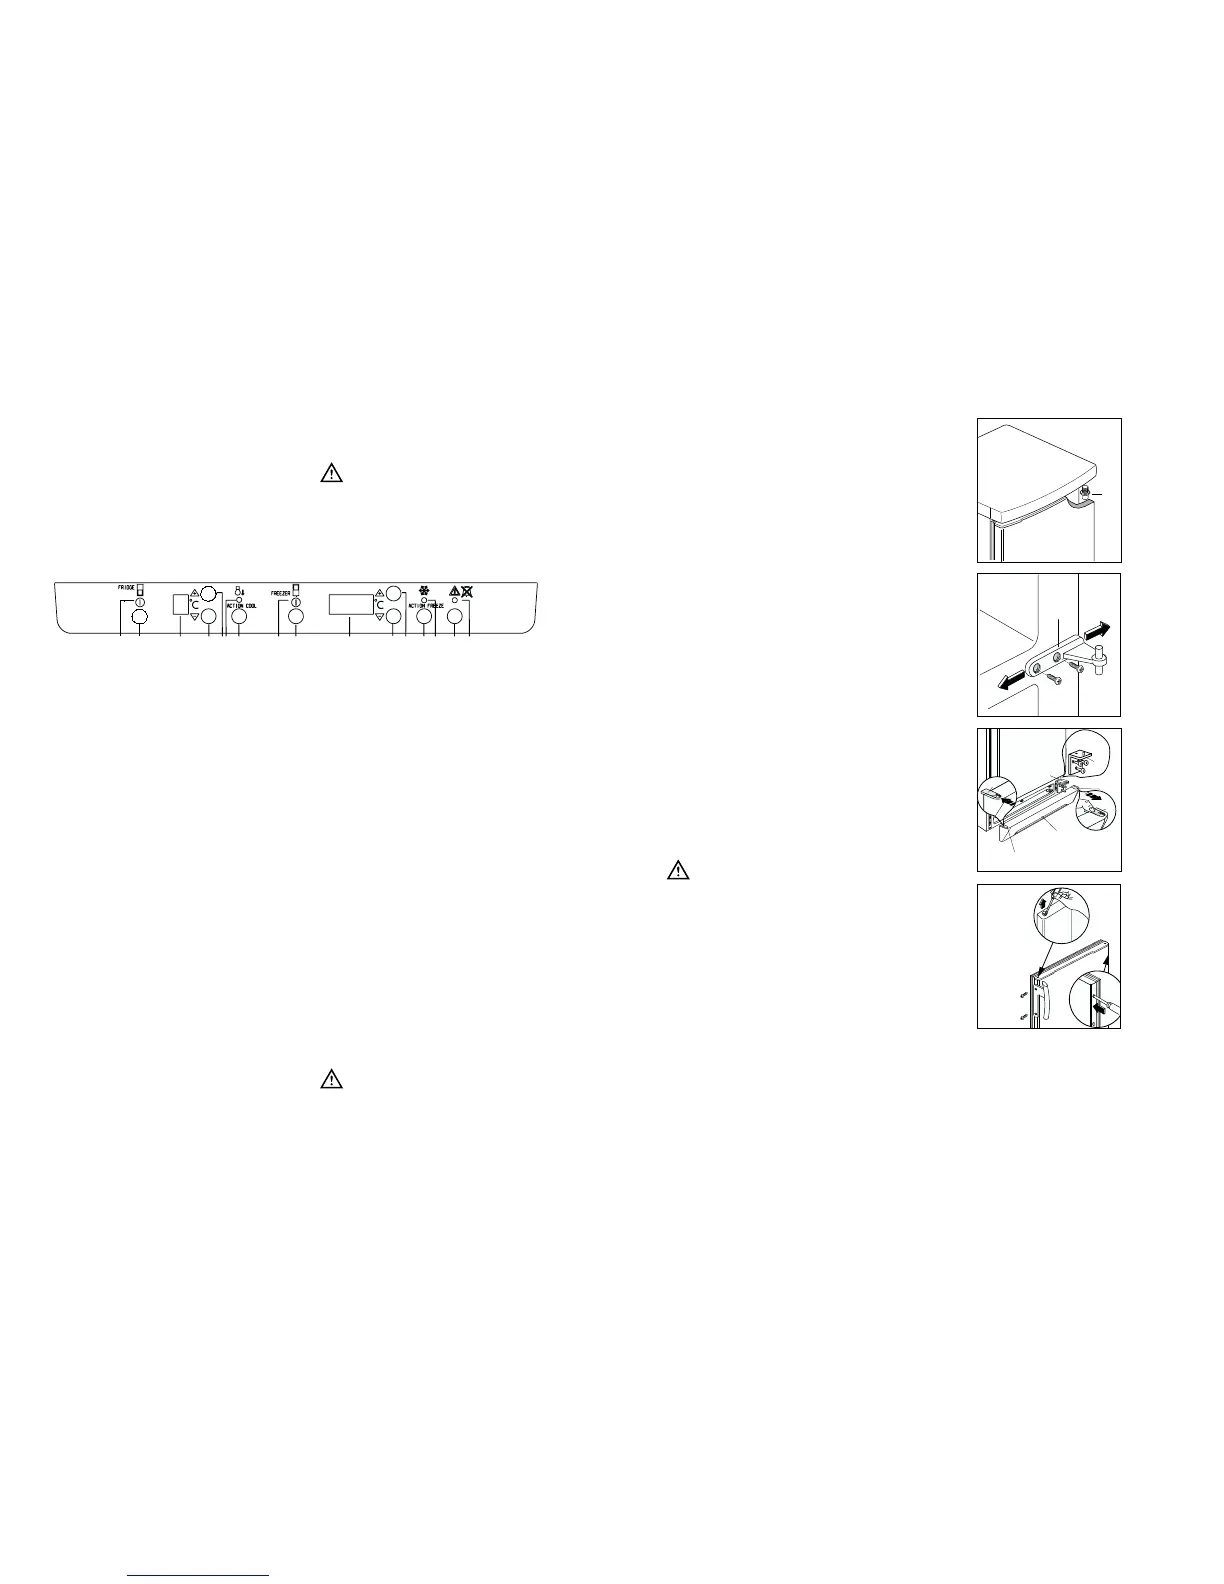
1 emelje ki a szellŒztetŒ rácsot (D);
2 szerelje le az alsó forgópántot (E);
3 akassza le az ajtót a középsŒ forgópántról (H)
majd szerelje le ezt a pántot is;
4 emelje le a felsŒ ajtót az (G) támcsapról,
csavarja ki a csapot, szerelje át az ellenkezŒ
oldalra;
5 vegye ki a két furatdugót, ide lesznek felszerelve
a forgópántok csapjai, helyezze át a furatdugókat
az ellenkezΠoldalra;
6 helyezze vissza a felsŒ ajtót illetve a középsŒ
forgópántot az elllenkezŒ oldalra;
7 helyezze vissza az alsó ajtót valamint az alsó
forgópántot (E) az ellenkezŒ oldalra.
8 Vegye ki a szellŒztetŒ rács (D) dugaszát (F),
tegye azt át a másik oldalra.
9 Helyezze vissza a szellŒztetŒ rácsot (D).
10 Szerelje le a fogantyút. Lyukassza ki az ellenkezŒ
oldalon a furattakaró dugaszokat.
Az ajtók egyvonalba hozásához a középsŒ pánton
(H) lehet vízszintesen szabályozni egy szerszám
segítségével, miután a két csavart kilazította (lásd az
ábrát).
Figyelem:
Miután megcserélte az ajtó nyitásirányát,
ellenŒrizze, hogy a tömítŒ mágneses profil jól tapad-
e a szekrényhez. Ha a szobahŒmérséklet alacsony
(pl. télen), elŒfordulhat, hogy mágnesprofil nem
fekszik fel tökéletesen az ajtókeretre. Ez esetben
vagy megvárja, hogy a tömítŒprofil magától
hozzáidomul a szekrényhez, vagy pedig egy
hajszárítóval óvatosan felmelegíti a tömítést,
elŒsegítve ily módon annak gyorsabb illeszkedését.
46
Cleaning the interior
Before using the appliance for the first time, wash
the interior and all internal accessories with luke-
warm water and some neutral soap so as to remove
the typical smell of a brand-new product, then dry
thoroughly.
USE
Control panel
Do not use detergents or abrasive
powders, as these will damage the finish.
Fridge section
A. ON/OFF warning light
B ON/OFF button for fridge section
C Fridge temperature indicator
D Buttons for adjusting the fridge temperature
(warmer)
E Buttons for adjusting the fridge temperature
(colder)
F Action Cool warning light
G Action Cool function button
H. ON/OFF warning light
I. ON/OFF button
ON: Press button (I). Warning light (H) will come
on.
OFF: Hold button (I) down till warning light (H) and
the temperature indicator go out.
K - L. Temperature adjustment
buttons
The temperature can be set between -15°C and -24°C.
When button (K) or (L) is pressed, the set temperature
appears flashing on the indicator (J). It is only possible to
modify the set temperature when the indicator is
flashing. To set a warmer temperature, press button (K),
to set a colder temperature, press button (L). The
indicator continues for a few seconds to display the
temperature just set, then it reverts to indicating the
temperature inside the section.
The programmed temperature will be reached within 24
hours.
Attention!
During the stabilisation period when the appliance is first
run, the temperature displayed may not correspond to
the temperature set. During this period, it is possible for
the temperature displayed to be lower than the
temperature set.
Freezer section
Freezer section
H ON/OFF warning light
I ON/OFF button for freezer section
J Freezer temperature indicator
K Temperature adjustment button (warmer)
L Temperature adjustment button (colder)
M Frostmatic warning light
N Frostmatic function button
O Alarm warning light
P Alarm disarming button



 To Next Page