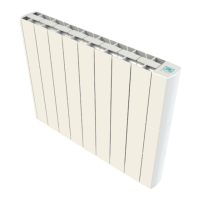
The Vanguard by Electrorad is an energy-efficient electric radiator designed for home heating. These radiators are constructed from aluminium, chosen for its lightweight properties and ability to achieve rapid heat-up times. The exterior of the radiators is finished with a durable powder coating.
Function Description:
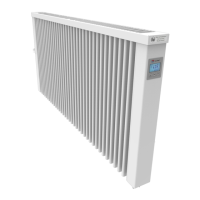
The primary function of the Vanguard radiator is to provide efficient and controllable heating for rooms. It operates by converting electrical energy into heat, which is then distributed through convection and radiation. The design incorporates convection air vents at the top to enhance heat distribution and improve the aesthetic appeal of the product. Each radiator features a built-in digital thermostat and weekly programming control, allowing users to set specific heating schedules and maintain desired room temperatures.
Important Technical Specifications:
- Material: Aluminium construction for lightness and rapid heat transfer.
- Heating Element: High-performance extruded aluminium heating element.
- Controls: Digital controls located at the top for ease of use and to maintain aesthetic appeal.
- Thermostat: Built-in digital thermostat for precise temperature regulation.
- Programming: Weekly programming control for customized heating schedules.
- Compliance: European legislation Lot 20 compliant, indicating adherence to energy efficiency standards (Ecodesign Lot 20 Compliant).
- Installation: Can be plugged in or connected to a fused spur. Wall brackets are provided for mounting.
Usage Features:
The Vanguard radiator is designed with several user-friendly and energy-saving features:
- Operating Modes: The display shows various operating modes, with active modes framed for easy identification.
- Program Number/Parameters: Users can view and adjust program numbers or parameters.
- Installation Parameters: Access to installation-specific settings.
- Key Lock Function: An indicator for when the controls are locked, preventing accidental changes.
- Room Temperature Indicator: Displays the current room temperature.
- Time Display: Supports both 12H (am/pm) and 24H formats.
- Graphic View: Provides a visual representation of the current day's program.
- Display Zone: Dedicated area for showing time, temperatures, and parameters.
- Heating Demand Indicator: Shows when the radiator is actively heating.
- Program Creation Pictogram: A visual cue for program creation status in normal mode.
- Pilot Wire Indication Pictogram: Indicates the status of the pilot wire connection.
- Current Day of the Week: Displays the current day.
- Override Function: An indicator that blinks when the override function in AUTO mode or ITCS function is activated.
- Windows Open Indicator: Alerts the user if a window is open, which can lead to heat loss.
Energy Saving Features:
- Virtual Open Window Detection Function: Automatically detects open windows and adjusts heating to prevent energy waste.
- ITCS Adaptive Start Function: An intelligent feature that learns the thermal characteristics of the room and activates heating in advance to reach the desired temperature at the programmed time, optimizing energy consumption.
- Surface Temperature Control: Helps maintain a consistent and safe surface temperature.
- Energy Consumption Monitor: Allows users to track their energy usage, promoting awareness and enabling more efficient heating habits.
Setting the Date and Time:
To set the date and time, users navigate through the display using button 5 to select the clock icon. Pressing OK presents a clock. Button 4 is used to make the hours flash, and buttons 2 and 4 adjust the hours. Pressing OK confirms the hours, and then the minutes flash, which are adjusted similarly. After setting the time, users select the day of the week (1-7, representing Monday to Sunday) using buttons 2 or 4 and confirm with OK. The date and month are set in the same manner as the time, followed by setting the year. Finally, the system prompts the user to save the information by pressing OK.
Setting Comfort and Economy Temperatures:
- Comfort Temperature: Symbolized by a sunshine icon, this is the desired temperature when the user is home and wants warmth. To set, use button 5 to scroll to the sunshine icon. Button 2 decreases the temperature, and button 4 increases it. Pressing OK moves from the current room temperature to the set temperature.
- Economy Temperature: Symbolized by a moon icon, this setting is typically used during the night or when the user is out during the day. The process for setting the economy temperature is similar: scroll to the moon icon with button 5, adjust with buttons 2 or 4, and confirm with OK.
- Scheduling: Once comfort and economy temperatures are set, users can program their room's temperature throughout 30-minute intervals, 24 hours a day, for the entire week to match their lifestyle.
Using the Radiator in Manual Mode (Easy Mode):
For users who prefer not to set timings, the radiator can be operated in a manual "easy mode."
- Activate Easy Mode: Press and hold button 3 (OK) for 5 seconds until "prog" appears.
- Select "No": Press button 4 to select "no" and then button 3 (OK).
- Navigate to "End": Press button 5 twelve times until "end" appears in the middle of the screen.
- Return Home: Press button 3 to return to the home screen.
In easy mode, only the sunshine (comfort) and moon (economy) icons are visible. Users can manually switch between comfort and economy settings by pressing button 5 until the desired icon is highlighted, then pressing OK.
Returning to Timings Mode:
To re-enable timings and access the full range of icons:
- Activate Timings Mode: Press and hold button 3 (OK) for 5 seconds until "prog" parameter 01 appears.
- Select "Yes": Press button 4 until "yes" appears, then press OK to accept.
- Navigate to "End": Press button 5 twelve times until "end" appears.
- Return Home: Press button 3 to return to the home screen.
All icons will reappear, and the user can proceed to set timings as described in the "set timings" section.
Setting Custom Timings:
Users need to act quickly when setting timings as the radiator can revert to the home screen.
- Select "P" Icon: Use button 5 to scroll to the "P" icon on the top of the screen and press OK.
- Select "U1": Press button 4 ten times until "U1" (user program 1) appears on the right side of the screen (after passing 9 pre-set programs). Press OK.
- Program Days and Hours: The screen will display numbers 1-7 (days of the week, with 1 being Monday) on the left and 1-24 (hours of the day) along the bottom.
- Set Temperatures in 30-Minute Intervals:
- Timings are set in 30-minute intervals, starting at 00:00.
- To select the economy (setback) temperature, press button 2. The time on the screen will advance by 30 minutes (e.g., to 00:30). Continue pressing button 2 for each 30-minute period desired for economy.
- To select the comfort temperature, press button 4. A small bar will appear along the bottom of the screen, indicating a comfort period. Continue pressing button 4 for each 30-minute interval desired for comfort.
- Users can switch between economy (no bars) and comfort (bars) by pressing button 2 or 4 accordingly.
- Complete Daily Cycle: Once a full 24-hour cycle is completed for day 1, a triangle on the left will move down to day 2. Repeat the process for each day of the week.
- Automatic Return: After completing the process for all days, the radiator will automatically return to the home screen with the square around the "auto" icon.
- Verification: Confirm that "u1" is displayed on the right side of the screen to ensure the custom timings are active.
Maintenance Features:
The manual does not explicitly detail maintenance features. However, the durable powder coating suggests a low-maintenance exterior. The digital controls and built-in thermostat are designed for long-term reliability. Regular cleaning of the exterior surfaces would likely be the primary user-level maintenance.