EasyManua.ls Logo

Elived EV005 - User Manual

Elived EV005
19 pages
Print Icon
To Next Page IconTo Next Page
Loading...
Dual Monitor Counterbalance Desk Mount
Instruction Manual
If you have any questions , please contact us via: cs@elivedglobal.com
75x75
100x100
32"
V1.0
Für die Installationsanweisungen auf Deutsch, siehe Seite 10~11.
Pour l'instruction en Français, veuillez vous reporter à la page 12~13.
Para las instrucciones de la instalación en Español, favor vea la página 16~17.
Per le Istruzioni in Italiano, vedi pagina 14~15.
(2~8kg)x2
(4.4~17.6lbs)x2
EV005
Question and Answer IconNeed help?

Do you have a question about the Elived EV005 and is the answer not in the manual?

Overview

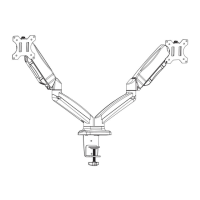
This document outlines the installation and usage instructions for the ELIVED Dual Monitor Counterbalance Desk Mount, model EV005.

Function Description

The ELIVED EV005 is a dual monitor desk mount designed to provide ergonomic positioning and flexible adjustment for two monitors. It utilizes a counterbalance gas spring arm system, allowing users to easily adjust the height, tilt, swivel, and rotation of their monitors. This mount aims to enhance user comfort and productivity by providing customizable viewing angles and reducing strain. It supports both clamp and grommet base installations, making it versatile for various desk setups. The integrated cable management system helps maintain a tidy workspace.

Important Technical Specifications

  • Model: EV005
  • VESA Compatibility: 75x75mm and 100x100mm
  • Monitor Size Compatibility: Up to 32 inches
  • Weight Capacity: 2-8kg (4.4-17.6lbs) per arm, for a total of 16kg (35.2lbs) for two monitors.
  • Installation Options:
    • Clamp Installation: Suitable for desk thickness ranging from 10-80mm.
    • Grommet Base Installation: Requires a grommet hole in the desk.
  • Adjustments:
    • Tilt: +90° to -45°
    • Swivel: 360° (at the arm joint and VESA plate)
    • Rotation: 360° (for portrait or landscape orientation)
    • Height Adjustment: Gas spring arm for smooth vertical movement.
  • Materials: The mount is constructed with durable materials to ensure stability and longevity.
  • Dimensions (Unit: mm):
    • Arm length (horizontal): Approximately 260mm from the central pole to the VESA plate.
    • Height range: 170-410mm (from desk surface to VESA plate center).
    • Desk clamp range: 10-80mm.
    • Overall width (fully extended): Approximately 184-260mm per arm.

Usage Features

Installation

The installation process is divided into several steps:

  1. STEP 1: Clamp Installation OR Grommet Base Installation

    • Option A: Clamp Installation:
      • Mount bracket (C) to the bottom of the gas spring arm (A) using bolts (E).
      • Attach clamp (D) to bracket (C) using bolts (E) and 4mm allen key (K).
      • Mount according to desk thickness.
      • Secure the stand to the desktop by tightening clamp (D) or by using a 6mm allen key (M).
    • Option B: Grommet Base Installation:
      • For grommet hole mounting, place carriage bolt (H) through the center of the grommet base (F).
      • Mount grommet base to the bottom of the gas spring arm (A) using bolts (E). Tighten them using a 4mm allen key (K).
      • Run carriage bolt (H) through the grommet hole in the desktop.
      • Attach metal plate (J) and wingnut (G). Tighten the wingnut.
  2. STEP 2: Attach Monitor

    • Option A: Flat Back Monitor:
      • Attach VESA plate (B) to the back of the monitor and secure with screws (M-A or M-B) and washers (M-C) using a 6mm Allen Key (M). Avoid over-tightening to prevent damage.
      • CAUTION: Select the correct screws (M-A or M-B) for your monitor. You can screw them in by hand; the one that screws in inside is the correct screw.
    • Option B: Curved Back Monitor:
      • Attach VESA plate (B) to the back of the monitor and secure with screws (M-A or M-B), washers (M-C), and spacers (M-D) using a 6mm Allen Key (M). Avoid over-tightening.
  3. STEP 3: Hang Monitor

    • Slide the monitor onto the head of the swivel arm.
    • Install the security bolt (I) to ensure the monitor is securely attached before rotating.
    • WARNING: Keep the front arm at its highest position before taking off the monitor, otherwise, it may spring up and injure your jaw.
    • Refer to illustrations to adjust the tilting angle of your monitor. Fasten/loosen the tilting bolt as needed per arrow direction (+/-) shown in the diagram.
  4. STEP 4: Adjust Tension

    • This step is crucial for proper functioning, depending on the monitor's weight. Use a 5mm Allen key (L).
    • Increase Tension (Clockwise "+"): If the monitor sags or does not stay at the desired height, turn clockwise to increase gas spring tension until the monitor can stay at the desired height.
    • Decrease Tension (Counter-clockwise "-"): If the monitor rises up and cannot stay at the desired height, turn counter-clockwise to reduce gas spring tension until the monitor can stay at the desired height.
    • Note: Be sure to keep the arm in a horizontal position during adjustment. If it's difficult to adjust, the mount or monitor might be damaged. If necessary, refer to illustrations to adjust the level of tightness of the arms.
  5. STEP 5: Cable Management

    • Remove the bottom plastic covers from the gas spring arm (A) as shown.
    • Run cables from the monitor through the bottom of the gas spring arm (A).
    • Reattach the plastic covers.

Adjust as Desired

The mount offers extensive adjustability:

  • Tilt: +90° to -45°
  • Swivel: 360°
  • Rotation: 360° (for portrait or landscape viewing)
  • Note: When tilted, if the monitor sags or does not stay, fasten the tilting bolt on the mount until the monitor can be held at any angle. Pay attention while clamp installation.

Maintenance Features

  • Regular Checks: Periodically check all screws and parts to ensure they are secure and undamaged. Loose parts or damage can lead to injury or product malfunction.
  • Cleaning: Clean the mount with a soft, dry cloth. Avoid using harsh chemicals that could damage the finish.
  • Tension Adjustment: Re-adjust the gas spring tension (STEP 4) if the monitor's weight changes or if the monitor no longer holds its position correctly.
  • Safety: Do not allow children to climb, stand, hang, or play on any part of the monitor or stand. This product is intended for indoor use only. Using this product outdoors could lead to product failure and personal injury.
  • Bracket Security: Check that the bracket is secure and safe to use at regular intervals (at least every three months).
  • Customer Support: If you have any questions, please contact customer service at cs@elivedglobal.com. This ensures proper installation and addresses any concerns regarding the product's safety and functionality.
  • Small Parts Warning: This product contains small items that could be a choking hazard if swallowed. Keep out of reach of children under 3 years. Adult supervision is required.

Elived EV005 Specifications

General IconGeneral
BrandElived
ModelEV005
CategoryRacks & Stands
LanguageEnglish

Related product manuals