1 / 7
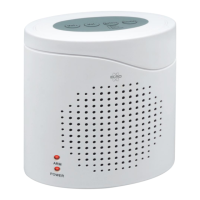
CARBON MONOXIDE ALARM USER MANUAL
The symbols above mean that the CO Alarm is suitable for
use in domestic premises (including static caravan holiday
homes), caravans, motor caravans and boats.
Please take a few minutes to thoroughly read the user manual
before operang or servicing and familiarize yourself and your
family with its operaon. And save for future reference.
CAUTION:
This CO alarm is designed for indoor use only. Do not expose to rain
or moisture. Do not knock or drop the detector. Do not open or tamper
with the alarm as this could cause malfuncon.
The alarm will not protect against the risk of carbon monoxide
poisoning when the baery has drained.
Installaon of the alarm should not be used as a substute for
proper installaon, use and maintenance of fuel burning appliances
including appropriate venlaon and exhaust systems.
This CO alarm can only detect CO. Please do not misuse this device
as a smoke alarm or a combusble gas detector.
WARNING! - DO NOT try to repair the device, it has the risk of
electric shock or malfuncon if the device is tampered with.
Table of Contents
1. Installaon instrucons
2. Product overview
3. Understanding your CO alarm
4. What to do if the alarm sounds
5. Baery installaon/replacement
6. General maintenance
7. Carbon monoxide overview
8. Specicaon
9. Manufacturer/Customer service informaon
10. Warranty Informaon
11. Warranty card
1. Installaon instrucons:
1.1 Installaon locaon
When choosing your installation locations, make sure you
can hear the alarm from all sleeping areas. If you install
only one CO alarm in your home, install the alarm near
bedrooms. Not in the basement or furnace room. The
recommended position for the unit should be at least 1.8
meters (about 6 feet) above the floor level. The unit is
suitable for desktop placement.
CAUTION: This alarm should be installed by a competent
person.
1.2 Installaon step
The device can be installed in two ways. Installaon steps
of the rst way.
1: Drill two ф 5.0mm holes on the wall, the distance between
the centers of the two holes is 60mm, and then insert the two
provided plastic plugs into the holes.
2: Hold the bracket by hand and align the two plastic plugs
to fix them first.
3: Insert and tighten the two provided screws.
4: Put the battery into the battery box.
5: Install the alarm on the bracket.
6: Use the TEST/SILENCE button to test the device. Ensure
that the sound of the device is in alarm mode.
CAUTION:
If the device is installed on a caravan or boat, plasc plugs are not
required. Use the self-tapping screws provided to install the device in a
wooden area.
Installaon steps of the second way. 1:
Put the battery into the battery box.
2: Install the bracket on the alarm.
3: Paste 3M tape on the bracket.
4: Fix the alarm at the correct position.
5: Use the TEST/SILENCE button to test the device.
Ensure
that the sound of the device is in alarm mode.
WARNING! - DO NOT install the device in direct sunlight or high
temperature environment.