Do you have a question about the Emeril Lagasse Pasta&Beyond and is the answer not in the manual?
Fill the Dry Measuring Cup with flour, level it, and add to the Mixing Chamber.
Place the Mixing Chamber Lid on, press the Power Button, then the Batch Button.
Mix eggs, oil, and water. Slowly add liquid to flour while mixing.
Mixer pauses and reverses to extrude dough when ingredients are mixed.
Cut extruded pasta to desired length, about 10 inches per portion.
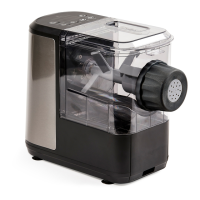
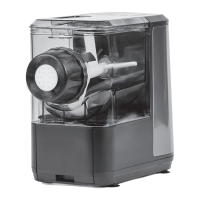
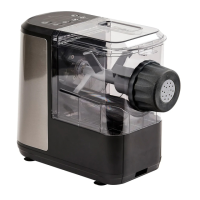
Identify the main components of the pasta maker, including housing, mixing chamber, lid, and extrusion parts.
Overview of available pasta discs for Penne, Spaghetti, Linguine, Tagliatelle, Udon, Angel Hair, Fettuccine, and Lasagna.
The Emeril Lagasse Pasta & Beyond device is an automated pasta maker designed to simplify the process of making fresh pasta at home. This Quick Start Guide provides an overview of its operation, from adding ingredients to extruding and cutting pasta, along with instructions for assembling the pasta maker housing and identifying its various parts and pasta disc types.
The Emeril Lagasse Pasta & Beyond device automates the entire pasta-making process, from mixing dry and wet ingredients to extruding fresh pasta. It eliminates the need for manual kneading and rolling, making homemade pasta accessible and convenient. The device is capable of producing various pasta shapes, depending on the chosen pasta disc, including Penne, Spaghetti, Linguine, Tagliatelle, Udon, Angel Hair, Fettucine, and Lasagna.
The device features a straightforward, step-by-step operation:
Adding Dry Ingredients: Users begin by filling the Dry Measuring Cup with flour, leveling it off with the Spatula/Cleaning Tool, and then adding the flour to the Mixing Chamber. The Dry Measuring Cup holds 1 1/2 cups of flour.
Starting the Appliance: After placing the Mixing Chamber Lid on the Mixing Chamber, the user presses the Power Button, followed by the Batch Button, to initiate the mixing process.
Adding Liquid and Mixing: Eggs are beaten and added to the Liquid Measuring Cup. Oil and water are then added to the same cup until the required measurement is reached. All wet ingredients are stirred together. The liquid is slowly added to the Mixing Chamber while the flour mixes, ensuring proper hydration of the dough.
Extruding Pasta Dough: Once the ingredients are thoroughly mixed, the mixer pauses and reverses direction to begin extruding the dough. This automated extrusion process ensures consistent pasta thickness and shape.
Cutting Pasta to Length: As the pasta extrudes, users can cut it to their desired length using the Spatula/Cleaning Tool with a downward motion. For most pasta types, a length of about 10 inches per portion is recommended.
The device's design incorporates several key components for its operation:
The variety of pasta discs (G) allows for diverse culinary creations:
The Quick Start Guide emphasizes initial setup and cleaning:
The design of the device, with its separable components like the Mixing Chamber, Mixing Chamber Lid, Kneading Paddle, Auger Sleeve, Auger, Pasta Disc, Extrusion Collector Ring, and Screw Cap, suggests that these parts are designed for easy disassembly, cleaning, and reassembly. This modular design simplifies the cleaning process, which is crucial for food preparation appliances. Regular cleaning of these parts prevents dough residue buildup and maintains hygiene.
| Type | Pasta Maker |
|---|---|
| Brand | Emeril Lagasse |
| Model | Pasta & Beyond |
| Color | Silver/Black |
| Power Source | Electric |
| Voltage | 120V |
| Material | Plastic |
| Included Accessories | Measuring cup, cleaning tool, pasta discs |
| Functions | Mixing, Kneading, Extruding |
| Pasta Shapes | Spaghetti, fettuccine, penne, lasagna, tagliatelle |
| Capacity | 1 pound |