Do you have a question about the Emeril Lagasse POWER GRILL 360 PLUS and is the answer not in the manual?
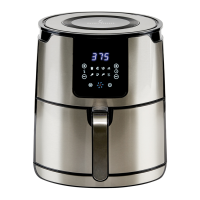
Insert the Air Fryer Drip Tray below the bottom heating elements.
Place food on the Crisper Tray and slide into the appliance shelf.
Use Control Knob to select the Air Fry cooking preset.
Press Control Knob to begin the cooking process.
Use oven mitts to remove the Crisper Tray when cooking is complete.
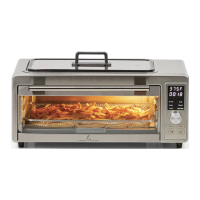
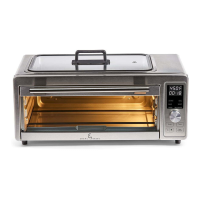
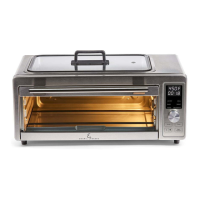
Assemble appliance, ensure Grill Plate and Drip Tray are in place.
Use Control Knob to select Grill preset and allow preheat.
Place food on grilltop and cover with the Glass Lid.
Press Control Knob to begin cooking, replace lid for finishing.
Use tongs or spatula to remove food when cooking cycle is complete.
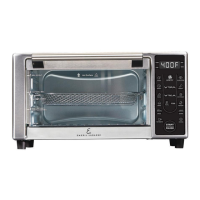
The Emeril Lagasse Power Grill 360 Plus is a versatile kitchen appliance designed for both air frying and grilling, offering a convenient way to prepare a variety of meals. This quick start guide outlines the basic steps for using the appliance for these two primary functions, emphasizing ease of use and safety.
Before using the Power Grill 360 Plus, it is crucial to unpack all parts from the box and remove any clear or blue protective film from the components. A thorough check of all packaging material for accessories is recommended. For initial cleaning, accessories should be washed with warm, soapy water; however, it's important to note that only select accessories are dishwasher safe. For complete instructions and important safety information, users should consult the owner's manual.
The air frying function allows for healthier cooking with less oil, producing crispy results.
Step 1: Preparation for Air Frying: To begin air frying, the Air Fryer Drip Tray must be inserted below the bottom heating elements, positioned at the very bottom of the appliance. This tray collects any drippings during the cooking process, making cleanup easier.
Step 2: Loading Food: Food intended for air frying should be placed on the Crisper Tray. Once loaded, the Crisper Tray is then slid into a shelf on the inside of the appliance. The design allows for flexibility, as the Wire Rack or Baking Pan can also be used and slid into the shelves. It's important to remember that only two accessories will fit into the shelves at once.
Step 3: Selecting the Air Fry Preset: The appliance features a control knob that allows users to select various cooking presets. For air frying, the user simply turns the control knob to choose the "Air Fry" cooking preset.
Step 4: Starting and Pausing the Cooking Process: Once the "Air Fry" preset is selected, pressing the control knob initiates the cooking process. A convenient feature is the ability to pause any cooking cycle by simply pressing the control knob again, offering flexibility if adjustments are needed during cooking.
Step 5: Removing Cooked Food: After the cooking cycle is complete, safety is paramount. Users should always use oven mitts or potholders to remove the hot Crisper Tray by sliding it out of the appliance, preventing burns.
The grilling function provides a way to achieve delicious grilled flavors indoors.
Step 1: Appliance Assembly for Grilling: For grilling, the appliance needs to be properly assembled, ensuring that the Grill Plate and Grill Drip Tray are correctly in place. Detailed instructions for this assembly can be found in the owner's manual.
Step 2: Selecting the Grill Preset and Preheat: Similar to air frying, the control knob is used to select the "Grill" cooking preset. After selecting the preset, the appliance will begin to preheat. This preheating phase is essential for achieving optimal grilling results. As with air frying, the Wire Rack or Baking Pan can also be used in the shelves, with a limit of two accessories at once.
Step 3: Placing Food on the Grill: Once the appliance has preheated, food is carefully placed on the grilltop. To facilitate cooking and retain moisture, the Glass Lid should then be placed over the food.
Step 4: Starting, Flipping, and Pausing Grilling: Pressing the control knob starts the grilling process. During grilling, it is recommended to flip the food halfway through the cooking process to ensure even cooking. After flipping, the Glass Lid should be replaced to allow the food to finish cooking. The control knob also serves as a pause button for the grilling cycle, offering control over the cooking duration.
Step 5: Removing Grilled Food: Upon completion of the grilling cycle, tongs or a spatula should be used to safely remove the cooked food from the appliance, again emphasizing safety precautions when handling hot items.
While the quick start guide primarily focuses on usage, it implicitly highlights maintenance through the mention of the Air Fryer Drip Tray for collecting drippings and the initial washing instructions for accessories. The drip tray simplifies cleanup by containing grease and food particles, making it easier to maintain the cleanliness of the appliance. The instruction to wash accessories with warm, soapy water (and noting that only select accessories are dishwasher safe) indicates that regular cleaning of these components is expected to ensure hygiene and prolong the life of the appliance. For comprehensive maintenance instructions, including cleaning the main unit and specific care for different accessories, users are directed to the owner's manual.
| Power | 1500 Watts |
|---|---|
| Temperature Range | 200°F to 450°F |
| Control Type | Digital |
| Accessories Included | Drip Tray |
| Color | Black |
| Grill Plates | Non-stick |
| Drip Tray | Removable and dishwasher safe |
| Indicator Lights | Yes |