1592023130 XM670K_XM679K GB r4.2 26.06.2017.docx XM670K - XM679K 2/10
5.7 SENSORS FOR SUPERHEAT CONTROL – ONLY FOR XM679K
Temperature probe: Pb6 terminals [19] - [20] without any polarity.
Select the kind of sensor with P6C parameter.
Pressure transducer: Pb5 terminals:
[21] = input of the signal; [22] = Power Supply for 4to20mA transducer;
[20] = GND; [23] = +5Vdc power supply for ratiometric pressure
transducer.
Select the configuration of the transducer with parameter P5C.
5.8 HOW TO USE ONLY ONE PRESSURE TRANSDUCER ON MULTIPLEXED APPLICATIONS
A working LAN connection is required (green LED lit on all XM670-XM679K boards of the same LAN). Connect
and configure a pressure transducer only on one XM670-XM679K of the network. Afterwards, the value of
pressure read by the unique transducer connected will be available to each device connected to the same LAN.
By pressing UP ARROW button, the user will be able to enter a fast selection menu and to read the value of the
following parameters:
dPP = measured pressure (only on master device);
dP5 = value of temperature obtained from pressure temperature conversion;
rPP = pressure value read from remote location (only for slave devices).
Examples of error messages:
dPP = Err the local transducer read a wrong value, the pressure is out of the bounds of the pressure
transducer or the P5C parameter is wrong. Check all these options and eventually change the transducer;
rPF the remote pressure transducer is on error situation. Check the status of the onboard GREEN LED: if
this LED is OFF the LAN is not working, otherwise check the remote transducer.
LAST CHECKS ABOUT SUPERHEAT
On the fast access menu:
dPP is the value read by the pressure gauge;
dP6 is the value read by the temperature probe, temperature of the gas on the outlet section of the evaporator;
SH is the value of the superheat. The nA or Err messages mean that the superheat has no sense in that
moment and its value is not available.
5.9 HOW TO CONNECT MONITORING SYSTEM
1) Terminals [36] [-] and [37] [+].
2) Use shielded twisted cable. For example Belden®
8762 o 8772 or cat 5 cables.
3) Maximum distance 1Km.
4) Don’t connect the shield to the earth or to GND
terminals of the device, avoid accidental contacts by
using insulating tape.
Only one device for each LAN has to be connected to the RS485 connection.
The Adr parameter is the number to identify each electronic board. Address duplication is not permitted, in
this case the synchronized defrost and the communication with monitoring system is not guaranteed (the Adr is
also the ModBUS address).
5.10 DIGITAL INPUTS
1) The terminals from [30] to [33] are all free of voltage;
2) Use shielded cable for distance higher than one
meter;
For each input, has to be configured: the polarity of
activation, the function of the input and the delay of
signaling.
The parameters to perform this configuration are i1P, i1F, i1d respectively for polarity, functioning and delay. The
i1P can be: cL = active when closed; oP = active when opened. The i1F parameter can be: EAL = external alarm,
bAL = serious lock alarm, PAL = pressure switch alarm, dor = door switch, dEF = external defrost, AUS = auxiliary
activation command, LiG = light activation, OnF = board On/OFF, FHU = don’t use this configuration, ES =
day/night, HdY = don’t use this configuration. Then there is i1d parameter for delay of activation. For the others
digital inputs there are a set of the same parameters: i2P, i2F, i2d, i3P, i3F, i3d.
5.11 ANALOG OUTPUT
Selectable between 4 to 20mA and
0 to 10Vdc.
Use CABCJ15 to perform the connections
It’s located near the terminal [39] on a 2-pin connector. It’s possible to use the output to control anti-sweat heaters
through a chopped phase controller XRPW500 (500watt) or family XV...D or XV...K.
6. QUICK REFERENCE GUIDE: HOW TO RUN THE SELF ADAPTIVE
REGULATION IN 4 STEPS.
1. After wiring the XM679K, set the proper gas via Fty parameter. Pre-set gas is R404A.
2. Configure the probes:
- Regulation and evaporator probe are preset as NTC. If another kind of sensors is used, set it via
P1c and P2c parameters.
- Superheat evaporator outlet probe is pre-set as Pt1000, if another kind of sensor is used, set it
via P6c parameter.
- The PP11 (-0.5÷11bar) is pre-set as pressure probe. It operates at relative pressure (Pru = rE).
If you’re using a ratiometric transducer, set P5c = 0-5, then use parameters PA4 and P20 to set
the range
NOTE: check the pressure gauge reading with the value of dPP, press the UP arrow once to enter
the Fast Access Menu. If ok, proceed; otherwise solve the situation before proceeding acting on
par. Pru, PA4 and P20.
3. Set the parameters for self adaptive regulation of superheat
NOTE: the parameters Pb (regulation band) and Int (integral time) are automatically calculated by the
controller
- Set CrE = no, this disable the continuos regulation of the temperature. Default is CrE = no.
- Set SSH, superheating setpoint: a value between 4 and 8 is acceptable. Default is SSH=8
- Set AMS = y to start the self adaptive regulation. Default is AMS = y
- Set ATU = y to start the search of the lowest stable superheat. Default is ATU = y. This function
reduces automatically the setpoint in order to optimize the use of the evaporator, keeping, at the
same time, the superheating regulation stable. The minimum allowed SH set point is LSH+2°C.
- Set LSH, low superheating limit: a value between 2-4 is acceptable. Default is LSH = 3
- Set SUb, pressure filter: Default is SUb = 10. The value can be increased up to 20 in case of too
fast response of the pressure variations.
4. Set the parameters for the temperature regulation
- Set the temperature setpoint. Default is -5°C
- Set the differential HY: Default is 2°C.
- If the capacity of the valve is higher than requested, it can be reduced by the par. MNF (Default
is 100). A proper setting of MnF will reduce the time that the algorithm takes to reach the stability.
MNF value doesn’t affect the band witdh
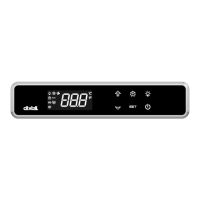
7. USER INTERFACE
7.1 ICONS
With icon ON the output is
active, while with blinking icon
there is a delay.
MEASUREMENT UNIT
°C, Bar and (time) are
ON depending on the
selection.
DURING PROGRAMMING: blink the measurement units of temperature and pressure
7.2 KEYBOARD COMMANDS
Single commands:
Press and hold for 3 sec the defrost button
Press for 3 sec the ON/OFF button (if the function is enabled).
Press for 3 sec the ON/OFF button (if the function is enabled).
Press and hold for about 3 sec to lock (Pon) or unlock (PoF) the keyboard.
Pressed together to exit from programming mode or from menu; on submenus rtC and EEV
this combination allow to come back to previous level.
Pressed together for 3 sec allow to access to first level of programming mode.
7.3 HOW TO MODIFY THE SET POINT FOR AIR TEMPERATURE REGULATION
The thermostat set point is the value that will be used to regulate the air temperature. The regulation output is
controlled by the electronic valve or by the relay.
Press SET button for 3 sec, the measurement units will blink together.
 Loading...