Types 1098-EGR and 1098H-EGR
15
Replacing Travel Indicator Assembly
When performing maintenance on the original
Type 1098-EGR body ange, travel indicator
replacement is recommended. The redesigned
travel indicator assembly is incorporated into all
Quick- Change Trim Kits and on the Travel Indicator
Kits. The elastomer repair kits contain the components
for the redesigned travel indicator assembly.
1. Remove the travel indicator assembly by removing
lower indicator tting (key 5) from the body ange
(key 2).
2. Coat the threads of the lower indicator tting
(key 5) with a good grade of general-purpose grease.
3. Install travel indicator assembly (10C1212), torque
to 40 ft-lbs / 54 N•m.
4. Check indicator zeroing by unscrewing the
indicator protector (key 19) and seeing if the ange
of the indicator nut (key 22) lines up evenly with
the bottom marking on the indicator scale (key 18).
If not, remove the indicator scale and separate
the indicator nut and hex nut (key 8). Hold the
indicator scale against the indicator tting (key 5)
with the scale base resting against the shoulder of
the tting and turn the indicator nut until its ange
is aligned with the bottom scale marking. Then
lock both nuts against each other and install the
indicator scale and protector.
Replacing Trim Parts
Perform this procedure when inspecting, cleaning or
replacing individual trim package parts. Key numbers
are referenced in Figures 11 and 12.
Note
O-ring, travel indicator parts or optional
travel stop (key 32) in step 1 can be
gained without removing the body
1. Remove the travel indicator assembly by removing
lower indicator tting (key 5) from the body ange
(key 2). Proceed to step 5 if maintenance on
only the travel indicator parts is needed and then
proceed to step 11 for reassembly instructions.
2. Remove the cap screws (key 3) on a cast iron
body or remove the stud bolt nuts (key 29, not
shown) on a steel body and pry the body ange
(key 2) loose from the valve body (key 1).
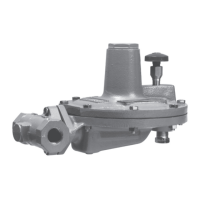
10C1212
Figure 9. Types 1098-EGR and 1098H-EGR
Travel Indicator Assembly
19
10
37
35
7
21
6
9
28
23
36
5
8
22
18
3. Use the valve body (key 1) as a holding xture
if desired. Flip the body ange (key 2) over and
anchor it on the valve body as shown in Figure 10,
removing the pipe plug (key 31) rst if necessary.
4. To gain access to the port seal (key 12), upper seal
(key 15) or valve plug (key 16) part, unscrew the
seat ring (key 13) from the cage (key 11) and the
cage from the body ange (key 2). For leverage,
a wrench handle or similar tool may be inserted
into the seat ring slots (Figure 10) and a strap
wrench may be wrapped around a standard or a
Whisper Trim
™
Cage or a soft bar may be inserted
through the windows of a standard cage. To remove
the piston ring (key 14) and/or plug O-ring (key 20),
remove the valve plug (key 16) from the body
ange, insert a screwdriver into the precut fold
over area of the piston ring and unfold the piston
ring. Proceed to step 6 if no further maintenance
is necessary.
5. To gain access to a part in the travel indicator
assembly, remove the indicator protector (key 19)
and indicator scale (key 18). Since some
compression is left in the spring,carefully remove
the anged nut (key 22) and hex nut (key 8). A
screwdriver may be inserted through the press-t
bushing (key 6) to remove the stem O-ring without
removing the bushing. If necessary, unscrew the
travel stop (if used) and unclip the E-ring from the
indicator stem.

 Loading...