Instruction Manual
D100310X012
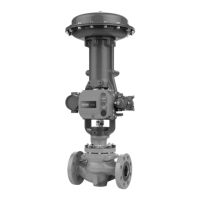
667 Actuator (Size 30/30i - 76/76i and 87)
May 2018
9
2. Set the diaphragm loading pressure to a value less than the lower bench set pressure, as indicated on the
nameplate, or near zero. The down travel stops (key 77) should be contacting the yoke.
3. Slowly increase the pressure towards the lower bench set pressure while checking for the first linear movement of
the actuator stem.
Note
Before turning the spring adjuster on size 70/70i, 76/76i, or 87 actuators, assemble the stem connector around the actuator stem
and the anti‐rotating lug on the yoke. Mark the actuator stem as a visual reference to verify that stem rotation does not occur.
Remove the stem connector before rechecking the bench set.
4. If movement occurs before or after the lower pressure is reached, adjust the spring adjuster (see figure 4). Thread
the adjuster up or down on the actuator stem until the actuator stem movement is first detected at the lower bench
set pressure.
5. Apply the upper bench set pressure indicated on the nameplate to the diaphragm. This will retract the actuator
stem away from the valve. Mark the end of the actuator stem on a nearby surface using tape or some other method.
6. Slowly decrease the diaphragm pressure until the lower bench set pressure is applied. Again, the down travel stops
(key 77) should be against the yoke.
7. Measure the distance between the mark or tape to the end of the actuator stem. This distance should match the
rated travel indicated on the nameplate.
8. If the measured travel matches the nameplate travel, bench set is complete. Proceed to the Installing the Stem
Connector Assembly subsection.
9. If the measured travel is not exact, consider the spring free‐length and spring rate tolerances may produce a slightly
different bench set than specified. Contact your Emerson Automation Solutions sales office for assistance.
Installing the Stem Connector Assembly
When installing the stem connector assembly (key 31), the actuator and valve stem threads should engage the
threads of the stem connector by a distance equal to the diameter of the stem.
WARNING
Install the stem connector securely before a positioner is mounted to the actuator and pressurized, using only a
regulator-controlled air supply, not the positioner, to move the actuator stem.
To avoid personal injury or property damage, keep hands and tools out of the actuator stem travel path while applying
loading pressure to move the actuator stem in the following steps.
CAUTION
To avoid damaging the seating surfaces, do not rotate the valve plug while it is seated. Exercise care while installing the
stem connector assembly to avoid damage to the valve plug stem and valve stem threads.
Note
Replacement stem connectors are an assembly of two stem connector halves, cap screws, and a spacer between the connector
halves. Remove the spacer and discard it, if present, before clamping the actuator and valve stems together. Use only a mated pair
of stem connectors.
 Loading...