Instruction Manual
D100423X012
V500 Valve
July 2017
18
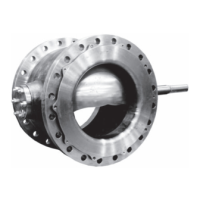
Figure 9. Ram Dimension for Bearing Removal (also see table 10)
A3308
A
L
Assembly of Valve Plug, Shaft, and Bearings
Note
Before starting to assemble the valve components, place the valve body (key 1) on a flat surface with the retainer (key 5) facing
down as shown in figure 10. This orientation of the valve body allows easier installation of the valve plug.
1. Thoroughly clean the parts before assembly.
2. If O‐rings (keys 19 and 20) are used, apply a small amount of lubricant to the O‐rings so the bearings will easily slide
into the valve body. Insert the smaller O‐ring (key 20) inside the bearing and the larger O‐ring (key 19) around the
outside of the bearing.
CAUTION
To avoid damage to O‐rings resulting from contact with sharp edges within the bearing holes, use appropriate care when
installing the O‐rings.
3. Slide the bearings (key 6) and O‐rings (keys 19 and 20), if used, into the valve body as shown in figures 13 and 12.
Note
Place the valve body on a flat surface with the retainer (key 5) facing down so that you can look into the valve body cavity. This
orientation makes installing the valve plug easier.
4. Inspect the valve shaft (key 3). Insert the shaft end opposite the splined end into the packing box and through the
set of bearings installed in the packing box in step 3. Stop before the shaft enters the main valve body cavity.
Support the splined end of the shaft.
5. Determine the correct orientation of the valve plug (key 2) required by the specific installation orientation of the
valve and the flow direction of the process fluid. See figure 2.
6. Inspect the valve plug. Note the location of the larger hole on the valve plug hub. Place the valve plug in the valve
body cavity.
7. Position the valve plug so that the larger hole is facing up, away from the seat ring and retainer. The valve plug must
also be oriented so that the seating surface of the plug is correctly positioned for the specific application as shown
by the illustrations in figure 2.

 Loading...