Instruction Manual
D101554X012
Vee-Ball Valves
March 2021
21
Disassembly
WARNING
When the actuator is removed from the valve, the ball/shaft assembly may suddenly rotate, with a shearing, cutting
motion, which could result in personal injury. To avoid injury, carefully rotate the ball to a stable position at the bottom of
the valve body cavity. Make sure the ball will not rotate.
Key numbers in this procedure are shown in figures 24, 25, and 26, unless otherwise indicated.
1. A taper key (key 4, figures 14, 24, 25 and 32) is used to connect the ball and drive shaft in NPS 3 through 12 valves.
2. Carefully rotate the ball to the open position after the actuator is disconnected. Make sure the ball will not rotate
(see warning above). Provide support for the ball during the following disassembly.
3. Working from the small end of the groove pin (key 7), use a pin punch to drive the groove pin out of the ball ear and
follower shaft.
For tack welded taper keys, driving the taper key out of the ball ear will shear the tack welding.
4. Locate the small end of the taper key (key 4, see figures 14, 24, 25 and 32). Using a pin punch on the smaller end of
the taper key, drive it out of the ball (key 2) and drive shaft (key 6). Note: driving the taper key in the wrong
direction will tighten it.
5. Pull the drive shaft (key 6) out of the actuator side of the valve body.
CAUTION
Exercise care to avoid damaging components in the following procedure.
6. The ball will be free to move when both shafts are removed. Make sure the sealing surface of the ball is not
damaged while removing the follower shaft.
a. Unscrew the pipe plug (key 25) if one is installed. Use a punch to drive the follower shaft (key 9) into the center of
the ball.
b. If a pipe plug is not installed, use a piece of continuous threaded rod as a removal rod when moving the follower
shaft (key 9) into the center of the ball. Refer to the table 4 for a description of the size threaded rod needed. The
length of the rod should allow easy working room from the valve body.
7. Carefully remove the follower shaft and ball (key 2) from the valve body.
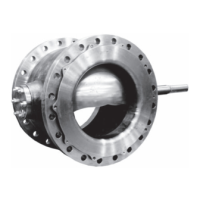
For NPS 4 valves with attenuator, remove the ball/attenuator through the inlet of the valve. Taking hold of the follower
shaft ear on the ball/attenuator, you must position the scalloped edge of the attenuator against the valve bore
opening and then pivot, or roll, the ball/attenuator out of the valve body (see figure 18).
For NPS 6, 8, 10, and 12 valves with attenuator, remove the ball/attenuator through the outlet of the valve by carefully
turning and manipulating the ball. The NPS 6, 8, 10, or 12 ball/attenuator will not come straight out of the valve body.
8. Remove the bearings (key 10) by hand. If the bearings are tight in the valve body, then pull or drive them out with a
slight pressure.
D To remove the follower shaft bearings, use a blind‐hole bearing puller. If you do not have such a tool, you can
machine the bearing out.
 Loading...