Instruction Manual
D101554X012
Vee-Ball Valves
March 2021
33
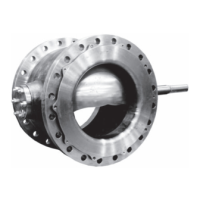
4. Insert the Cavitrol Hex anti-cavitation trim into the valve, ensuring the holes in the body outlet flange align with the
holes in the trim flange.
5. Install two fasteners (key 21) and adequately tighten to secure the trim to the valve assembly.
Actuator Mounting
Use the appropriate actuator instruction manual, this section of this manual, and figure 23 of this manual when
mounting the actuator or changing actuator styles and positions.
1. To help ensure correct centering of the Vee‐Ball (key 2) on the seal (key 11), be sure the ball is closed when
mounting the actuator (for applications other than Spring Return Fail‐Open).
2. Clean the valve shaft and actuator lever splines to be sure the actuator lever will slide on easily. Only drive the lever
in if absolutely necessary.
3. Carefully wedge the ball solidly against the actuator‐side bearing, using a screwdriver or similar tool inserted
between the lower ear of the ball and the valve body. This will center the ball. See figure 6.
4. Keep the wedge in place while installing the lever, if necessary. Remove the wedge after you have clamped the
actuator lever on the valve shaft and have connected the lever to the actuator piston rod or diaphragm rod.
Determining Mounting Position
The actuator can be either right or left‐hand mounted, with the actuator on the right or left side when viewed from
upstream (see figure 23).
The Series B Vee‐Ball, NPS 4 through 12 with attenuator, and the NPS 1 micro‐notch Vee‐Ball have one V‐notch. For
right‐hand mounting (standard), the ball will be in the top of the valve body when the valve is open and the shaft is
horizontal. In this position the ball rotates CCW to Close. For left‐hand mounting (standard), the ball will be in the
bottom of the valve body when the valve is open and the shaft is horizontal. In this position the ball rotates CCW to
Close. An optional ball for left‐hand mounting, which rotates into the top of the valve body when the shaft is
horizontal, is also available. In this position the ball rotates CW to Close.
The NPS 1 through 2 has two notches, and can be rotated in either direction.
Determining Closed Position
1. The valve must be removed from the line to check the position of the ball.
WARNING
The Vee‐Ball closes with a shearing, cutting motion. To avoid personal injury, keep hands, tools, and other objects away
from the ball while stroking the valve.
2. Rotate the ball to the closed position.
3. Position the ball in the proper location
For Series B:
D When viewed from the valve body inlet, the ball is in the proper position when the flat spot on the top of the ball is
exactly in the center of the seal package.
Make a copy of the centering template in figure 27 out of a suitable stiff material. Place the centering template in the
opening at the seal (See figure 27). Find the center of the template and make sure the spot on the ball is centered
directly below it.
 Loading...