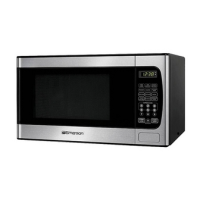
LOCATION OF CONTROLS
5
6
8
Power
Defrost/Clock
9
12
Auto Cook
Reheat
10
13
Kitchen Timer
14
Pause/Cancel
Time/Weight
15
START/+30s
11
16
1
2 3 4
7
1. Popcorn
2. Potato
3. Fresh
Vegetable
4. Pizza
5. Beverage
6. Frozen
Vegetable
1.
Door Latches – When the door is
closed, they will automatically lock
shut. If the door is opened while the
oven is operating, the magnetron
will automatically shut off.
2.
Door Screen – Allows viewing of
food. The screen is designed so
that light can pass through, but not
the microwaves.
3.
Roller Guide – Supports the glass
cooking tray. Must always be in
proper position before operating
the oven.
4.
Rotating Axis/Coupler – The
glass cooking tray (turntable) sits
on the axis, which coupled with the
motor underneath to rotate the
glass cooking tray.
5.
Glass Cooking Tray (Turntable)
– Made of special heat resistant
glass. The tray must always be in
proper position before operating
the oven. Do NOT cook food
directly on the tray.
6.
Control Panel – The control
buttons are shown on the right.
7.
Spatter Shield (Waveguide Cover)
(Do NOT remove) – Protects the
microwave outlet from splashes of
cooking foods.
8.
Display
9.
Power Button – Used to set a power
level.
10.
Auto Cook Menu Button – Used to
select an Auto Cook program.
11.
Time/Weight Knob – Used to set
time or weight.
12.
Defrost/Clock Button – Used to set
the clock or to set the oven to estimate
the defrosting time or by weight entered.
13.
Reheat Button – Used to reheat the
food by weight selected.
14.
Kitchen Timer Button – Used to set
the kitchen timer function.
15.
Pause/Cancel Button – Used to stop
or clear a cooking program.
16.
START/+30s Button – Used to start
or add 30 seconds cooking time for
each press of the button.
Alert: Please clean microwave oven often. Failure to do so may create a fire
hazard and void the warranty.
 Loading...