Do you have a question about the ENCLO Liberty Lattice ZP19052 and is the answer not in the manual?
| Brand | ENCLO |
|---|---|
| Model | Liberty Lattice ZP19052 |
| Category | Fencing & Gates |
| Language | English |
Important points regarding assembly preparation, including checking packaging, using a non-abrasive surface, and workspace requirements.
Information on how to address missing or damaged parts, including website and contact details for replacements.
Guidance on seeking assistance for assembly or installation issues, providing contact numbers.
Instructions for returning the product, emphasizing resolving issues first and initiating returns through the original seller.
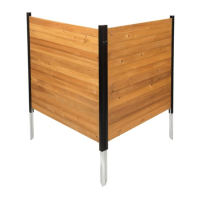
Attach (2) loose Rail End Caps (B) to the ends of the Front Panel Top Rail (F) and Front Panel Bottom Rail (D).
Position (2) Posts (G) with routed holes facing inwards towards each other.
Insert (9) Horizontal Pickets (H) into the routed holes of one post, then guide them into the opposite post.
Slide front bottom rail over posts, align holes, and drive (4) 3/4" screws (J) into front and back pre-drilled holes.
Insert (8) Vertical Pickets (I) into the routed picket holes in the front bottom rail.
Slide front top rail over posts, align holes, and drive (4) 3/4" screws into aligned pre-drilled holes.
Repeat steps 2-4 using Side Panel Top Rail (E) and Side Panel Bottom Rail (C) for the other two panels.
Attach side panels to the front panel using (4) 4" screws (K) into pre-drilled holes on top and bottom rails.
Install (6) Post Caps (A) over the tops of the posts to complete the screen assembly.