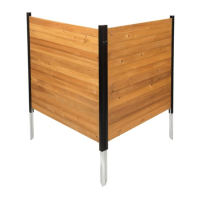
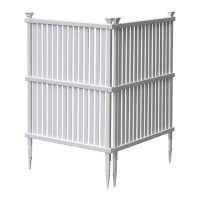
The Enclo Waverly Screen Kit is a versatile and stylish solution designed to "hide it with style," offering both aesthetic enhancement and practical functionality for outdoor spaces. This assembly manual details the construction and installation of a screen system that can be used for various purposes, such as concealing unsightly outdoor elements, creating privacy, or defining different areas within a garden or patio. The kit is available in two color options: EC18010 (White Color) and EC18011 (Cedar Color), allowing users to choose the finish that best complements their existing outdoor decor.
Function Description
The primary function of the Enclo Waverly Screen Kit is to provide a decorative and functional barrier or enclosure. It is designed to be an attractive alternative to traditional fencing or other less visually appealing solutions for outdoor screening. The screen panels, composed of horizontal slats and vertical posts, create a louvered effect that offers a balance of privacy and airflow, preventing a completely solid and imposing barrier.
One of the key applications is to conceal outdoor eyesores. This could include air conditioning units, garbage cans, pool equipment, utility boxes, or other items that detract from the beauty of an outdoor living area. By strategically placing the screen panels, users can effectively hide these elements, improving the overall visual appeal of their property.
Another significant function is creating privacy. The screen can be installed to block views from neighbors, busy streets, or other areas where a sense of seclusion is desired. This is particularly useful for patios, decks, hot tubs, or outdoor seating areas where homeowners want to relax without feeling exposed. The louvered design allows for some light and air to pass through, maintaining an open feel while still offering a substantial degree of privacy.
The Enclo Waverly Screen Kit also serves to define outdoor spaces. It can be used to delineate different zones within a larger garden, such as separating a dining area from a lounging area, or creating a distinct entryway. This helps to organize the outdoor environment and make it feel more structured and intentional.
Furthermore, the screen can act as a decorative backdrop for plants or other garden features. Its clean lines and choice of colors provide a neutral yet elegant background that can highlight foliage, flowers, or outdoor artwork. It can also be used to support climbing plants, adding a living element to the screen itself.
The modular nature of the kit allows for flexible configurations. Users can install individual panels as standalone screens or connect multiple panels in a straight line or at corners to create longer runs or enclosed spaces. This adaptability ensures that the screen can be tailored to fit specific spatial requirements and design preferences.
Usage Features
The Enclo Waverly Screen Kit is designed for ease of assembly and installation, making it accessible for DIY enthusiasts. The assembly process is broken down into clear, sequential steps, starting with laying out materials and progressing through panel assembly, ground stake installation, and connecting multiple screens.
Assembly Process:
- Step 1: Lay Out Materials: This initial step ensures all components are present and organized, preventing delays during assembly. The kit includes ground stakes, slats, rails, left and right posts, joiner clips, and self-drilling stainless steel screws.
- Step 2: Assemble the Panel: This involves sliding rails into the routed holes of a left post, then sliding slats into the angled slots of the same post. A right post is then slid over the opposite ends of the slats and rails, ensuring a tight and square fit. Self-drilling stainless steel screws are then driven into pre-drilled holes to secure the posts, rails, and slats, forming a complete screen panel. The use of pre-drilled holes simplifies the process and ensures proper alignment.
- Step 3: Install the Ground Stakes: Ground stakes are slid into the bottom of the posts until pre-drilled holes align. Screws are then driven in to secure the stakes to the posts. These stakes are crucial for anchoring the screen firmly into the ground.
- Step 4: Assemble the Second Screen Panel: If multiple screens are being installed, the assembly steps for the first panel are repeated to create additional panels.
- Step 5: Install Panels in the Ground: This step focuses on placing the assembled screen panels into their final desired locations. Users are instructed to push the unit into the ground, ensuring the entire length of the ground stakes is embedded. If the ground is too hard, the manual provides helpful tips:
- Loosening the soil: Using a claw hammer to loosen the top 6-7 inches of soil and adding water can make installation easier.
- Using a block of wood: To protect the top of the post, a block of wood can be used when gently hammering the post into the ground.
- Optional for hard ground/multiple panels: For very hard ground or when installing many panels, an auger bit (1½" diameter, commonly used for planting tulips) can be used to drill 12-16 inch deep holes. These holes can then be filled with water before pushing the panel posts in. This feature highlights the kit's adaptability to various ground conditions.
- Step 6: Connect the Screens: For installations requiring more than one screen, joiner clips and self-drilling stainless steel screws are used to connect panels. The manual illustrates two common applications:
- Straight Line Application: Panels are connected side-by-side to form a continuous screen.
- Corner Application: Panels are connected at a 90-degree angle to create an L-shaped configuration, useful for enclosing areas or navigating corners of a property.
Important Assembly Considerations:
- Non-abrasive surface: It is recommended to assemble components on a non-abrasive surface, such as the shipping box, to prevent scratching the materials.
- Adequate space: An area of approximately 5'x 8' is suggested for unobstructed assembly, allowing enough room to maneuver the components.
- No excessive force: The design should allow for components to fit together without requiring excessive force, indicating a well-engineered product.
- Squareness: Ensuring the unit is square before driving in screws is crucial for a stable and aesthetically pleasing final product.
Video Assembly Guide: The inclusion of a QR code on the front cover that links to an assembly video is a significant usage feature. This provides a visual, step-by-step guide that can be incredibly helpful for users who prefer visual instructions or need clarification on specific steps, enhancing the ease of use.
Maintenance Features
The Enclo Waverly Screen Kit is designed with durability in mind, utilizing materials and fasteners that contribute to its longevity and minimize the need for extensive maintenance.
- Self-Drilling Stainless Steel Screws: The use of stainless steel screws is a key maintenance feature. Stainless steel is highly resistant to rust and corrosion, which is essential for outdoor applications where the fasteners will be exposed to moisture and varying weather conditions. This prevents unsightly rust stains and ensures the structural integrity of the screen over time. The "self-drilling" aspect simplifies assembly, but the material choice is what contributes to long-term durability.
- Material Durability: While the specific material of the posts, slats, and rails is not explicitly detailed in the provided pages, the context of an outdoor screen kit suggests materials chosen for weather resistance. The availability in "White Color" and "Cedar Color" implies either a durable composite, vinyl, or treated wood, all of which are typically selected for their ability to withstand outdoor elements with minimal degradation. These materials generally require less upkeep compared to untreated wood, which might need regular sealing or painting.
- Easy Cleaning: Outdoor screens are inevitably exposed to dirt, dust, pollen, and environmental grime. The smooth surfaces of the components (implied by the design) would likely allow for easy cleaning with a hose, a damp cloth, or a mild detergent solution, requiring minimal effort to keep the screen looking fresh.
- Replacement Parts Availability: The manual explicitly addresses "MISSING OR DAMAGED PARTS?" and directs users to a website (parts.nychbrands.com) and customer support (support@encloscreens.com, phone numbers provided) for ordering replacement parts. This is a crucial maintenance feature, as it ensures that individual components can be replaced if they become damaged or lost, rather than requiring the purchase of an entirely new kit. This extends the lifespan of the product and makes it more sustainable.
- Customer Support: The availability of customer service agents via phone during weekdays (9 am-5 pm EST) for assembly and installation help, as well as for missing/damaged parts, is a significant support feature that indirectly contributes to maintenance. Prompt assistance can prevent incorrect assembly that might lead to premature wear or damage, and efficient part replacement ensures the screen can be repaired quickly.
- Batch Lot Information: The recommendation to provide the batch lot number (stamped on the end of the box) when seeking assistance helps customer service quickly identify the specific product version, streamlining the process of troubleshooting or ordering correct replacement parts.
In summary, the Enclo Waverly Screen Kit is a thoughtfully designed product that combines functionality, aesthetics, and user-friendliness. Its modular design, clear assembly instructions, and robust material choices make it a practical and durable solution for enhancing outdoor living spaces while minimizing maintenance efforts.