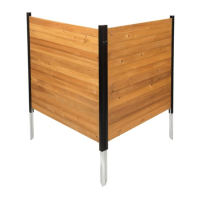
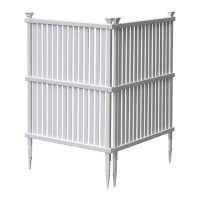
This document provides assembly instructions for the Fresno Screen Kit (2 PACK), a decorative and functional outdoor privacy screen manufactured by ENCLO. The kit is available in two color options: EC18014 (Cedar Color) and EC18015 (Charcoal Color).
Function Description
The Fresno Screen Kit is designed to "Hide It With Style," offering a solution for enhancing privacy and aesthetics in outdoor spaces. It consists of two panels that can be installed individually or connected to form a corner or straight line application. The screen is intended for ground installation, providing a semi-permanent structure to define areas, conceal unsightly objects, or create a decorative backdrop.
Important Technical Specifications
- Product Dimensions (per panel):
- Width: 63.3 inches
- Height: 48.0 inches (above ground) + 11.1 inches (below ground for posts) = 59.1 inches total post length.
- Depth (slats): 0.9 inches
- Post dimensions: 4.0 inches (width at base) x 4.6 inches (depth at base).
- Components (per 2-panel kit):
- A. Thin Slat: 10 pieces, 1/4" x 1 1/4" x 62"
- B. Square Slat: 10 pieces, 5/8" x 5/8" x 62"
- C. Wide Slat: 12 pieces, 3/8" x 2 7/8" x 62"
- D. Middle Post: 2 pieces, 5/8" x 1" x 52 1/2"
- E. End Post: 4 pieces, 7/8" x 1 1/2" x 59"
- F. Top Rail: 2 pieces, 1 1/2" x 1 1/2" x 63 1/4" (with large cut holes on one side only)
- G. Bottom Rail: 2 pieces, 1 1/2" x 1 1/2" x 63 1/4"
- H. Rail End Cap: 8 pieces (4 installed, 4 loose)
- I. Joiner Clip: 4 pieces
- J. 3/4" Self-Drilling Steel Screws: 32 pieces
- Assembly Time: Approximately 60 minutes for 2 panels.
- Recommended Assembly Area: Approximately 5' x 8' for unobstructed assembly.
Usage Features
- Assembly Process:
- Step 1: Inspect Parts: Check inside larger pieces for other packed materials.
- Step 2: Lay Out Materials: Organize all components as listed above.
- Step 3: Assemble First Panel:
- Slide slats (Wide, Square, Thin) into the routed holes of an End Post.
- Slide the Middle Post over the slats, positioning it in the middle.
- Slide a second End Post over the slats, ensuring all slats are pushed tightly against the back wall of the posts.
- Slide the Bottom Rail over the post bottoms, aligning pre-drilled holes. Secure with three 3/4" self-drilling steel screws.
- Slide the Top Rail over the post tops, aligning pre-drilled holes. Secure with three 3/4" self-drilling steel screws.
- Turn the panel over and drive six additional 3/4" self-drilling steel screws through the pre-drilled holes in the top and bottom rails.
- Insert two Rail End Caps into the ends of the rails.
- Step 4: Assemble Second Panel: Repeat Steps 2-3 for the second panel.
- Installation in the Ground:
- Standard Installation (Step 5.1): Move the screen to its final location and attempt to push it into the ground, ensuring it is level. Two people are highly recommended for this step.
- Installation in Hard Ground (Step 5.2): If the panel cannot be pushed, loosen the top 6" of ground with a claw hammer, add water to the loosened soil, and gently hammer each post into the ground using a block of wood to protect the post.
- Optional for Hard Ground / Multiple Panels (Step 5.3): For very hard ground or multiple installations, use a 1 1/2" diameter auger bit (e.g., for planting tulips) to drill 12" to 16" deep holes. Fill the holes with water, then push the panel posts into the holes.
- Connecting the Panels (Step 6.1):
- Corner Application: Install Joiner Clips (I) to connect panels at a corner.
- Straight Line Application: Install Joiner Clips (I) to connect panels in a straight line.
- Customer Support:
- Missing/Damaged Parts: Visit parts.nychbrands.com or contact support@encloscreens.com or call 704-892-5222 / 877-234-6196. Customer service agents are available weekdays from 9 am-5 pm EST. Provide the item number (EC18014/EC18015) and specific part name (from page 4), and the batch lot number (stamped on the end of the box).
- Assembly Help: Call 704-892-5222 / 877-234-6196 for assistance.
- Returns: Contact the original company of purchase.
Maintenance Features
- The manual emphasizes placing components on a non-abrasive surface during assembly to avoid scratching, suggesting a focus on preserving the product's finish.
- No specific long-term maintenance instructions are provided within the manual, but the use of self-drilling steel screws suggests a durable construction. The product is designed for outdoor use, implying resistance to typical weather conditions.