DJM2.4 MANUAL
14 Oct 00 R2
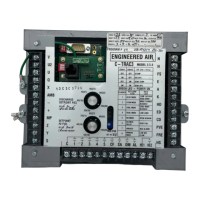
management system the DJM2.4 has the ability to accept that as a control
signal if wired into + and - terminals. This is similar to the above set up
except the control source is different. (If controlled by a BMS, there should
be a discharge control device to stop discharge air temperatures exceeding
120°F to avoid high limit tripping. The BMS could reset its discharger signal
from an override: e.g. room temperature.)
The BMS voltage input can be wired two ways.
Method 1
(Old method used on original DJM controls and not recommended on the DJM2 unless it is desired
to continue to use it when retrofitting an old DJM.) Uses an external 33,000-ohm series resistor
and Ziener diode. This is the method used by the original DJM. This drops the 10-volt signal down
to about 3.5 volts (the signal used by the original DJM). Unless necessary to use method 1, it is
best to use method 2 (which is used on all new equipment. It is possible to use method 2 if
converting from a DJM to a DJM2.4).
Method 2
(Recommended for new designs) Uses no external components and has the input signal directly
connected to terminals "+" and "-". Method 2 is optically isolated and is the preferred wiring
method. As normally shipped from the factory, the DJM2.4 is configured to have an input
impedance of 500-ohms on the "+ and -" terminals. At 10 VDC input the current would be 20 mA.
If the host BMS system cannot source 20 mA, the input impedance can be increased to 1500-ohms
by removing (cutting) resistor R19 (680-ohms). This resistor is located next to terminals "+" and "-
". To gain access to R19 to cut it, the DJM2.4 must be turned over.
BMS Calibration
Refer to instructions in above section DJM2.4 Controlled by DCV in section X, regarding pot
settings and BMS calibration.
NOTE: These controls are calibrated at the factory and in most instances field
calibration is not necessary.
XIII. DISCHARGE SENSOR READOUTS, CALIBRATION, ETC.
If the DJM2 is being used as a stand-alone device, there are two possible devices used as a set
point. They are a Maxitrol series 14 set-point dial TD114 (which works in association with the
Maxitrol TS114 discharge air temperature sensor), or the built in set point (which is used with a
Johnson TE 6000-960 discharge air sensor).
When the Maxitrol or Johnson controls are used the “DCAL” pot can be used for calibration. Set it
to just turn the heat light on when the sensor and set point values match. Note additional
information about the TE6000 and the Maxitrol systems following.
If both a discharge air sensor/set-point and BMS (used as an override) are connected to the
DJM2.4, discharge calibration will be required as the discharge sensor will be acting as a
modulating low limit when the BMS is not calling for override. It should be calibrated with the