EasyManua.ls Logo

Englefield VALENCIA - User Manual

Englefield VALENCIA
4 pages
Print Icon
To Next Page IconTo Next Page
Loading...
1378364-A02-B 25/01/2018
INSTALLATION
INSTRUCTIONS
FURNITURE
Englefield
VALENCIA
TM
LED Mirrors
NOTES:
1. Fitting instructions are intended to facilitate installation. They are not
subject to contract.
2. Since the type of wall determines the fittings necessary for each unit,
bolts and screws have not been supplied for hanging the mirror but left
to the responsibility of the installer.
WARNINGS:
This installation must comply with the most recent AS/NZS 3000
electrical standards.
The light source of this luminaire is not replaceable; when the light
source reaches its end of life the whole luminaire shall be replaced.
Question and Answer IconNeed help?

Do you have a question about the Englefield VALENCIA and is the answer not in the manual?

Summary

Warnings and Notes

Electrical Standards Compliance

Installation must comply with the most recent AS/NZS 3000 electrical standards.

Light Source Replacement Policy

The light source is not replaceable; the entire luminaire requires replacement when the light source reaches end of life.

Fitting Instructions Disclaimer

Fitting instructions are provided to facilitate installation and are not subject to contract.

Wall Mounting Hardware Responsibility

Wall fittings are not supplied, as they depend on the wall type and are the installer's responsibility.

Before Installation Preparation

Pre-Installation Checks and Guidance

Read instructions carefully, familiarize with tools, materials, and sequences. Inspect mirror for transit damage before installation.

Product Dimensions and Requirements

Rough-In Dimensions: 750 mm Model

Diagrams illustrating the rough-in dimensions for the 750mm Valencia LED Mirror.

Rough-In Dimensions: 900 mm Model

Diagrams illustrating the rough-in dimensions for the 900mm Valencia LED Mirror.

Wall Mounting Fastener Requirement

The two top fasteners must be securely fixed to a nog in the wall.

Installation Steps

Location Selection and Marking

Select an appropriate location, mark fixing holes accurately using a spirit level and dimensions.

Bracket Installation on Mirror

Install the bracket onto the bottom of the mirror using the two small screws provided.

Mirror Hanging and Leveling

Hang the mirror on cleats, use a spirit level to check for levelness, and make adjustments as needed.

Wall Bracket Mounting

Mount the bracket to the wall at the marked location using larger screws, and use wall anchors if no stud is present.

Electrical Connection and Completion

Electrical Wiring by Certified Electrician

Electrical hard wiring must be connected by a certified electrician, complying with AS/NZS 3000 standards.

Final Mirror Attachment

Lift and lower the mirror onto cleats, align the lower bracket, and fasten it securely to the mirror.

Product Features and Maintenance

Sensor Switch Operation

The LED light is controlled by a sensor switch located at the bottom right-hand corner, activated by hand.

Demister Functionality

The built-in demister activates when the LED light is switched on to prevent fogging.

Cleaning and Maintenance Advice

Remove moisture after each use. Clean with a soft cloth, warm water, and methylated spirits. Avoid abrasive or harsh cleaners.

Overview

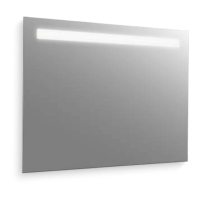
The Valencia LED Mirror is a modern bathroom mirror designed with integrated LED lighting and a demister function, offering both aesthetic appeal and practical utility. It is available in two sizes: 750mm and 900mm models.

Function Description

The primary function of the Valencia LED Mirror is to provide illuminated reflection, making it ideal for grooming tasks in bathrooms. The integrated LED lighting ensures clear visibility, while the demister function prevents the mirror surface from fogging up, especially in humid bathroom environments.

Important Technical Specifications

  • Models:
    • 750mm Model: 750mm width, 650mm height.
    • 900mm Model: 900mm width, 650mm height.
  • Electrical Standards: Installation must comply with the most recent AS/NZS 3000 electrical standards. Electrical hard wiring should be connected by a certified electrician.
  • Light Source: The light source of this luminaire is not replaceable. When the light source reaches its end of life, the entire luminaire must be replaced.
  • Mounting: Designed for wall mounting, with the top fasteners requiring fixation to a nog (stud) in the wall for secure installation. The bottom bracket can be mounted to the wall using a supplied wall anchor if no stud is present.
  • Power Connection: Requires hard wiring to an electrical supply.

Usage Features

  • Sensor Switch: The mirror features a sensor switch located at the bottom right-hand corner. To activate or deactivate the LED light, users simply place their hand under the sensor.
  • Demister Function: The built-in demister automatically activates when the LED light is switched on. This feature is designed to prevent the mirror from fogging up, making it particularly useful before bathing or showering. For optimal performance, it is recommended to turn on the LED light prior to generating steam in the bathroom.
  • Installation Flexibility: The mirror's design allows for precise positioning, with instructions provided for marking fixing holes and ensuring a level installation. The installation process involves mounting a bottom bracket to the mirror, hanging the mirror on cleats, marking the bracket's wall location, removing the mirror, and then securing the bracket to the wall before re-hanging and fastening the mirror.

Maintenance Features

  • Cleaning:
    • It is recommended to remove all moisture from the mirror surface with a soft cloth after each use to prevent water spots and potential damage.
    • For cleaning the mirror surface, use a soft cloth dampened with warm water and methylated spirits.
    • Apply the cleaning solution directly to the cloth, not directly to the mirror surface. Applying cleaners directly to the mirror surface could allow them to come into contact with the back of the mirror, potentially causing damage.
    • Ensure all edges of the mirror are thoroughly dried after cleaning to prevent moisture ingress.
  • Avoidance of Harsh Cleaners:
    • Do not use abrasive cleaners, as these can scratch the mirror surface.
    • Avoid acidic, alkali, or extra-strength ammonia cleaners, as these can damage the copper coating and destroy the mirror's reflective properties.

Installation Notes

  • Fitting instructions are provided to facilitate installation but are not subject to contract.
  • Bolts and screws for hanging the mirror are not supplied, as the type of wall determines the appropriate fittings. The installer is responsible for selecting and providing these.
  • Prior to installation, inspect the mirror for any transit damage or visible defects. If damage is found, do not proceed with installation and immediately advise the supplier.
  • The installation process requires careful attention to detail, including pre-drilling holes accurately and ensuring the mirror is level. It may require two people for certain steps, particularly when hanging and adjusting the mirror.
  • Wiring connections should be made without any slack in the wiring to ensure a neat and safe installation.

Englefield VALENCIA Specifications

General IconGeneral
BrandEnglefield
ModelVALENCIA
CategoryIndoor Furnishing
LanguageEnglish

Related product manuals