This document provides an installation guide and aftercare information for an L Shaped Thermostatic Shower, specifically for model T28 from ENKI®. It is recommended that installation be carried out by a qualified plumber.
Function Description
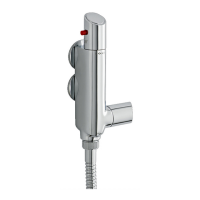
The device is an L-shaped thermostatic shower valve designed to control both water temperature and flow. It features a thermostatic cartridge that maintains a consistent water temperature, preventing sudden changes. The temperature control handle allows users to adjust the water temperature, with a safety stop set at 38°C, which can be overridden by pressing a red button. The side handle controls the water flow from the shower.
Important Technical Specifications
Pressure:
- Minimum working pressure: 0.5 bar
- Recommended working pressure: 1 – 3 bar
- Maximum working pressure: 5 bar
- If pressure exceeds 5 bar, a pressure reducer must be used.
- For optimal efficiency, operating pressures should be balanced.
Water Temperature:
- Hot water supply maximum temperature: 85°C
- Hot water supply recommended temperature: 65°C
- Cold water supply: 10°C - 25°C
- A minimum 10°C difference between the outlet temperature and the hot supply temperature must be maintained at all times.
Dimensions (from diagram):
- Overall height (from bottom of outlet to top of inlet pipe): Approximately 184.6 mm
- Distance between hot and cold inlets (center to center): 45 mm
- Projection from wall to front of body: Approximately 50.5 mm
- Diameter of main body: Approximately 30 mm
- Diameter of outlet: Approximately 30 mm
- Diameter of trim plate: Approximately 44 mm
- Thread size for connections: G1/2"
Usage Features
- Temperature Control: The top handle adjusts temperature. Turning it anti-clockwise increases hot water, and clockwise increases cold water.
- Safety Stop: A default stop is set at 38°C (indicated by a red button). This can be overridden by pressing the red button and continuing to turn the handle for hotter water.
- Flow Control: The side handle regulates the water flow from the shower.
- Temperature Recalibration: If the installed temperature is not satisfactory, the device can be recalibrated. This involves turning the temperature handle to the stop, removing the handle cap and screw, pulling off the handle, turning the spindle on the thermostat until the desired temperature is reached, and then reassembling the handle with the stop in the maximum position. Recalibration should only be performed when absolutely necessary.
Maintenance Features
General Aftercare:
- To maintain the appearance, the fitting should be cleaned regularly with a clean, soft, damp cloth.
- Abrasive cleaners or detergents must not be used as they can cause surface deterioration.
Cleaning Filters (10) and Non-Return Valves (9):
- Turn off the water supply.
- Follow the drain-down procedure.
- Release the grub screws (2) in the mixer body using an Allen key to remove the mixer body from the tails (13).
- Carefully pull out the non-return valves, clean them under warm water, or replace if faulty.
- Remove the filters from the tails and clean them under warm water.
- Replace all components in the order shown in the parts drawing.
- Refit the tails, ensuring they are fully inserted, and secure the grub screws.
- Reconnect the mixer, turn on the water supply, and check for leaks.
Replacing the Thermostatic Cartridge:
- Turn off the water supply.
- Remove the handle cap (19A) and handle screw (1A).
- Remove the handle (21) from the mixer and the nylon stop ring (14).
- Remove the cartridge from the mixer body.
- Clean or replace the cartridge as needed, ensuring components are correctly located for the maximum set temperature.
- If recalibration is required, follow the "Operation & Setting" instructions.
- Once the water supply is turned on, check for leaks.
Replacing the Flow Control Valve:
- Turn off the water supply.
- Remove the handle cap (19) and handle screw (1).
- Pull the handle from the valve.
- Remove the valve from the mixer without disturbing the pipework.
- Clean and replace the valve as necessary.
- Replace all components, turn on the water supply, and check for leaks.
Drain Down Procedure:
- Turn off the water supply to the valve.
- Remove the shower hose from the mixer.
- Turn the flow control valve to fully open.
- Turn the temperature control fully clockwise to drain all cold water until flow stops.
- Turn the temperature control fully anti-clockwise and press the red button to continue turning, draining hot water until flow stops.
- If the shower will be left for extended periods in freezing conditions, the mixer should be removed by loosening the grub screws in the body and detaching it from the tails.